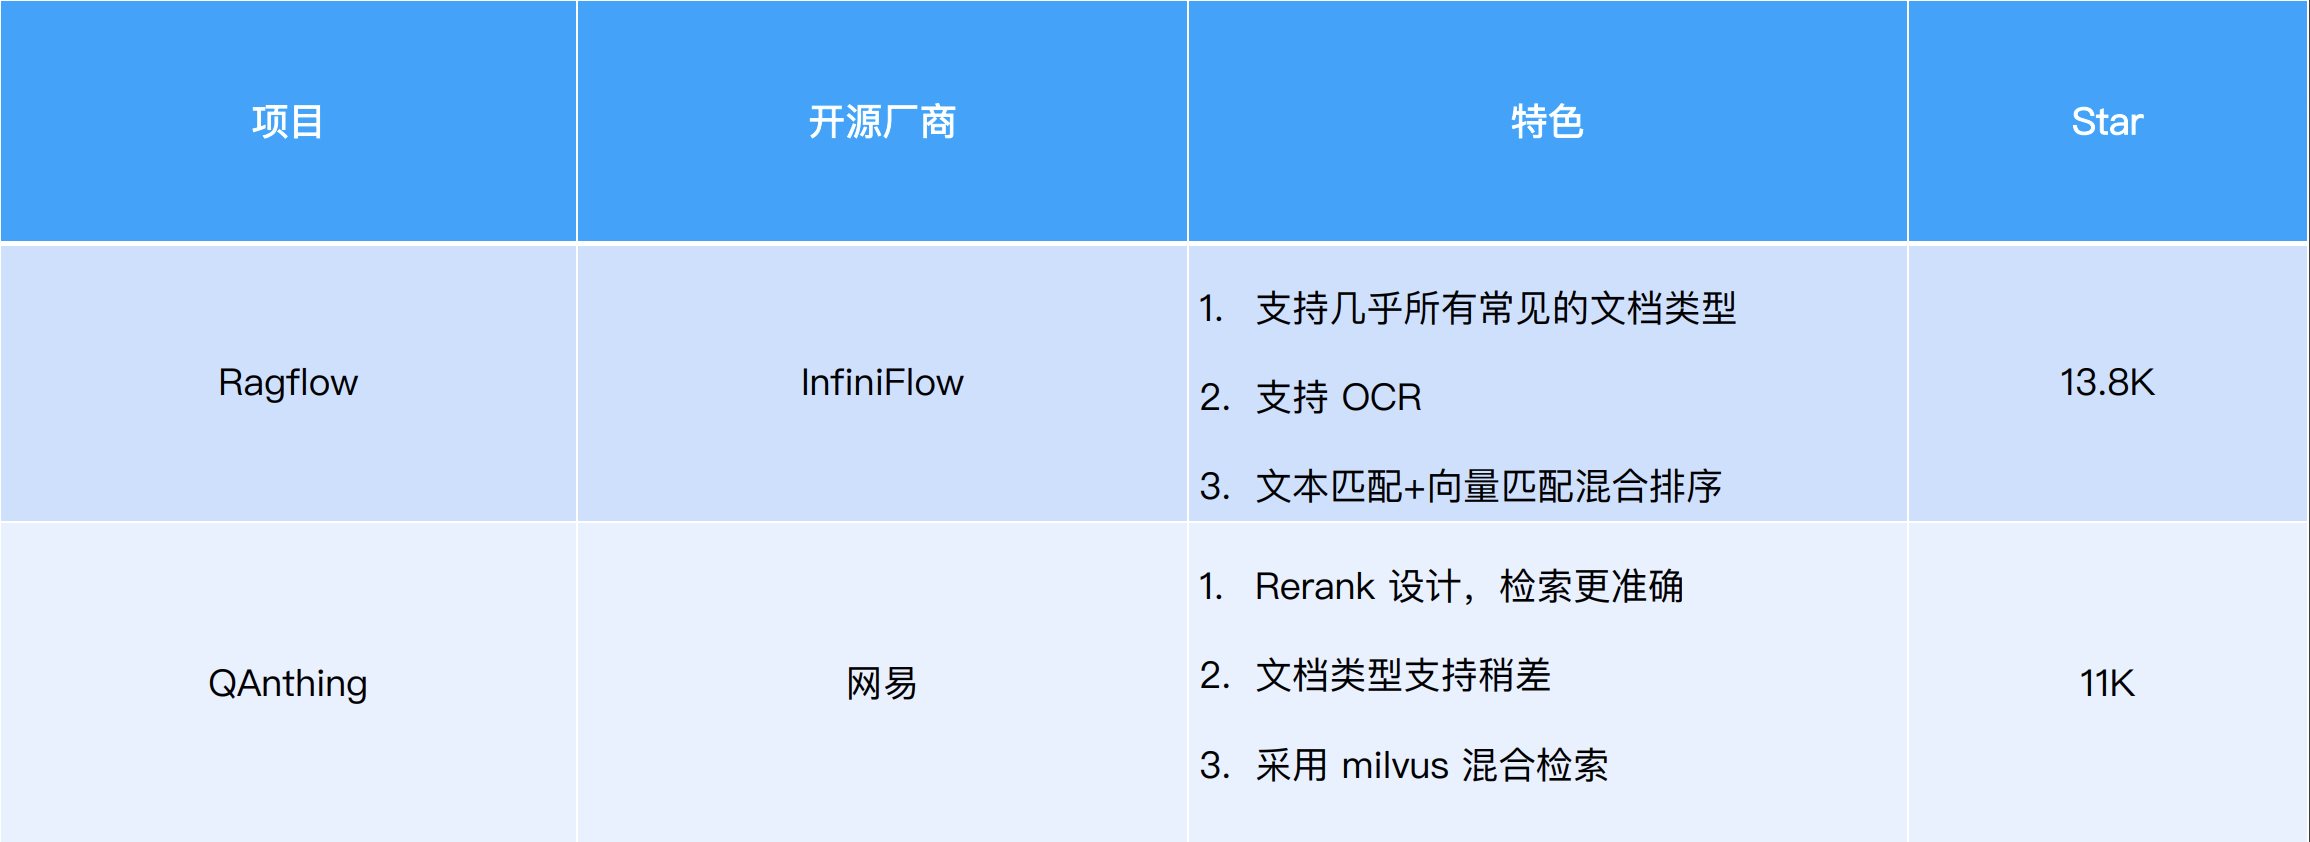
检索增强生成(RAG、GraphRAG)实战 电脑版发表于:2025/8/18 14:11  >#检索增强生成(RAG、GraphRAG)实战 [TOC] 通用知识 Prompt ------------ tn2>Generate Knowledge Prompting 在上下文中提供额外的知识来改善推理结果,比如把运维专家知识库的部分内容放在 system prompt 中进行问答。 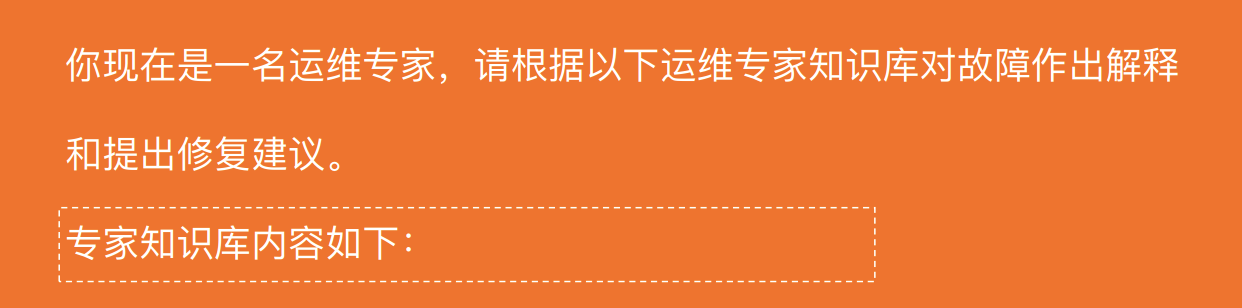 tn2>受限于 Token 长度限制,不能无限地往 system prompt 里写入通用知识,但可以根据用户问题动态组装通用知识 RAG(检索增强生成) ------------ tn2>将私有知识库引入 LLM 的过程称为检索增强生成 (RAG) 步骤:<br/> 1.索引-对私有知识库建立索引,包含加载知识库、拆分、向量化和存储过程 1.1为了清楚“哪段知识可以解答用户提问”<br/> 2.检索和生成-从私有知识库中查询有关信息,并传递给模型进行对话 2.1为了提取“可以解答用户提问的知识内容 ### RAG-索引 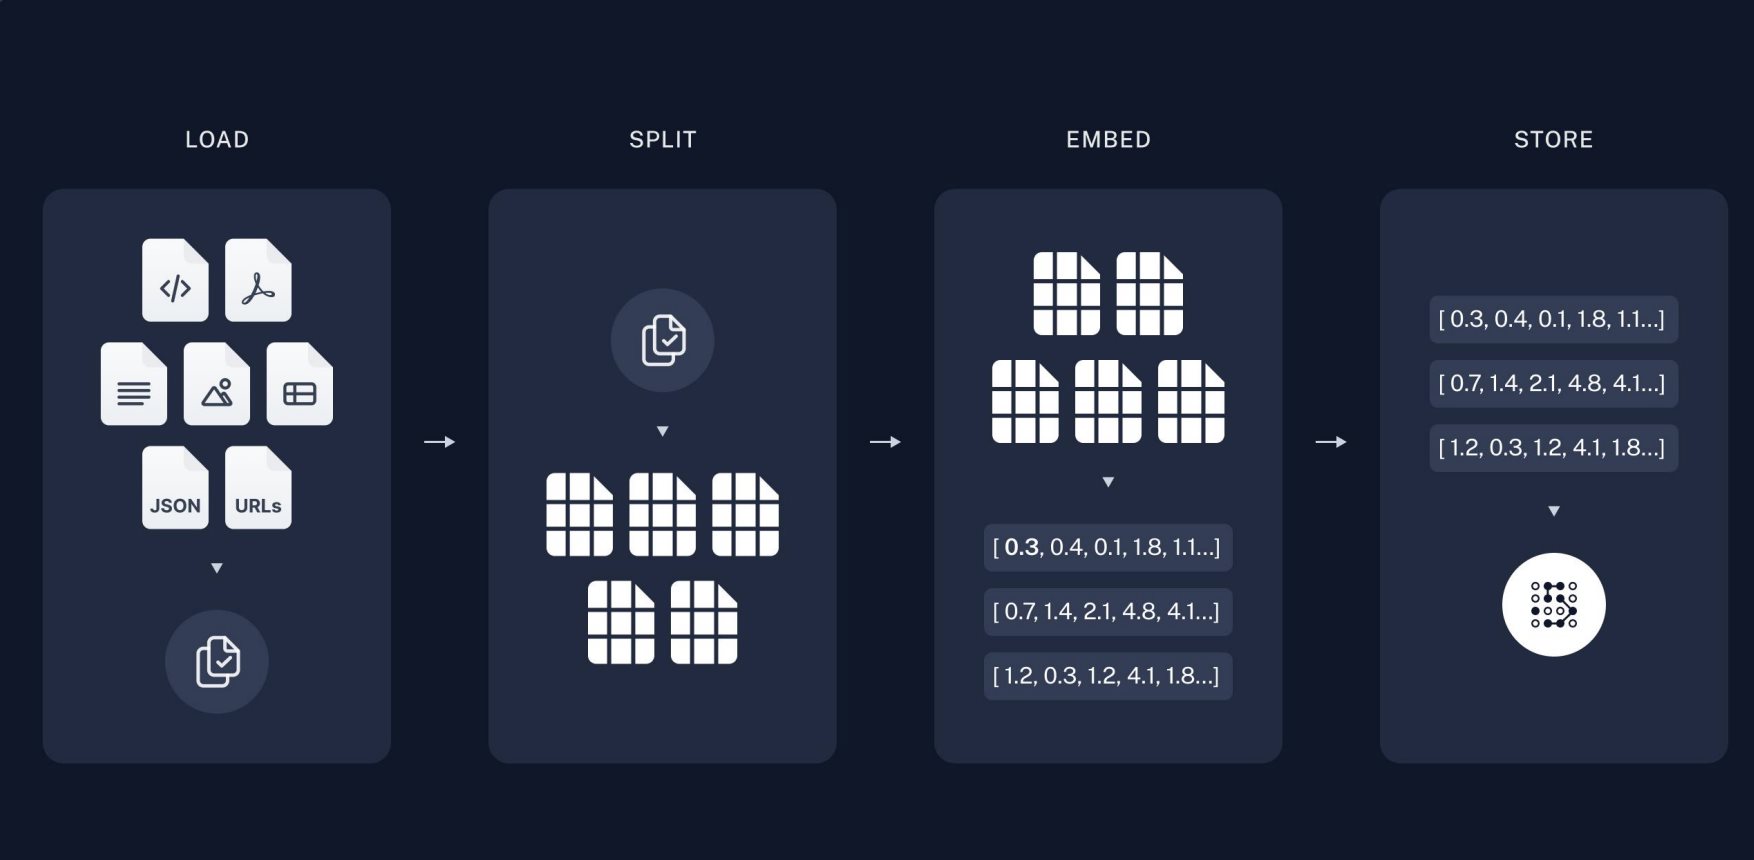 tn2>步骤: 1.加载:加载不同格式的文档,借助文档加载器实现 2.拆分:按一定规则把文档拆分成小块,借助文档拆分器实现 3.存储:对文档块进行向量化,并存储在向量数据库中 ### RAG-检索和生成 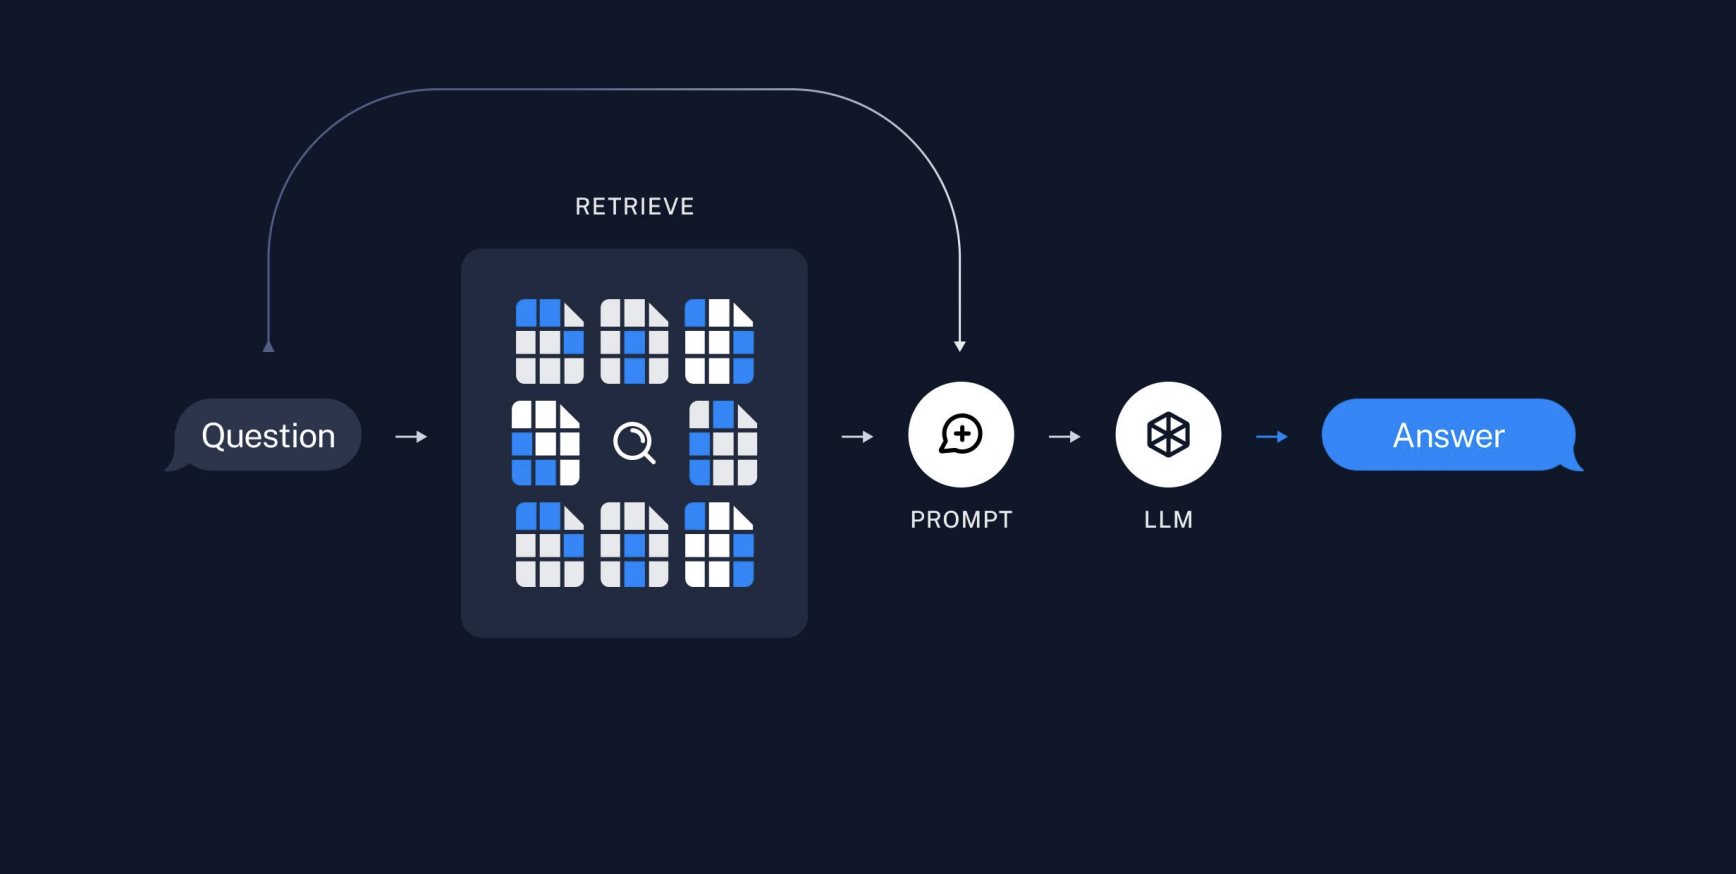 tn2>步骤: 1.检索:根据用户的输入,借助检索器从向量数据库中检索出相关的块 2.生成:LLM 使用包含问题答案的块进行问答 ### RAG 分片核心代码 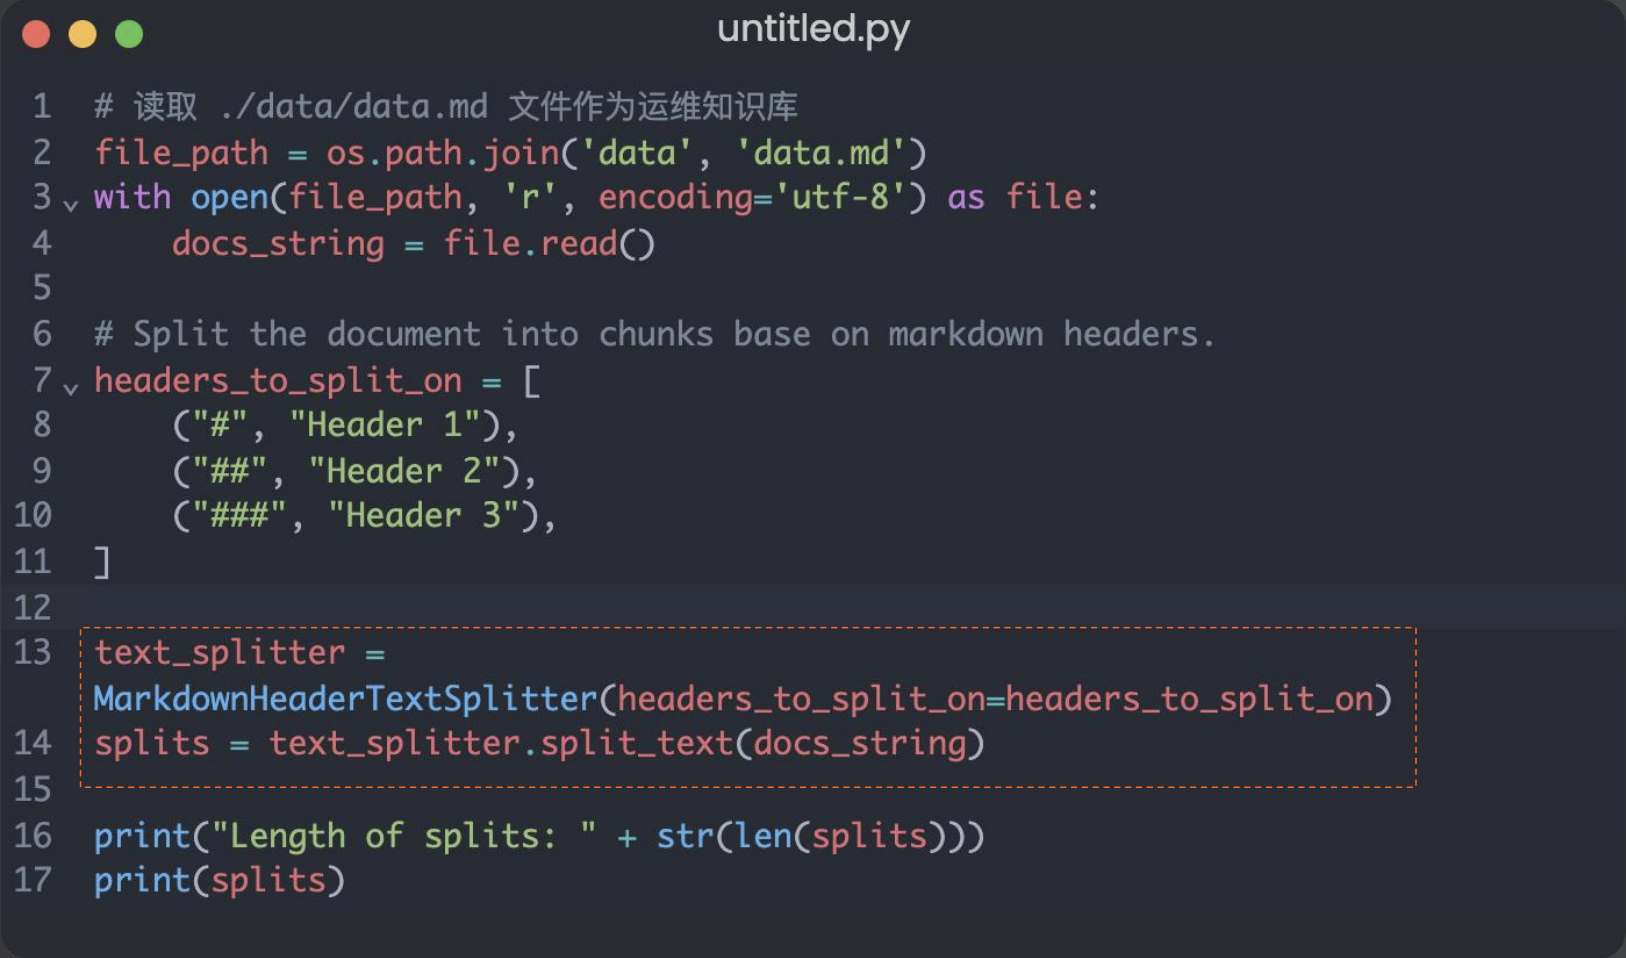 tn2>原理: 1.借助 LangChain text_splitter 对 Markdown 运维专家知识库进行分片 2.再将分片的段落进行 Embedding 向量化 ### RAG Embedding 核心代码 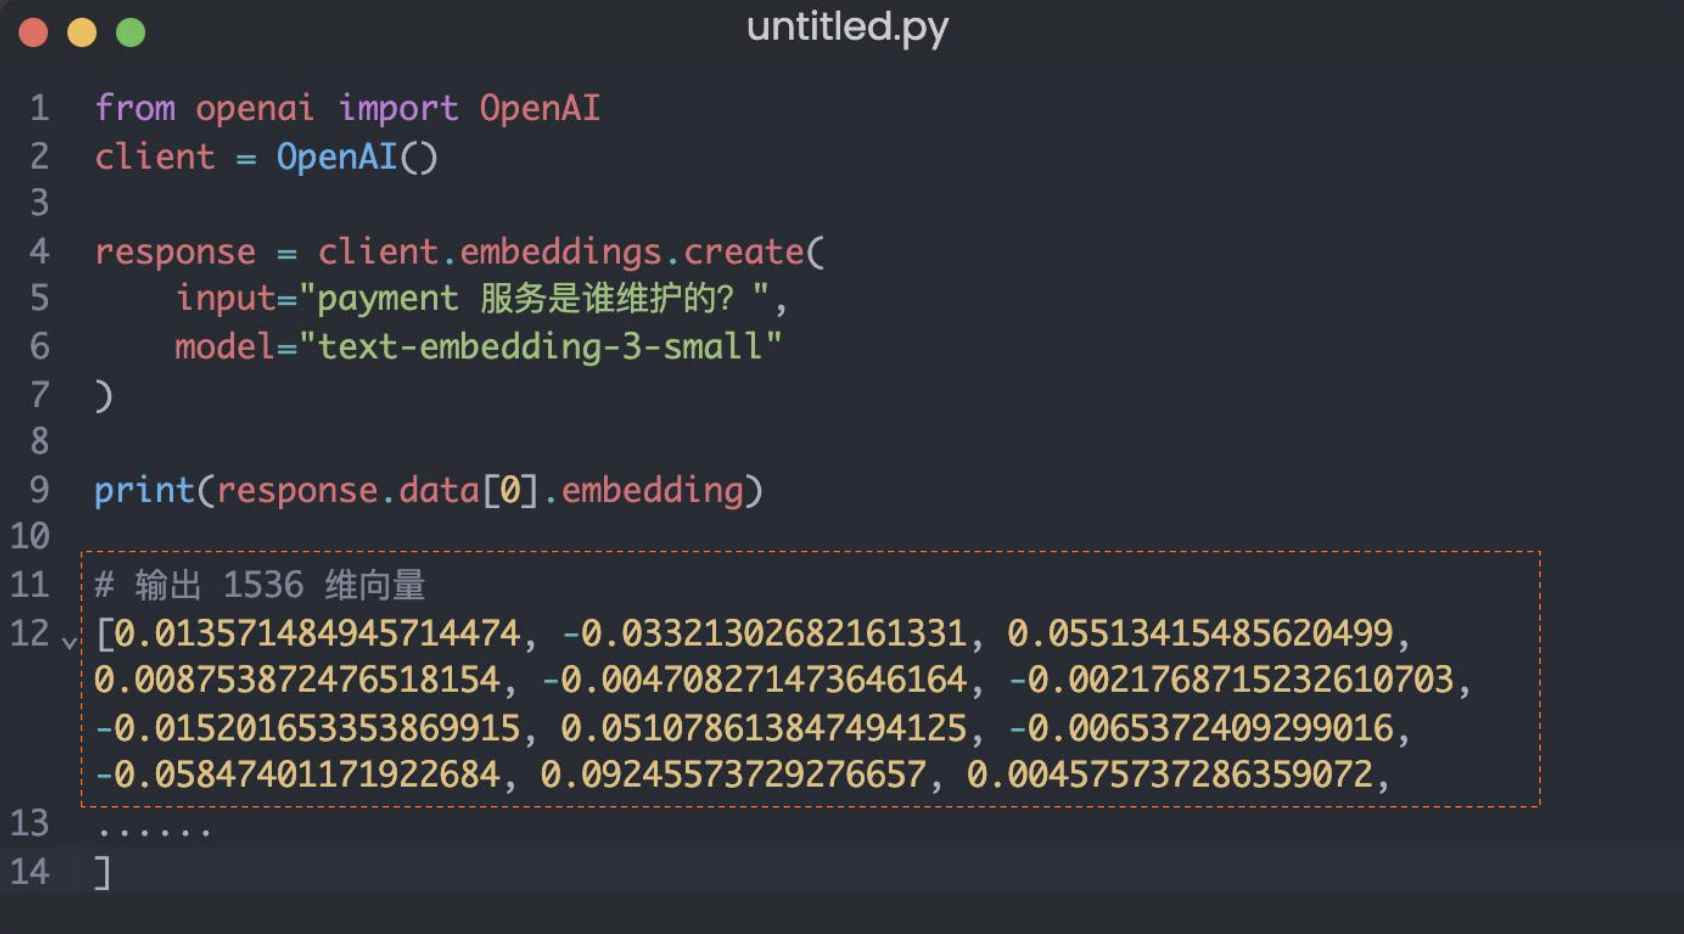 tn2>原理: 1.借助 OpenAI Embedding 模型对每个分片进行向量化,返回特定维度的向量 2.Embedding 模型可选:text-embedding-3-small、text-embedding-3-large ### RAG Embedding 模型选择 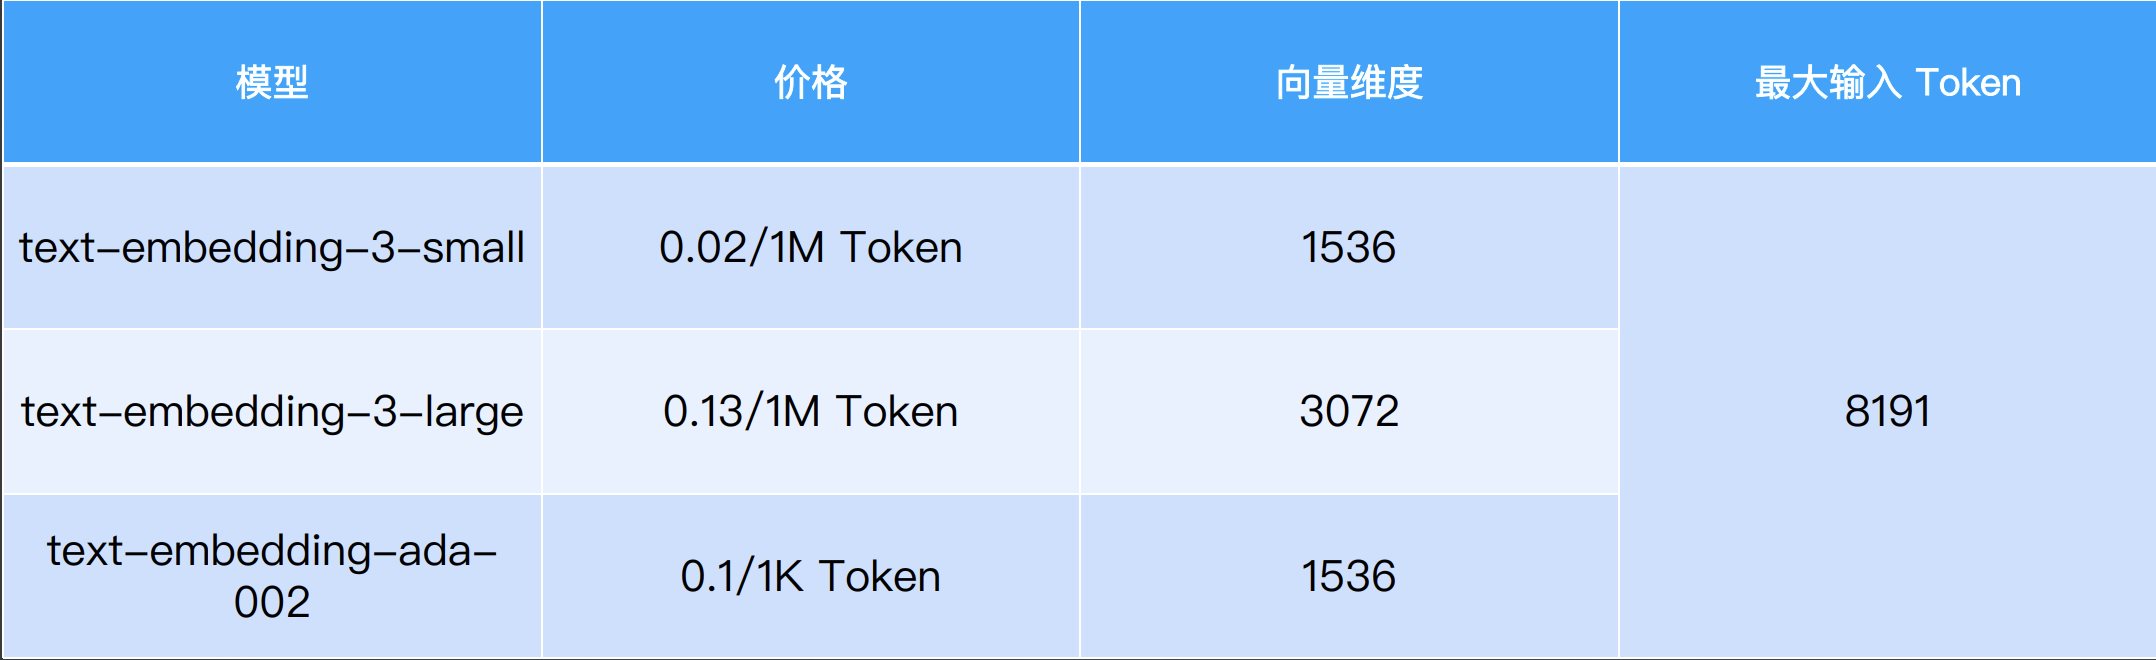 ### RAG 向量检索原理 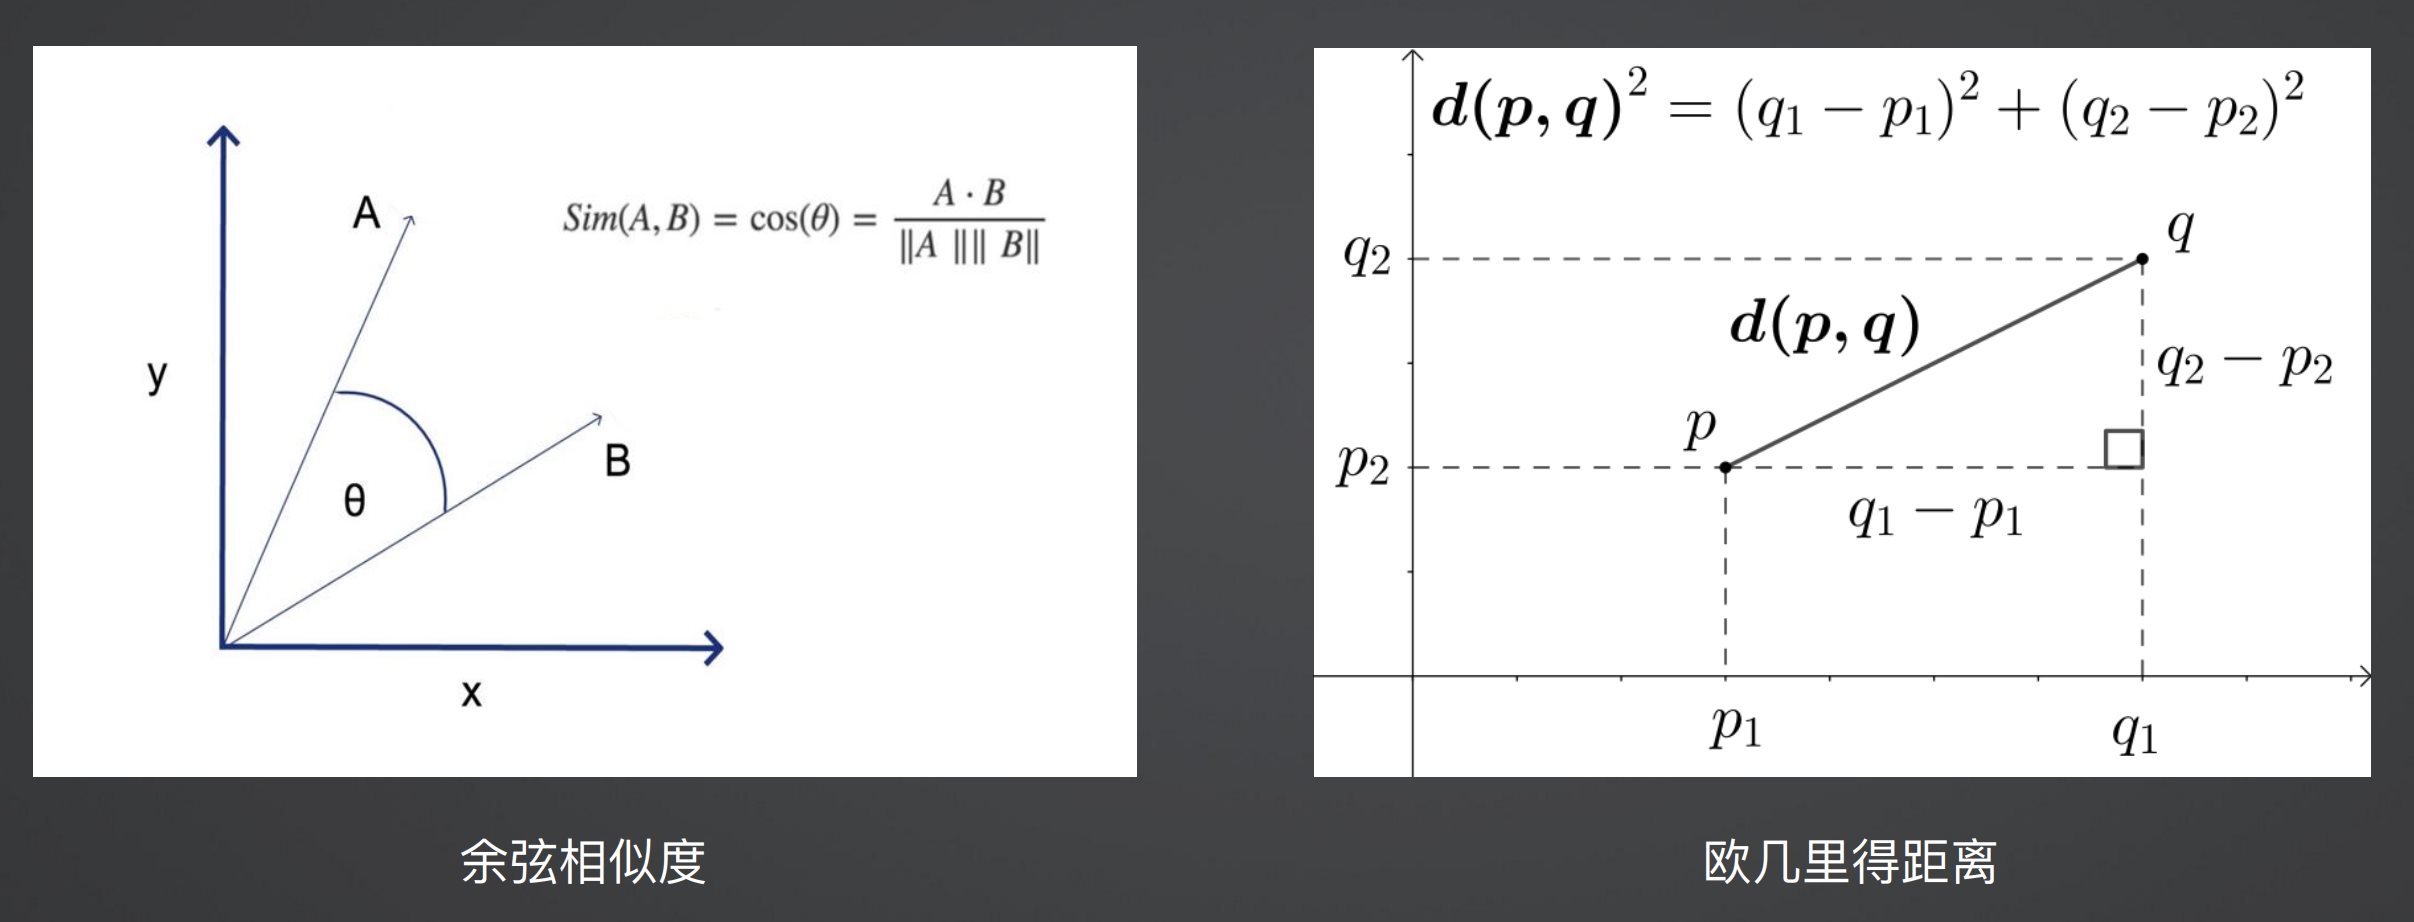 ### RAG 向量检索原理 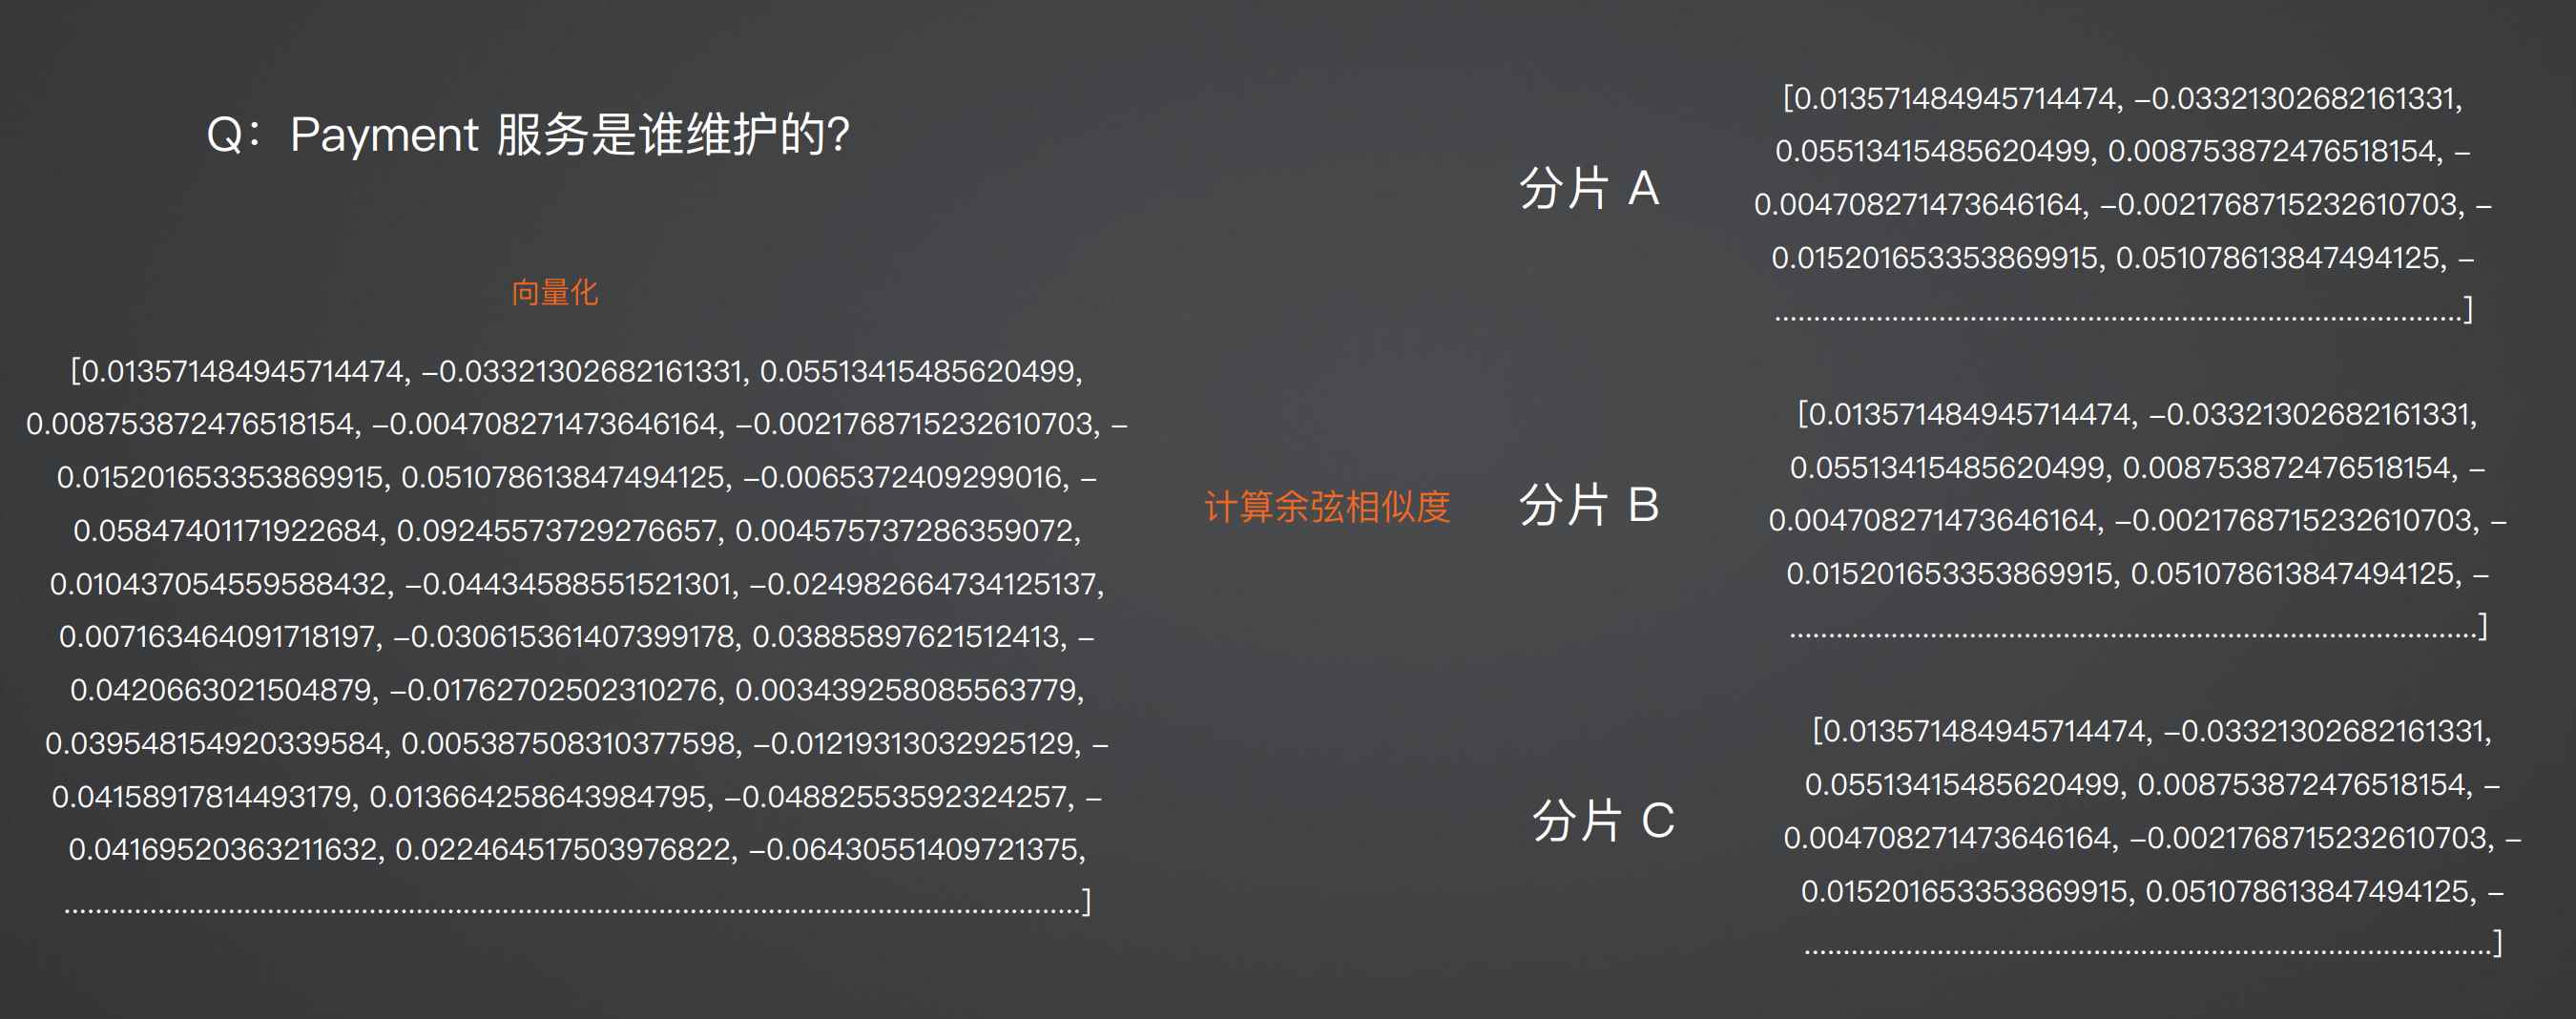 ### RAG 提示语 tn2>System Prompt: 您是问答任务的助手。使用以下检索到的上下文来回答问题。如果您不知道 答案,就说您不知道。最多使用三句话并保持答案简洁。 问题:{question} # 用户输入的问题 上下文:{context} # 最近似的 N 个分片 答案: ### RAG 运维知识库示例 tn2>首先我们创建`simple_rag.ipynb`,安装一下相关包。 借助 LangChain TextSplitter,我们可以先将 markdown 格式的运维知识库进行拆分,然后进行 Embedding 并存储在本地向量数据库中。当用户提问时,将用户的问题也进行 Embedding,然后通过向量检索的方式找到最相似的知识库内容,并将内容返回给大模型,然后再进行问答。 ```python ! python -m pip install -qU langchain-openai langchain langchain_community langchainhub ! python -m pip install chromadb==0.5.3 # 设置 OPENAI API KEY # # export OPENAI_API_KEY=sk-... ```  tn2>加载相关依赖包 ```python from langchain import hub as langchain_hub from langchain.schema import StrOutputParser from langchain_openai import ChatOpenAI from langchain.schema.runnable import RunnablePassthrough from langchain.text_splitter import MarkdownHeaderTextSplitter from langchain_openai import OpenAIEmbeddings import os #from langchain_chroma import Chroma from langchain_community.vectorstores.chroma import Chroma ``` tn2>然后我们进行分片 ```python # 读取 ./data/data.md 文件作为运维知识库 file_path = os.path.join('data', 'data.md') with open(file_path, 'r', encoding='utf-8') as file: docs_string = file.read() # Split the document into chunks base on markdown headers. headers_to_split_on = [ ("#", "Header 1"), ("##", "Header 2"), ("###", "Header 3"), ] text_splitter = MarkdownHeaderTextSplitter(headers_to_split_on=headers_to_split_on) splits = text_splitter.split_text(docs_string) print("Length of splits: " + str(len(splits))) print(splits) ```  ```python # 将运维知识库的每一块文本向量化(Embedding) embedding = OpenAIEmbeddings( model="text-embedding-3-small", openai_api_key="你的API Key" ) vectorstore = Chroma.from_documents(documents=splits, embedding=embedding,persist_directory="./chroma_langchain_db") vectorstore.persist() ```  ```python # 文本相似性检索 results = vectorstore.similarity_search_with_score( "payment 服务", k=1, ) for res, score in results: print(f"* [相似性={score:3f}] {res.page_content} [{res.metadata}]") ```  ```python # 向量检索 results = vectorstore.similarity_search_by_vector_with_relevance_scores( embedding=embedding.embed_query("payment 服务是谁维护的?"), k=1 ) for doc, score in results: print(f"* [相似性={score:3f}] {doc.page_content} [{doc.metadata}]") ```  ```python # 向量检索时会把 input Embedding 之后转成向量 from openai import OpenAI client = OpenAI( api_key="你的API key" ) response = client.embeddings.create( input="payment 服务是谁维护的?", model="text-embedding-3-small" ) print(response.data[0].embedding) ```  ```python # 使用运维知识库进行检索生成 retriever = vectorstore.as_retriever() # 使用 LangChain 提供的 RAG Prompt,来源于:https://smith.langchain.com/hub/rlm/rag-prompt?organizationId=989ad331-949f-4bac-9694-660074a208a7 """ 这是 RAG Prompt 原文: human You are an assistant for question-answering tasks. Use the following pieces of retrieved context to answer the question. If you don't know the answer, just say that you don't know. Use three sentences maximum and keep the answer concise. Question: {question} Context: {context} Answer: """ prompt = langchain_hub.pull("rlm/rag-prompt") def format_docs(docs): print("匹配到的运维知识库片段:\n", "\n\n".join(doc.page_content for doc in docs)) return "\n\n".join(doc.page_content for doc in docs) llm = ChatOpenAI(model="gpt-4o-mini",api_key="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") rag_chain = ( {"context": retriever | format_docs, "question": RunnablePassthrough()} | prompt | llm | StrOutputParser() ) # 问题将会被 Embedding 转成向量,然后再从向量数据库检索 res = rag_chain.invoke("payment 服务是谁维护的?") print("\n\nLLM 回答:", res) ``` 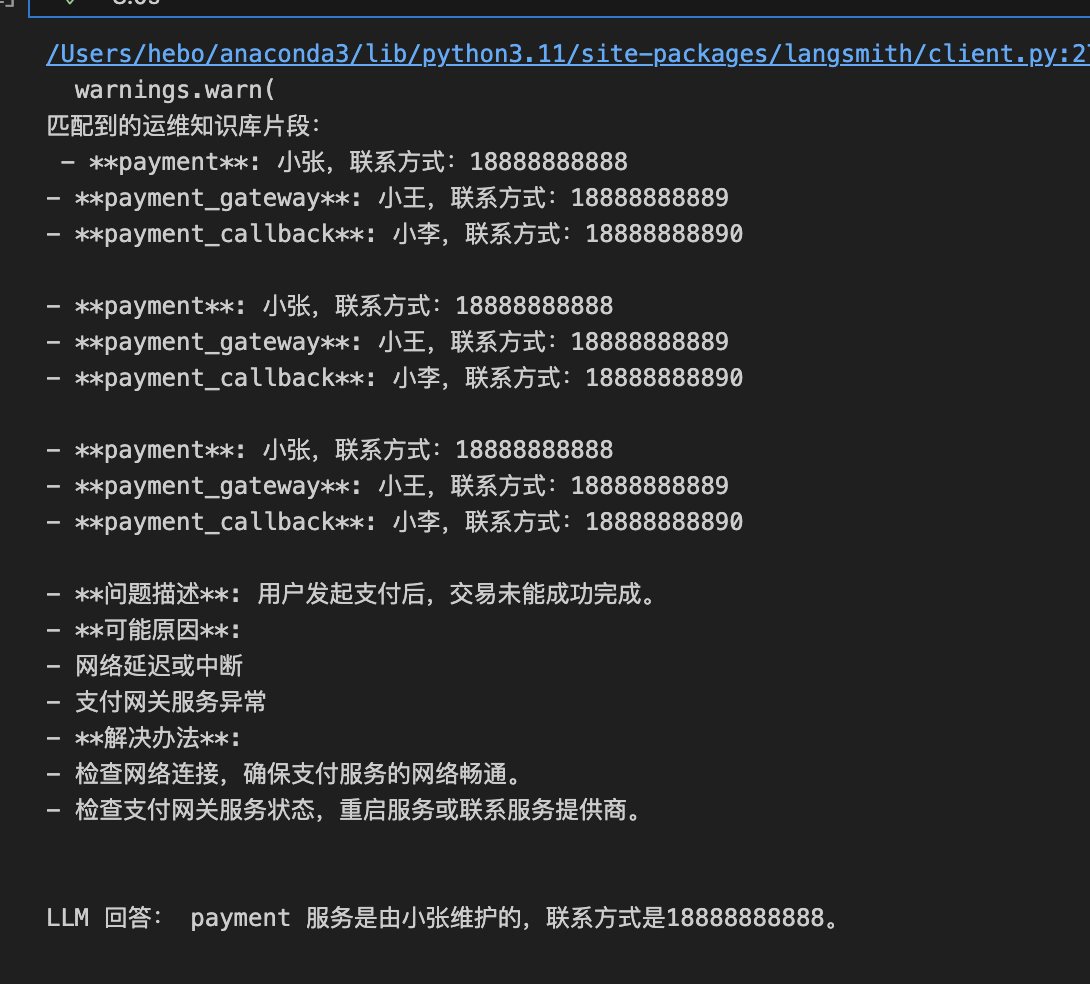 ### RAG 缺点 tn2>1.由于文本分片会把上下文逻辑截断,可能导致无法回答内在逻辑关联的问题 2.只能回答显式检索问题,无法回答全局性/总结性问题,例如:“谁维护的服务最多?” ```python # RAG 无法回答的问题 res = rag_chain.invoke("谁负责的服务最多?") print("\n\nLLM 回答:", res) ```  Graph RAG ------------ tn2>由微软提出的一种全新的方法( https://arxiv.org/pdf/2404.16130 ) 借助 LLM 提取知识库内部实体之间的关系,并构建出知识图谱 基于知识图谱进行问答,提供全局性问题的答案 ### Graph RAG Demo tn2>借助 Graph Rag 实现运维专家知识库 建立实体关系,解决全局性问题的对话 例子:知识库包含每个业务的负责人列表 问题:谁负责的业务最多? https://github.com/microsoft/graphrag 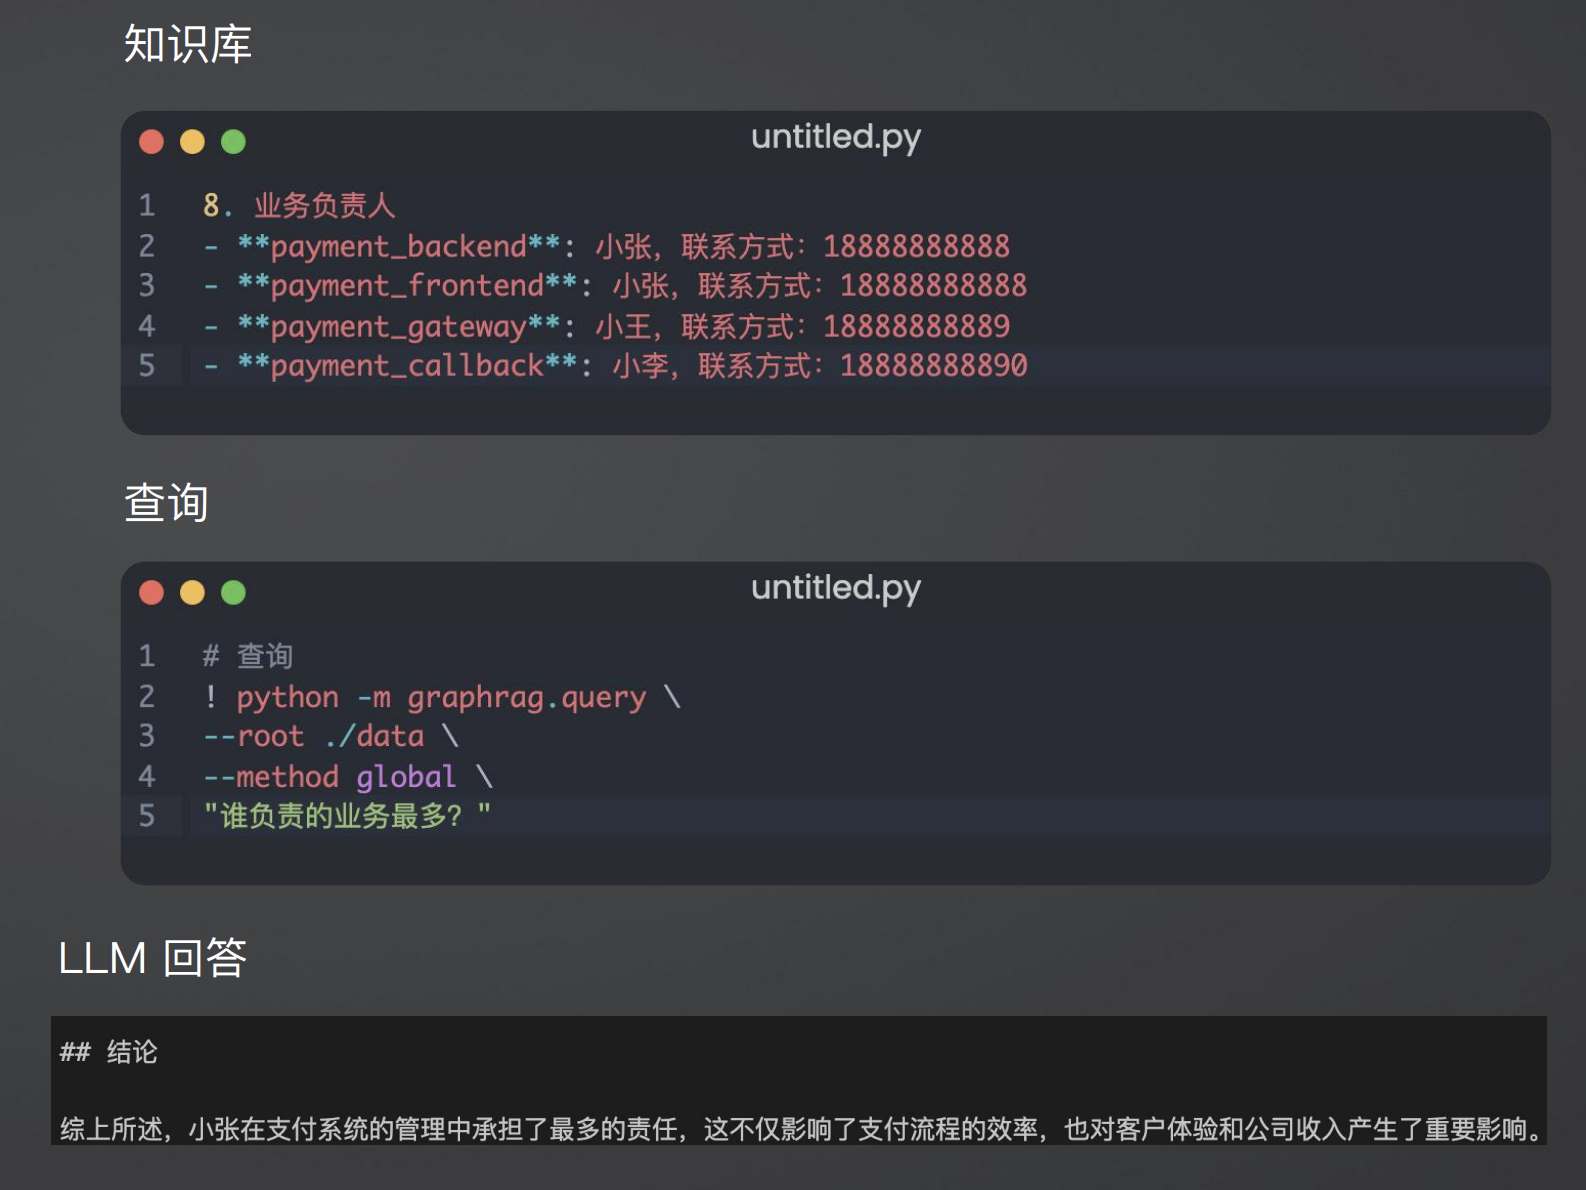 tn2>首先我们创建一个`graph_rag.ipynb`文件,执行下面的命令安装我们的Graph RAG。 ```python # 安装 Graphrag ! python -m pip install graphrag ``` tn>注意:这里容易出现报错`error: command 'cmake' failed: No such file or directory`,可以通过安装`cmake`解决。 我这里是mac通过`brew install cmake`命令安装解决了这个问题。 tn2>还可能CMake 在构建 pyarrow 的时候,找不到 Apache Arrow C++ 库。报错信息如下: ```bash CMake Error at CMakeLists.txt:289 (find_package): By not providing "FindArrow.cmake" in CMAKE_MODULE_PATH this project has asked CMake to find a package configuration file provided by "Arrow", but CMake did not find one. Could not find a package configuration file provided by "Arrow" with any of the following names: ArrowConfig.cmake arrow-config.cmake ``` tn2>我这里升级 pip/setuptools,然后强制走二进制安装解决了这个问题。 ```bash ! pip install --upgrade pip setuptools wheel ! pip install --prefer-binary pyarrow ```  tn2>首次运行需要设置工作区,这里我们将目录设置为`data`目录下。 ```python ! graphrag init --root ./data ```  tn2>然后在data目录生成了一系列文件,接着我们编辑`.env`文件,设计一下API Key,如果基础链接不一样也可以设置一下`GRAPHRAG_API_BASE`。 ```python GRAPHRAG_API_KEY=写你自己的API Key GRAPHRAG_API_BASE= ``` tn2>修改 settings.yaml 文件 llm 和 embeddings 参数,如果需要`GRAPHRAG_API_BASE`的话。 将知识库文档放入 `./data/input` 目录下,这里我将`data.md`文件放到该目录下面。 ```bash ! mkdir ./data/input ``` tn2>我在这里多添加了一个小张的记录  tn>注意文件只支持:csv, text, json(这三种格式的)。 tn2> 建立 Graphrag 索引 ```python ! graphrag index --root ./data ```  tn2>接下来我们进行一下查询。 ```bash # 查询 ! graphrag query \ --root ./data \ --method global \ --query "谁负责的业务最多?" ```  借助 Neo4j 查看实体关系 ------------  tn2>首先我们安装Neo4j。 ```bash docker pull neo4j:5.21.2 ``` ```bash # 启动 Neo4j 查看实体关系 docker run -d \ -p 7474:7474 -p 7687:7687 \ --name neo4j-apoc \ -e NEO4J_apoc_export_file_enabled=true \ -e NEO4J_apoc_import_file_enabled=true \ -e NEO4J_apoc_import_file_use__neo4j__config=true \ -e NEO4J_PLUGINS=\[\"apoc\"\] \ neo4j:5.21.2 ```  tn2>然后我们访问一下`Neo4j`,访问:`http://localhost:7474/`,输入默认账号密码 neo4j/neo4j,按照修改密码为:mypassword   tn2>接下来我们需要安装两个包: ```bash ! pip install --quiet pandas neo4j-rust-ext ``` tn2>然后将我们的`./data/output`下面的输出,加载到的Neo4j,执行如下代码: ```python import pandas as pd from neo4j import GraphDatabase import time # 修改为你的 Graphrag 输出目录 GRAPHRAG_FOLDER = "./data/output" NEO4J_URI = "neo4j://localhost" # or neo4j+s://xxxx.databases.neo4j.io NEO4J_USERNAME = "neo4j" NEO4J_PASSWORD = "mypassword" NEO4J_DATABASE = "neo4j" QZ = "" # Create a Neo4j driver driver = GraphDatabase.driver(NEO4J_URI, auth=(NEO4J_USERNAME, NEO4J_PASSWORD)) statements = """ create constraint chunk_id if not exists for (c:__Chunk__) require c.id is unique; create constraint document_id if not exists for (d:__Document__) require d.id is unique; create constraint entity_id if not exists for (c:__Community__) require c.community is unique; create constraint entity_id if not exists for (e:__Entity__) require e.id is unique; create constraint entity_title if not exists for (e:__Entity__) require e.name is unique; create constraint entity_title if not exists for (e:__Covariate__) require e.title is unique; create constraint related_id if not exists for ()-[rel:RELATED]->() require rel.id is unique; """.split(";") for statement in statements: if len((statement or "").strip()) > 0: print(statement) driver.execute_query(statement) def batched_import(statement, df, batch_size=1000): """ Import a dataframe into Neo4j using a batched approach. Parameters: statement is the Cypher query to execute, df is the dataframe to import, and batch_size is the number of rows to import in each batch. """ total = len(df) start_s = time.time() for start in range(0,total, batch_size): batch = df.iloc[start: min(start+batch_size,total)] result = driver.execute_query("UNWIND $rows AS value " + statement, rows=batch.to_dict('records'), database_=NEO4J_DATABASE) print(result.summary.counters) print(f'{total} rows in { time.time() - start_s} s.') return total doc_df = pd.read_parquet(f'{GRAPHRAG_FOLDER}/{QZ}documents.parquet', columns=["id", "title"]) doc_df.head(2) # import documents statement = """ MERGE (d:__Document__ {id:value.id}) SET d += value {.title} """ batched_import(statement, doc_df) text_df = pd.read_parquet(f'{GRAPHRAG_FOLDER}/{QZ}text_units.parquet', columns=["id","text","n_tokens","document_ids"]) text_df.head(2) statement = """ MERGE (c:__Chunk__ {id:value.id}) SET c += value {.text, .n_tokens} WITH c, value UNWIND value.document_ids AS document MATCH (d:__Document__ {id:document}) MERGE (c)-[:PART_OF]->(d) """ batched_import(statement, text_df) entity_df = pd.read_parquet( f'{GRAPHRAG_FOLDER}/entities.parquet', columns=["id", "human_readable_id", "title", "type", "description", "text_unit_ids"] ) #entity_df = pd.read_parquet(f'{GRAPHRAG_FOLDER}/{QZ}entities.parquet', # columns=["name", "type", "description", "human_readable_id", "id", "description_embedding", # "text_unit_ids"]) entity_df.head(2) # # CALL db.create.setNodeVectorProperty(e, "description_embedding", value.description_embedding) entity_statement = """ MERGE (e:__Entity__ {id:value.id}) SET e += value {.human_readable_id, .description, title:replace(value.title,'"','')} WITH e, value CALL apoc.create.addLabels(e, case when coalesce(value.type,"") = "" then [] else [apoc.text.upperCamelCase(replace(value.type,'"',''))] end) yield node UNWIND value.text_unit_ids AS text_unit MATCH (c:__Chunk__ {id:text_unit}) MERGE (c)-[:HAS_ENTITY]->(e) """ batched_import(entity_statement, entity_df) #rel_df = pd.read_parquet(f'{GRAPHRAG_FOLDER}/{QZ}relationships.parquet', # columns=["source", "target", "id", "rank", "weight", "human_readable_id", "description", # "text_unit_ids"]) rel_df = pd.read_parquet( f'{GRAPHRAG_FOLDER}/{QZ}relationships.parquet', columns=["id", "human_readable_id", "source", "target", "weight", "description", "text_unit_ids"] ) rel_df.head(2) # SET rel += value {.rank, .weight, .human_readable_id, .description, .text_unit_ids} rel_statement = """ MATCH (source:__Entity__ {name:replace(value.source,'"','')}) MATCH (target:__Entity__ {name:replace(value.target,'"','')}) // not necessary to merge on id as there is only one relationship per pair MERGE (source)-[rel:RELATED {id: value.id}]->(target) SET rel += value {.weight, .human_readable_id, .description, .text_unit_ids} RETURN count(*) as createdRels """ batched_import(rel_statement, rel_df) community_df = pd.read_parquet(f'{GRAPHRAG_FOLDER}/{QZ}communities.parquet', columns=["id", "level", "title", "text_unit_ids", "relationship_ids"]) community_df.head(2) statement = """ MERGE (c:__Community__ {community:value.id}) SET c += value {.level, .title} /* UNWIND value.text_unit_ids as text_unit_id MATCH (t:__Chunk__ {id:text_unit_id}) MERGE (c)-[:HAS_CHUNK]->(t) WITH distinct c, value */ WITH * UNWIND value.relationship_ids as rel_id MATCH (start:__Entity__)-[:RELATED {id:rel_id}]->(end:__Entity__) MERGE (start)-[:IN_COMMUNITY]->(c) MERGE (end)-[:IN_COMMUNITY]->(c) RETURn count(distinct c) as createdCommunities """ batched_import(statement, community_df) #['id', 'human_readable_id', 'community', 'level', 'parent', 'children', # 'title', 'summary', 'full_content', 'rank', 'rating_explanation', # 'findings', 'full_content_json', 'period', 'size'] community_report_df = pd.read_parquet(f'{GRAPHRAG_FOLDER}/{QZ}community_reports.parquet', columns=["id", "community", "level", "title", "summary", "findings", "rank", "rating_explanation", "full_content"]) community_report_df.head(2) # import communities community_statement = """MATCH (c:__Community__ {community: value.community}) SET c += value {.level, .title, .rank, .rating_explanation, .full_content, .summary} WITH c, value UNWIND range(0, size(value.findings)-1) AS finding_idx WITH c, value, finding_idx, value.findings[finding_idx] as finding MERGE (c)-[:HAS_FINDING]->(f:Finding {id: finding_idx}) SET f += finding""" batched_import(community_statement, community_report_df) ```  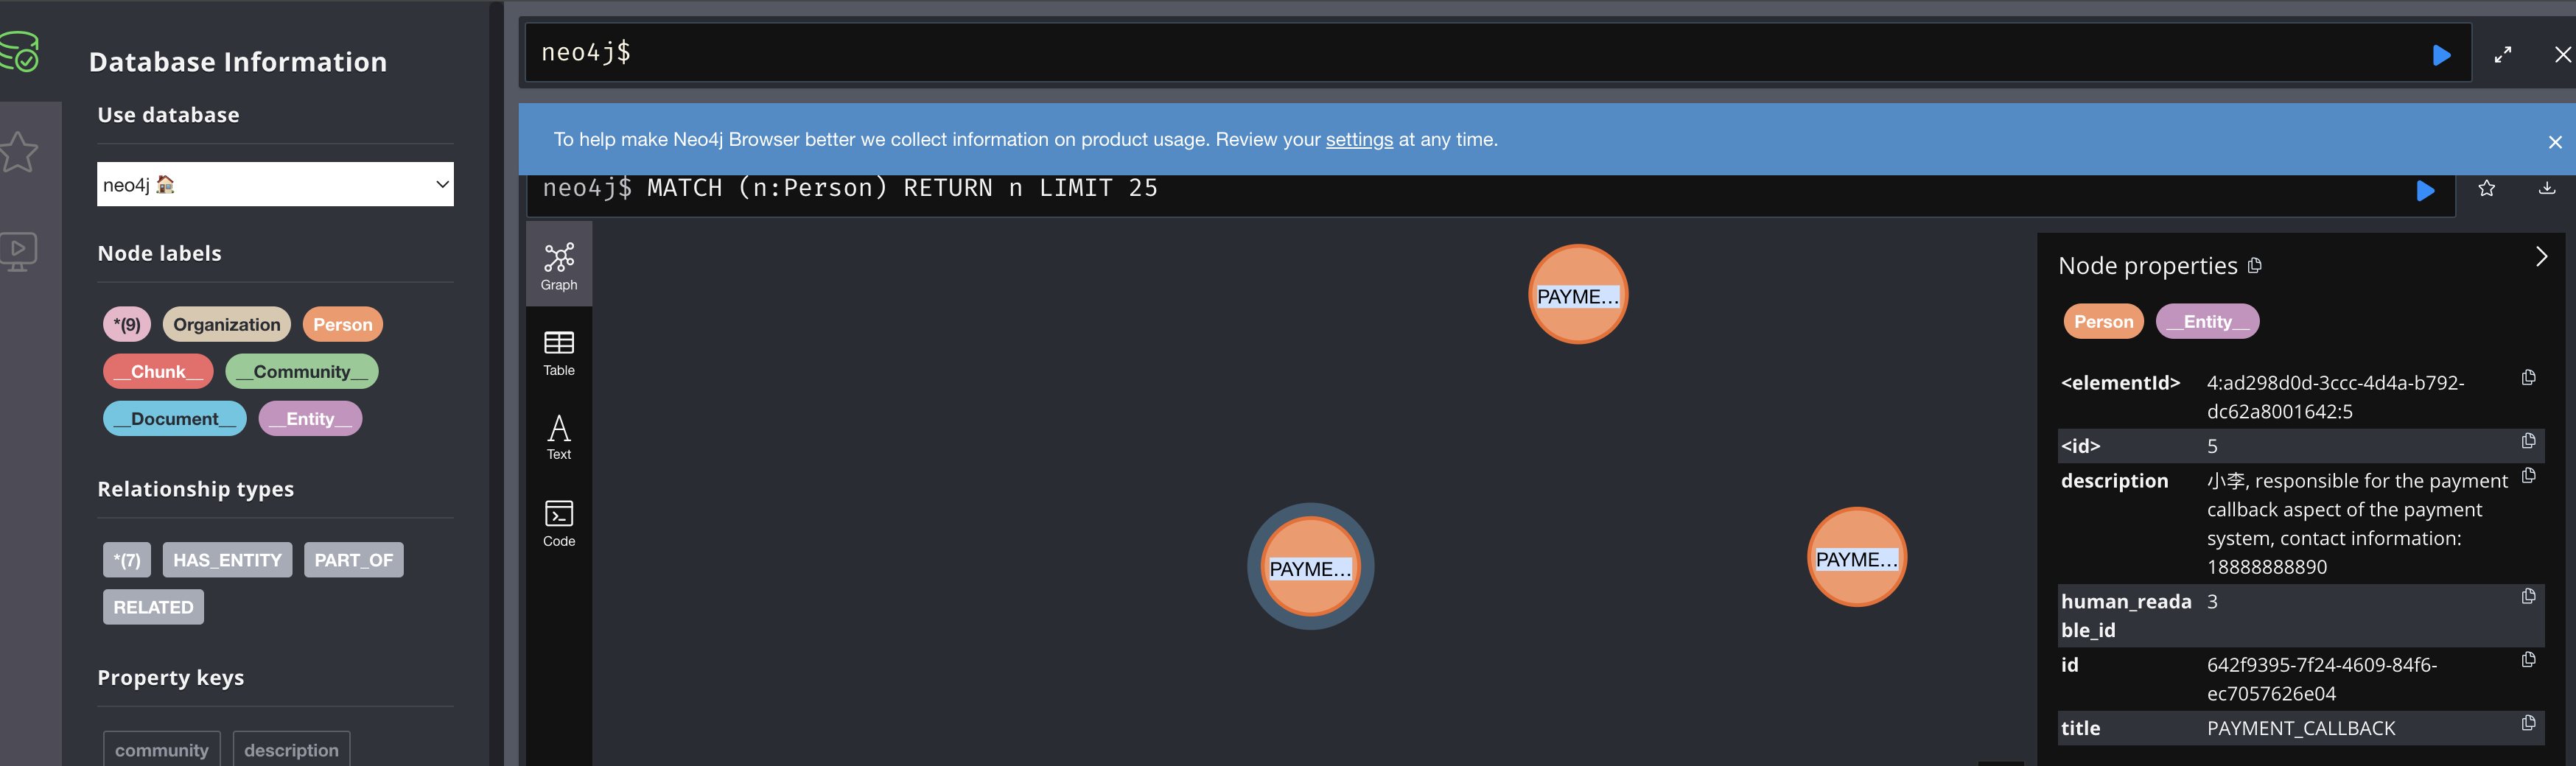 tn2>Neo4j呈现了实体之间的关系。 零代码开源 RAG 工具介绍:Ragflow ------------ ### 配置要求 tn2>要求: CPU >= 4 核 RAM >= 16 GB Disk >= 50 GB Docker >= 24.0.0 & Docker Compose >= v2.26.1 ### 安装 tn2>确保`vm.max_map_count> = 262144`: ```bash sysctl vm.max_map_count # 设置为262144 sudo sysctl -w vm.max_map_count=262144 ``` tn2>我这里大于了这个数值所以不需要修改。  tn2>克隆仓库,然后通过`docker-compose`进行安装。 ```bash git clone https://github.com/infiniflow/ragflow.git cd ragflow/docker docker compose -f docker-compose.yml up -d ```  tn2>在运行时如果遇到了这样的问题,我们需要升级一下我们的docker-compose ```bash DOCKER_CONFIG=${DOCKER_CONFIG:-$HOME/.docker} mkdir -p $DOCKER_CONFIG/cli-plugins curl -SL https://github.com/docker/compose/releases/download/v2.27.1/docker-compose-linux-x86_64 \ -o $DOCKER_CONFIG/cli-plugins/docker-compose chmod +x $DOCKER_CONFIG/cli-plugins/docker-compose ``` ```bash docker compose version ```  tn2>然后我们再次运行我们的安装代码就好了。 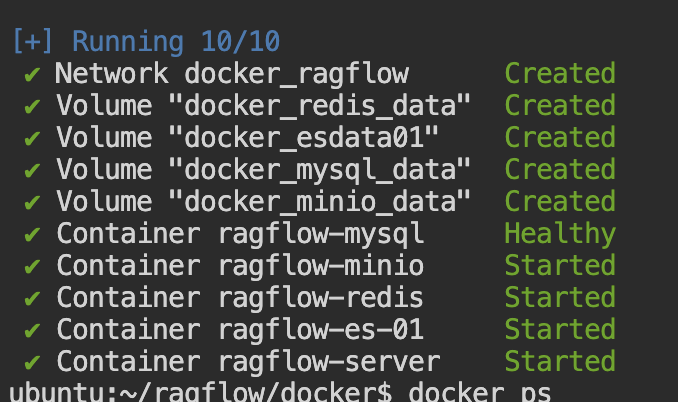 ### Ragflow:以运维专家知识库为例 tn2>访问服务器`80`端口,注册账号并登录 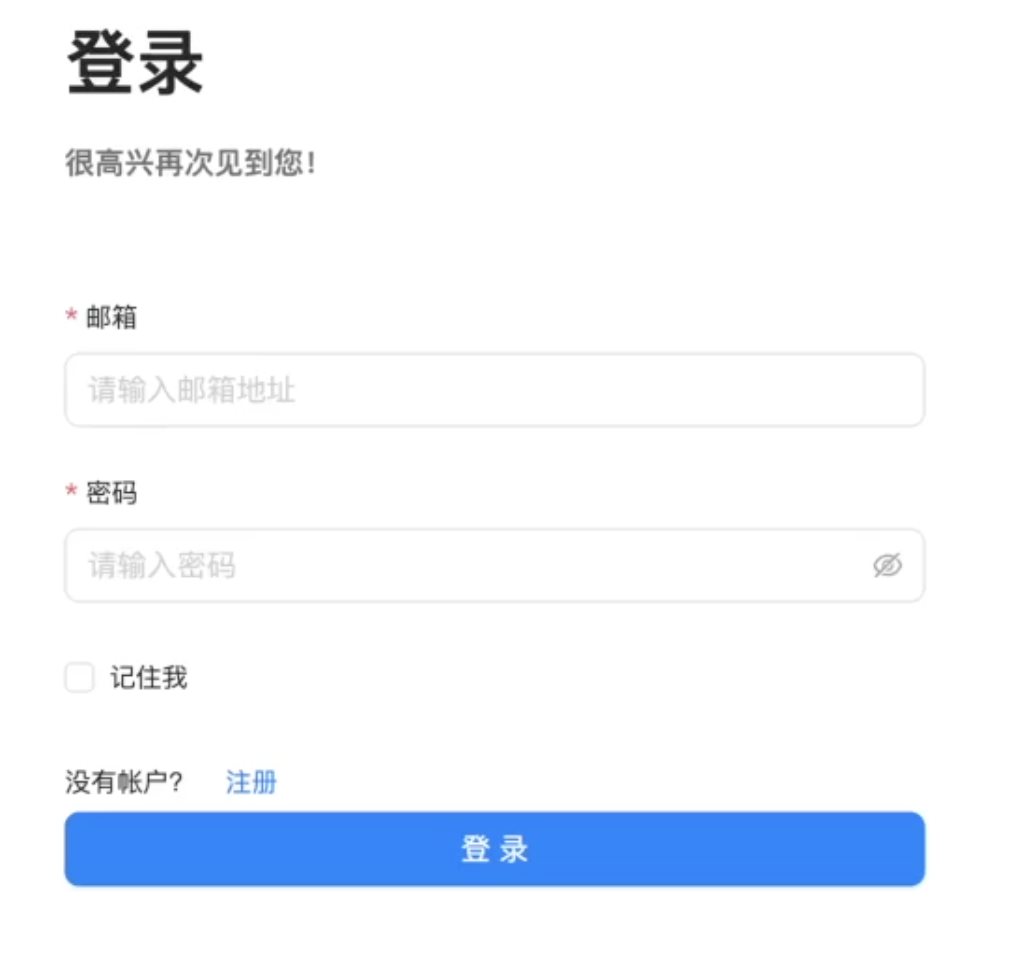 tn2>点击右上角头像,进入模型供应商设置,以 OpenAI 为例,点击添加模型,输入 Base URL 和 API KEY 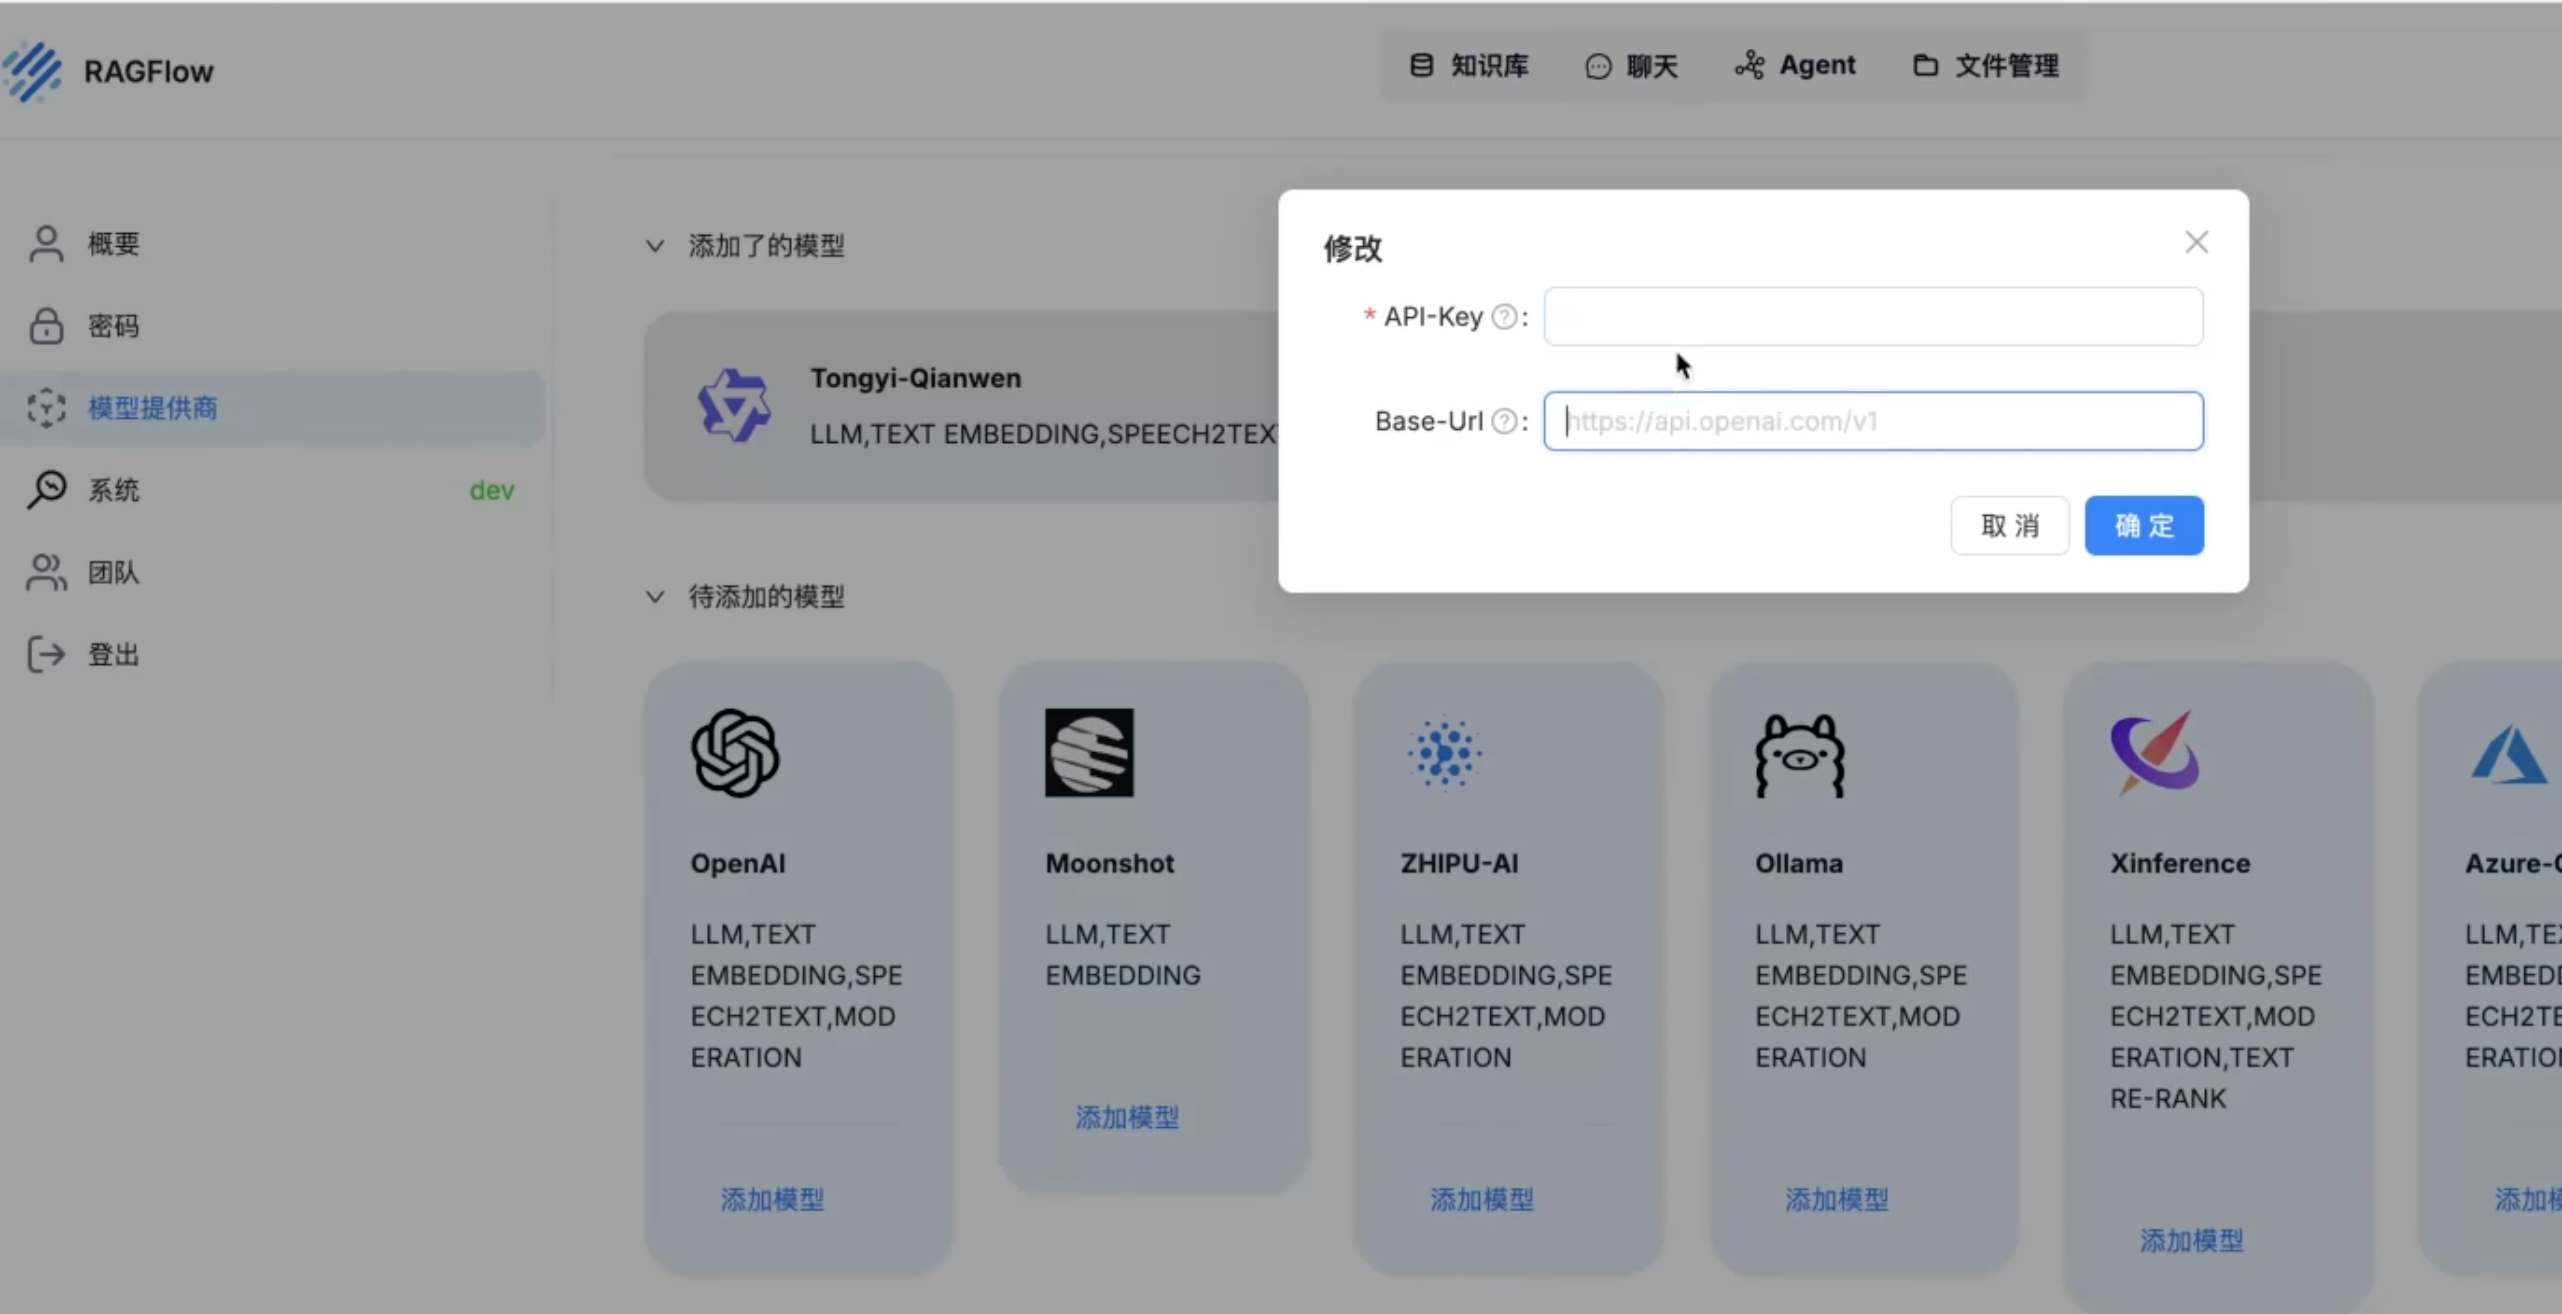 tn2>返回首页,创建知识库,选择 Embedding 模型和文档解析方法 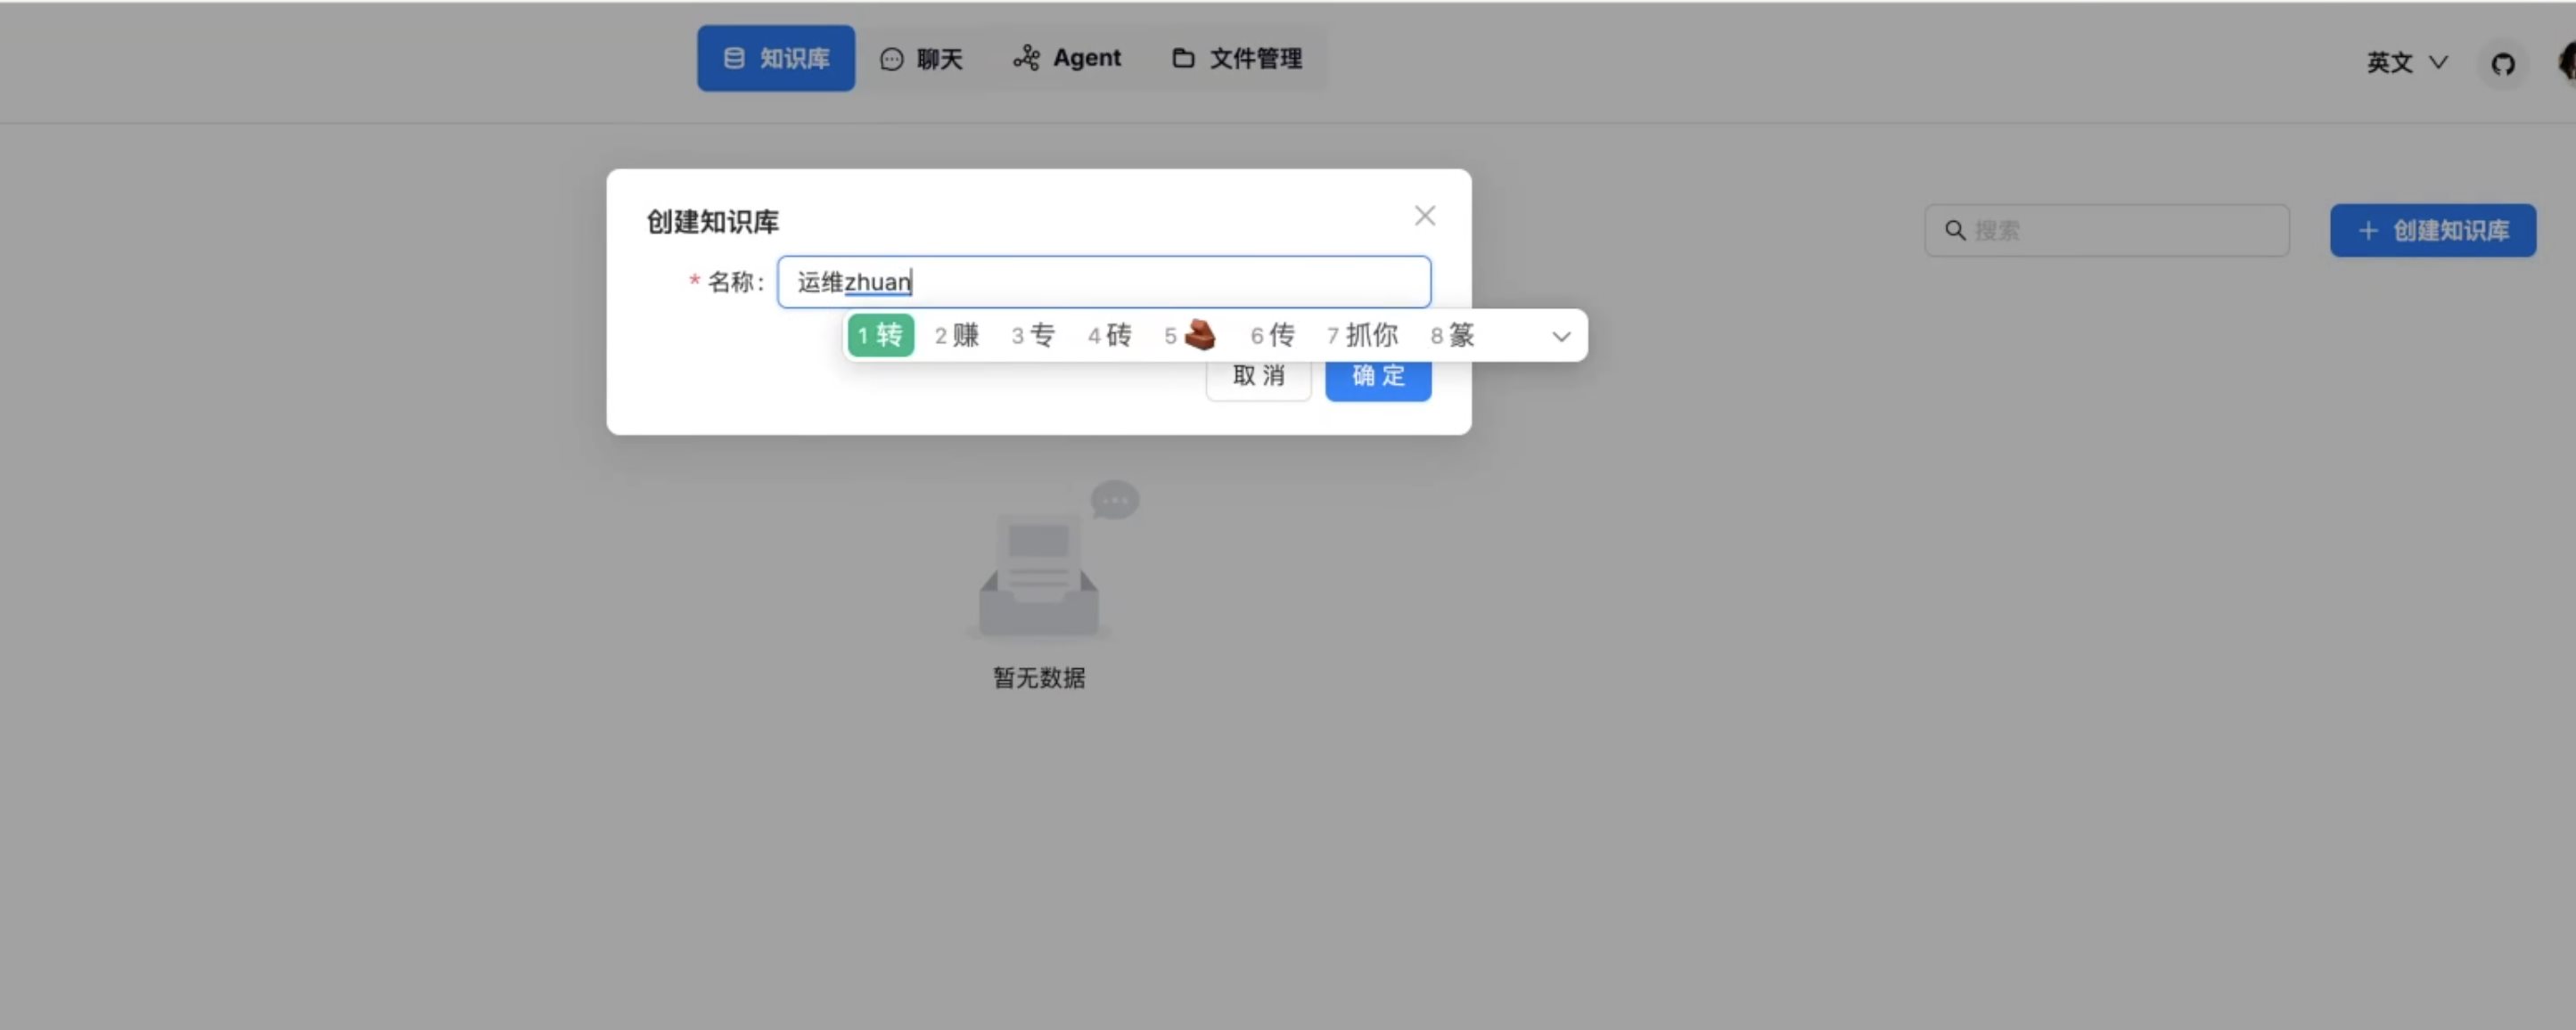 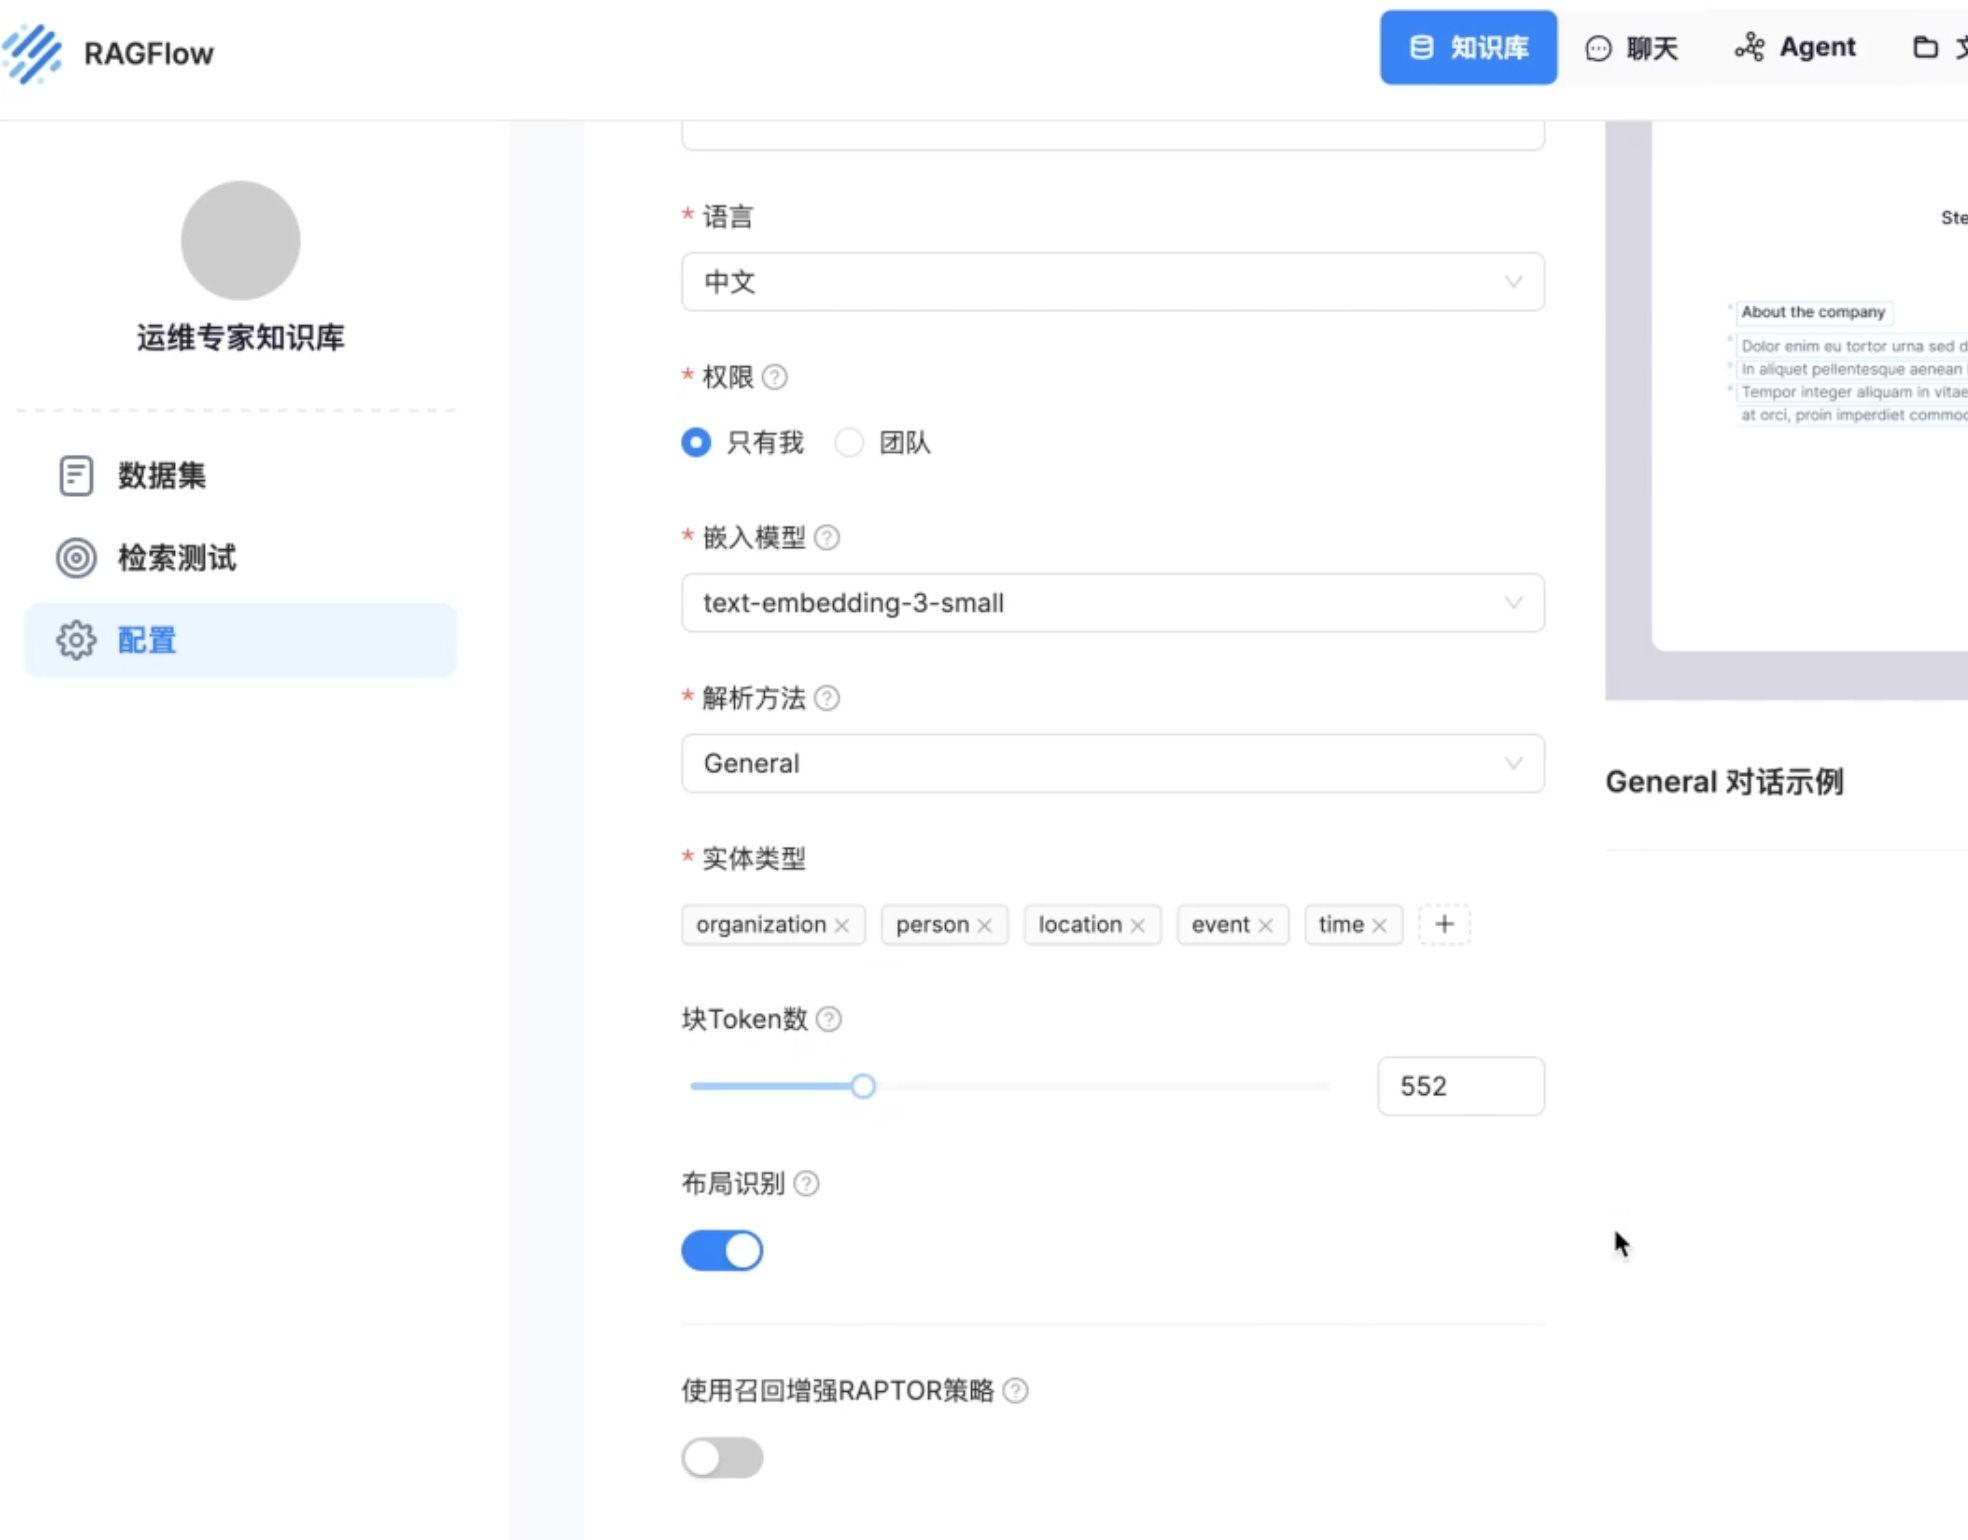 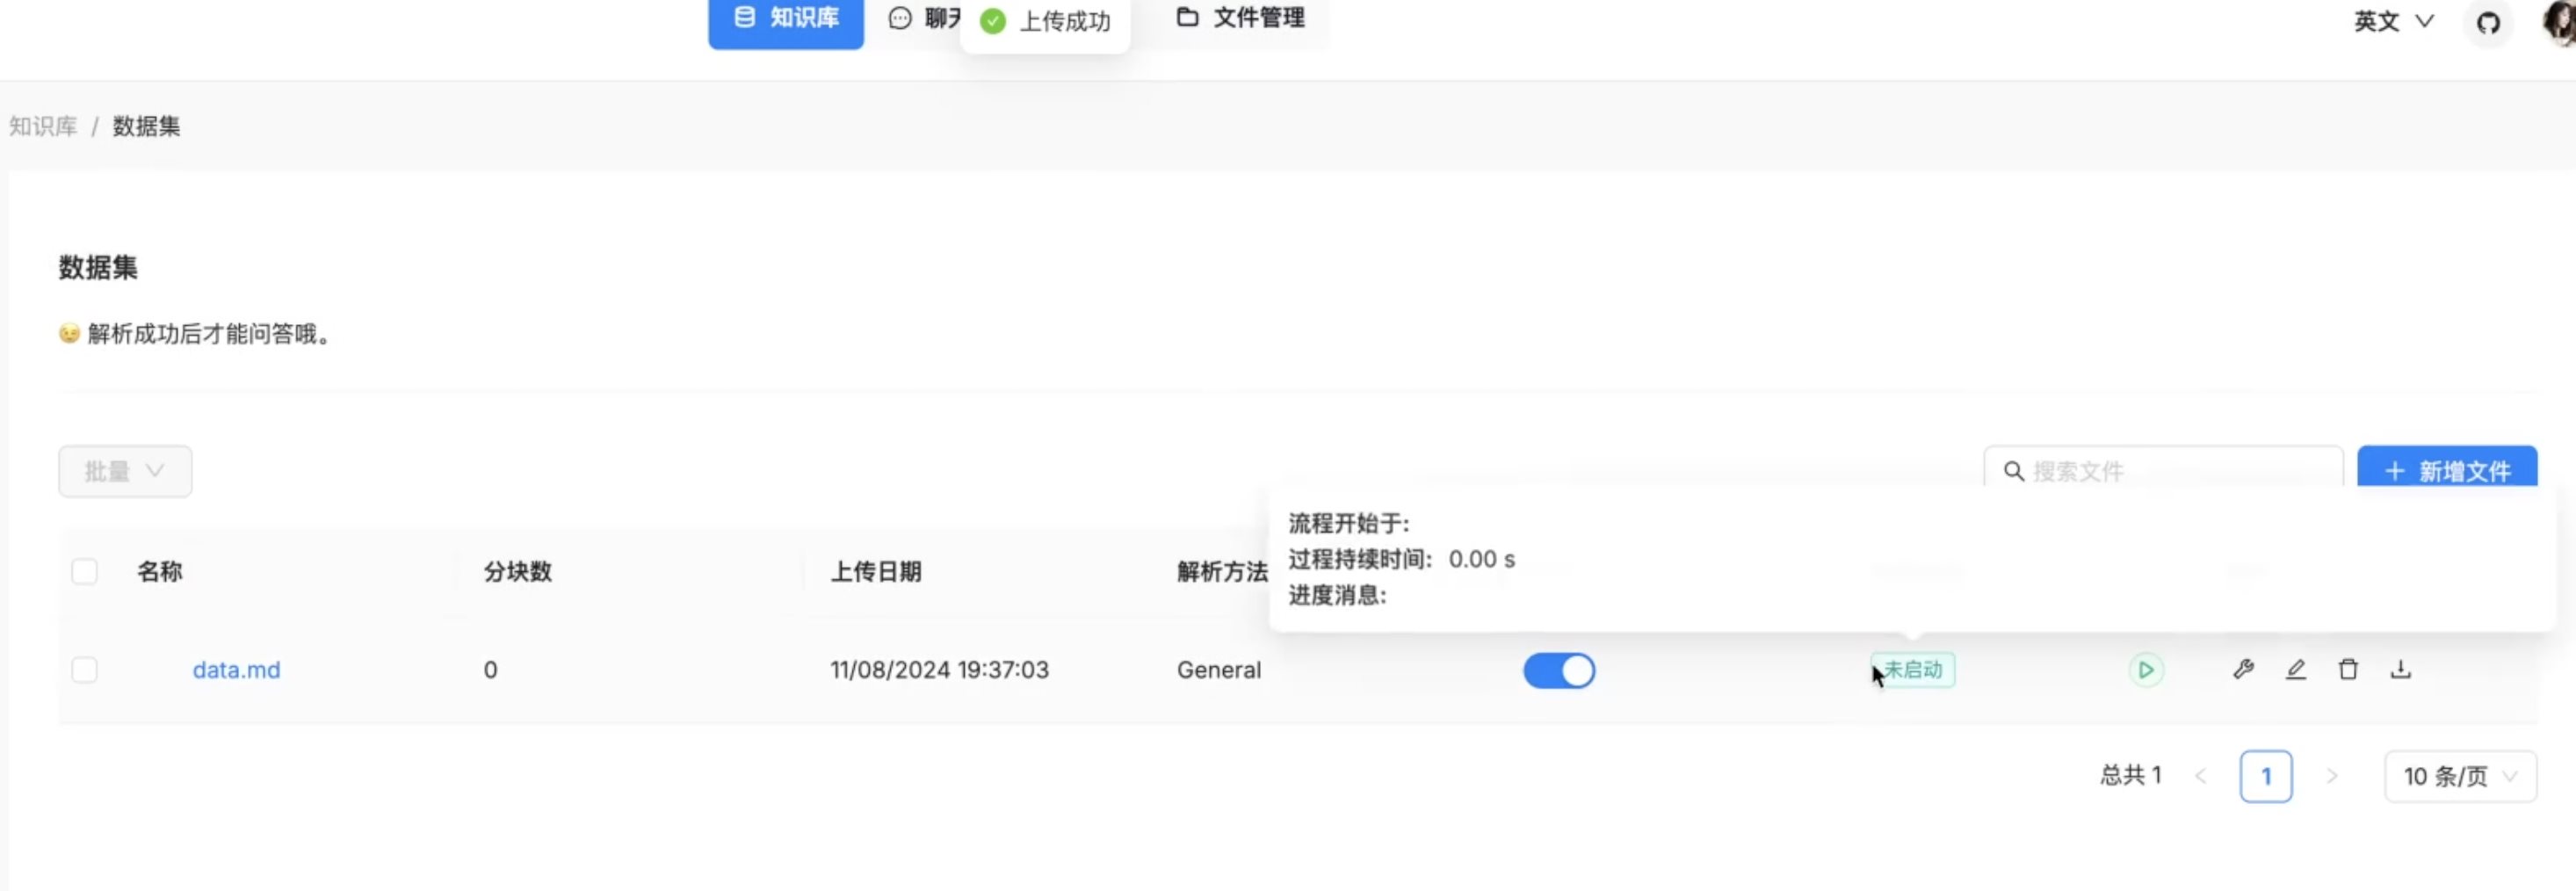 tn2>上传文件,点击“启动”按钮进行 Embedding,等待处理完成 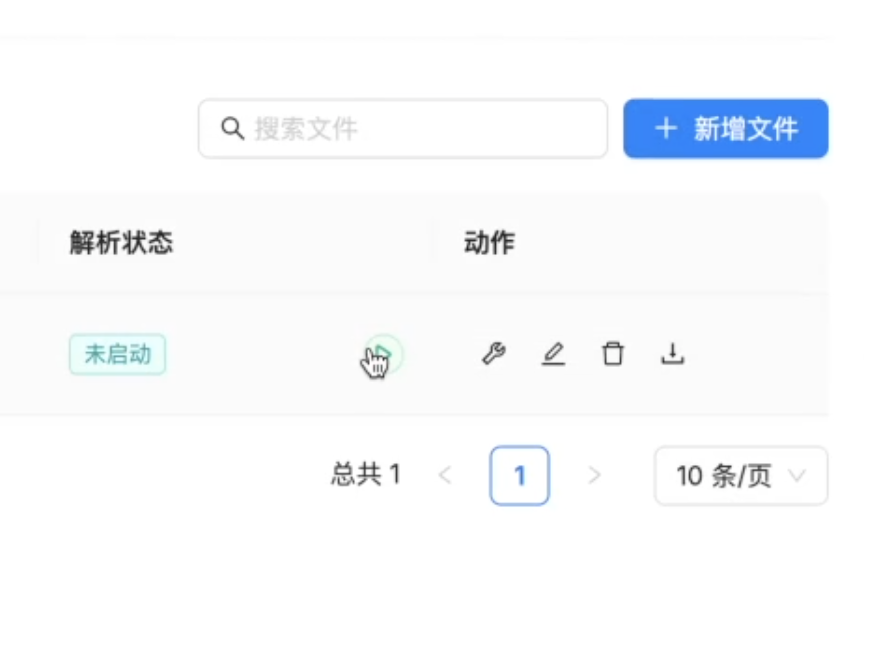 tn2>新建助理并基于知识库进行对话 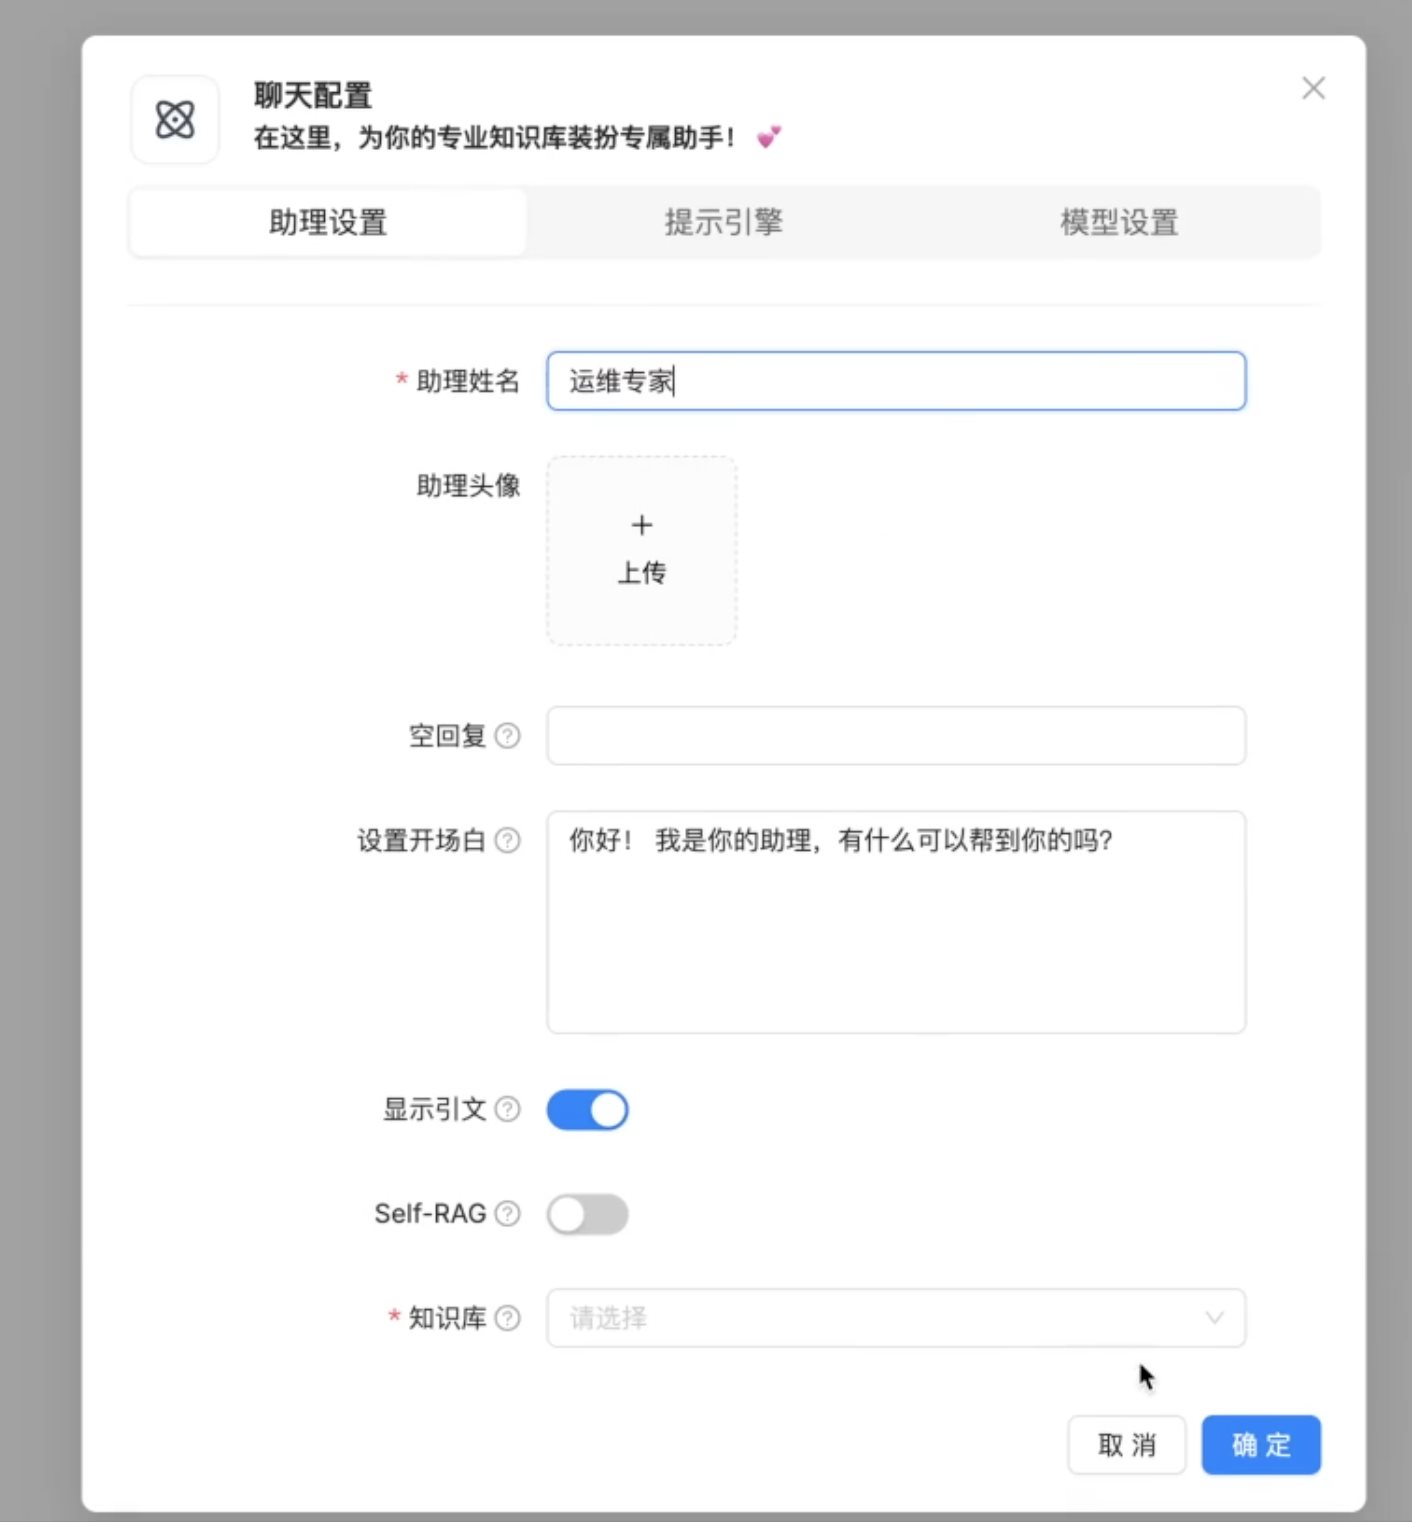 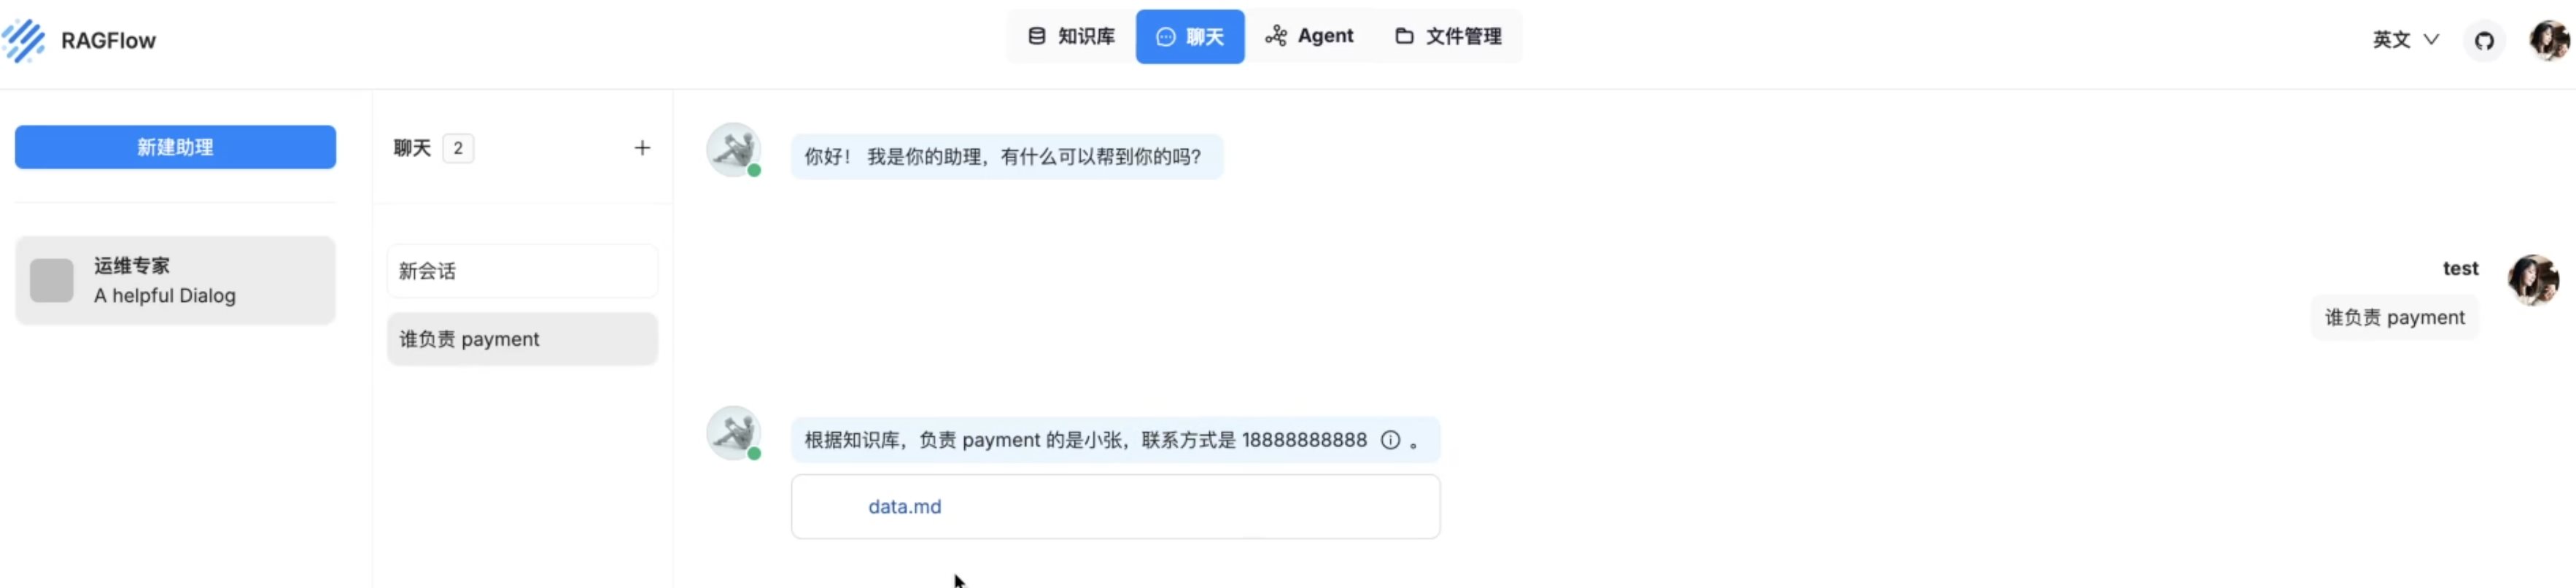 ### Ragflow VS QAnthing