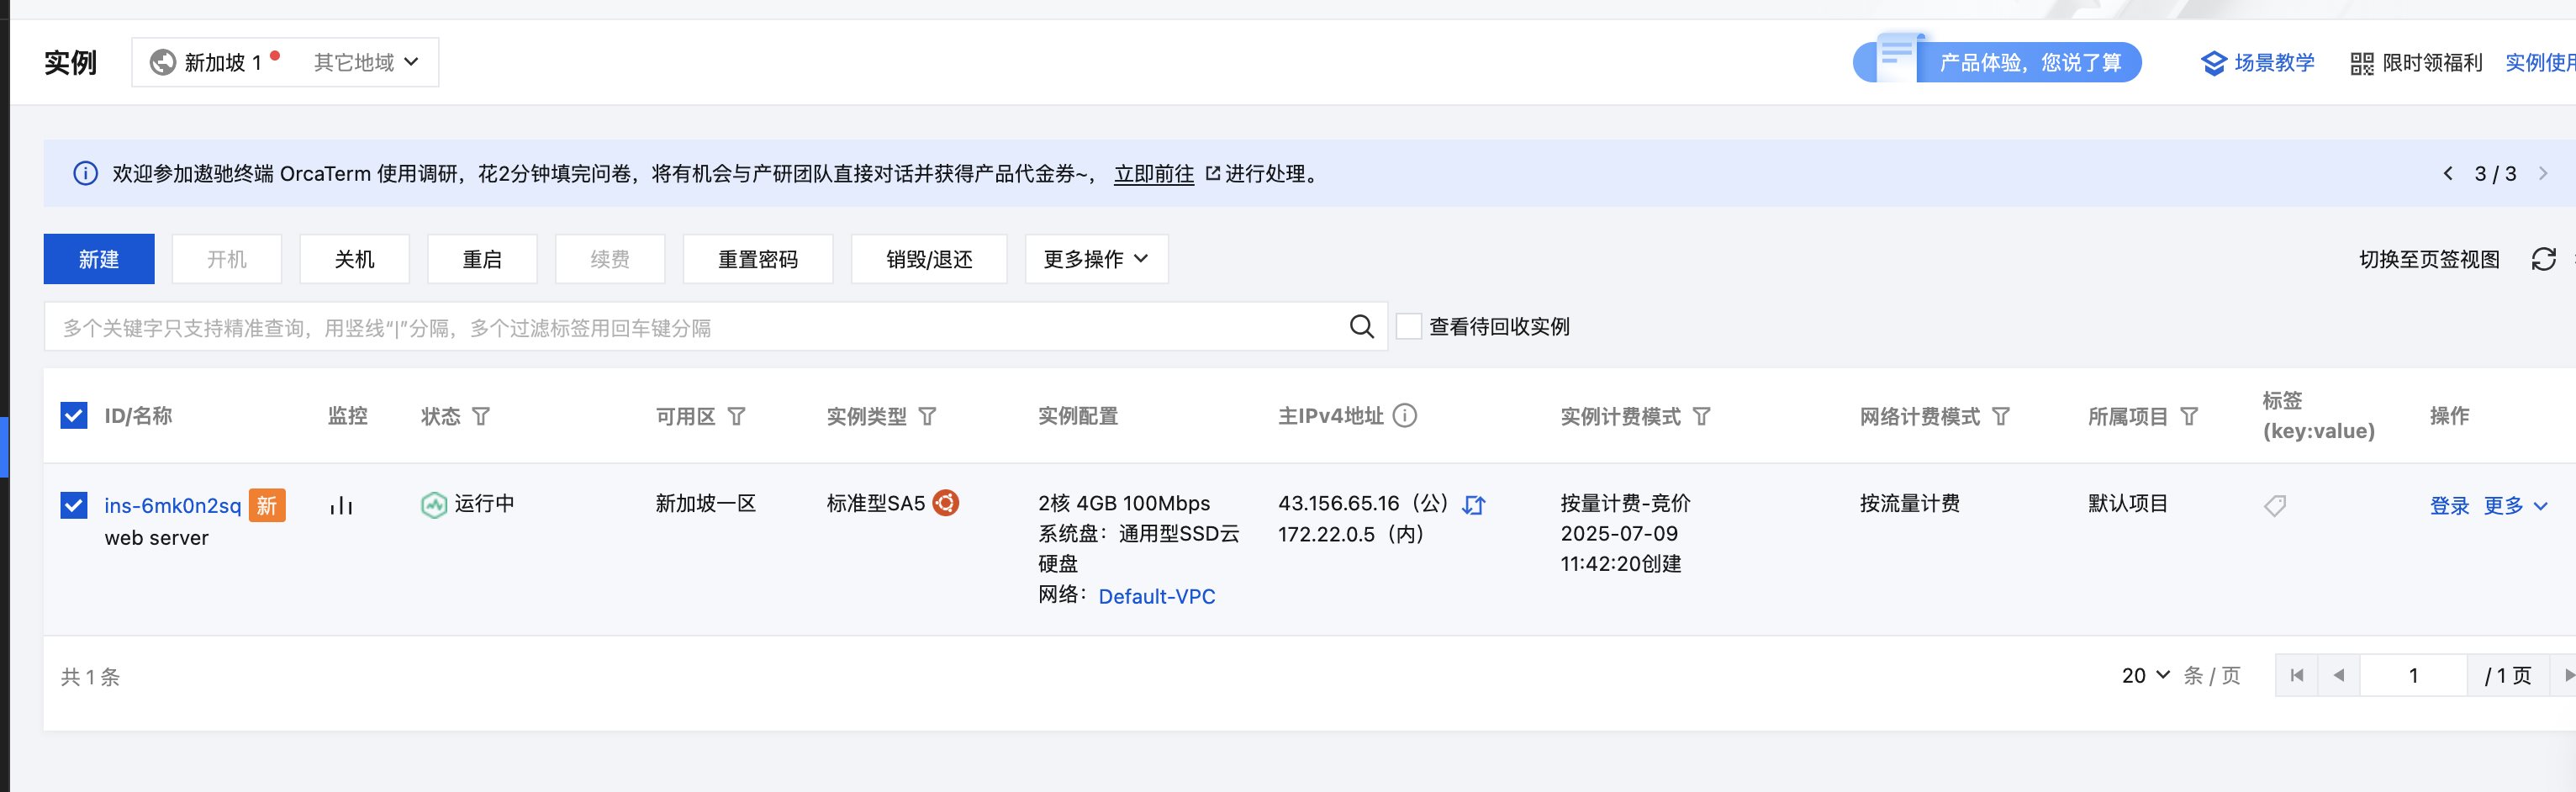
Terraform 腾讯云安装Docker实战 电脑版发表于:2025/7/9 12:04  >#Terraform 腾讯云安装Docker实战 [TOC] 前提准备 ------------ tn2>首先创建好腾讯云相关的`secret_id`和`secret_key`,可以参考一下我的这篇文章: https://www.tnblog.net/hb/article/details/8676#%E8%AE%A4%E8%AF%81%E9%85%8D%E7%BD%AE%EF%BC%88%E8%85%BE%E8%AE%AF%E4%BA%91%EF%BC%89 创建好后记得在腾讯云上面充点钱。 定义基础设施代码 ------------ tn2>首先我们定义一下`variables.tf`变量,这里区域设置建议选择新加坡或者香港方便访问外网。 ```bash variable "secret_id" { default = "你的secret_id" } variable "secret_key" { default = "你的secret_key" } variable "region" { default = "ap-singapore" } variable "password" { default = "你的服务器密码" } ``` tn2>这里我们创建`cvm.tf`文件定义我们的机型。 ```bash # Configure the TencentCloud Provider provider "tencentcloud" { region = var.region secret_id = var.secret_id secret_key = var.secret_key } # Get availability zones data "tencentcloud_availability_zones_by_product" "default" { product = "cvm" } # Get availability images data "tencentcloud_images" "default" { image_type = ["PUBLIC_IMAGE"] os_name = "ubuntu" } # Get availability instance types data "tencentcloud_instance_types" "default" { # 机型族 filter { name = "instance-family" values = ["SA5"] } cpu_core_count = 2 memory_size = 4 exclude_sold_out = true } # Create a web server resource "tencentcloud_instance" "web" { depends_on = [tencentcloud_security_group_lite_rule.default] count = 1 instance_name = "web server" availability_zone = data.tencentcloud_availability_zones_by_product.default.zones.0.name image_id = data.tencentcloud_images.default.images.0.image_id instance_type = data.tencentcloud_instance_types.default.instance_types.0.instance_type system_disk_type = "CLOUD_BSSD" system_disk_size = 50 allocate_public_ip = true internet_max_bandwidth_out = 100 instance_charge_type = "SPOTPAID" orderly_security_groups = [tencentcloud_security_group.default.id] password = var.password user_data = base64encode(<<EOF #!/bin/bash apt-get update apt-get install -y docker.io systemctl enable docker systemctl start docker EOF ) } # Create security group resource "tencentcloud_security_group" "default" { name = "tf-security-group" description = "make it accessible for both production and stage ports" } # Create security group rule allow ssh request resource "tencentcloud_security_group_lite_rule" "default" { security_group_id = tencentcloud_security_group.default.id ingress = [ "ACCEPT#0.0.0.0/0#22#TCP", "ACCEPT#0.0.0.0/0#6443#TCP", "ACCEPT#0.0.0.0/0#ALL#ALL" ] egress = [ "ACCEPT#0.0.0.0/0#ALL#ALL" ] } ``` tn2>除了选择机型以外,重点在于这段代码: ```bash user_data = base64encode(<<EOF #!/bin/bash apt-get update apt-get install -y docker.io systemctl enable docker systemctl start docker EOF ) ``` tn2>user_data 是云主机初始化时自动执行的脚本,这里我们让他更新后安装docker容器。 然后定义一下`outputs.tf`我们的输出,这里我们只需要输出公网IP和范围。 ```bash output "public_ip" { description = "vm public ip address" value = tencentcloud_instance.web[0].public_ip } output "selected_region" { value = var.region } ``` tn2>`version.tf`定义腾讯云的依赖和版本。 ```bash terraform { required_version = "> 0.13.0" required_providers { tencentcloud = { source = "tencentcloudstack/tencentcloud" version = "1.81.5" } } } ``` tn2>开始初始化与创建。 ```bash # 这里我使用了代理 http_proxy=http://127.0.0.1:1088 \ https_proxy=http://127.0.0.1:1088 \ all_proxy=socks5h://127.0.0.1:1080 \ terraform init # 开始申请 terraform apply -auto-approve ``` 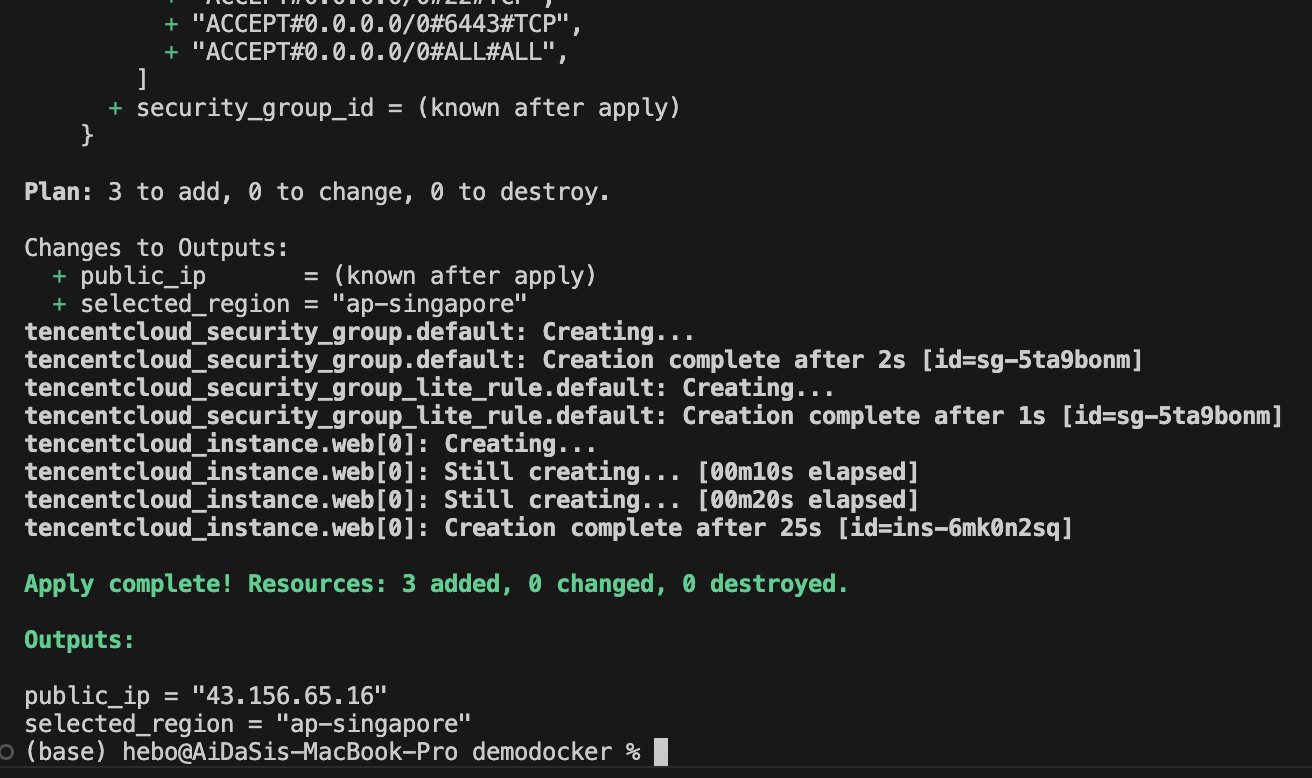 检验 ------------ tn2>在腾讯云服务器中是有创建的,并且还安装好了docker。