Terraform案例演示(学习笔记) 电脑版发表于:2025/7/4 13:50 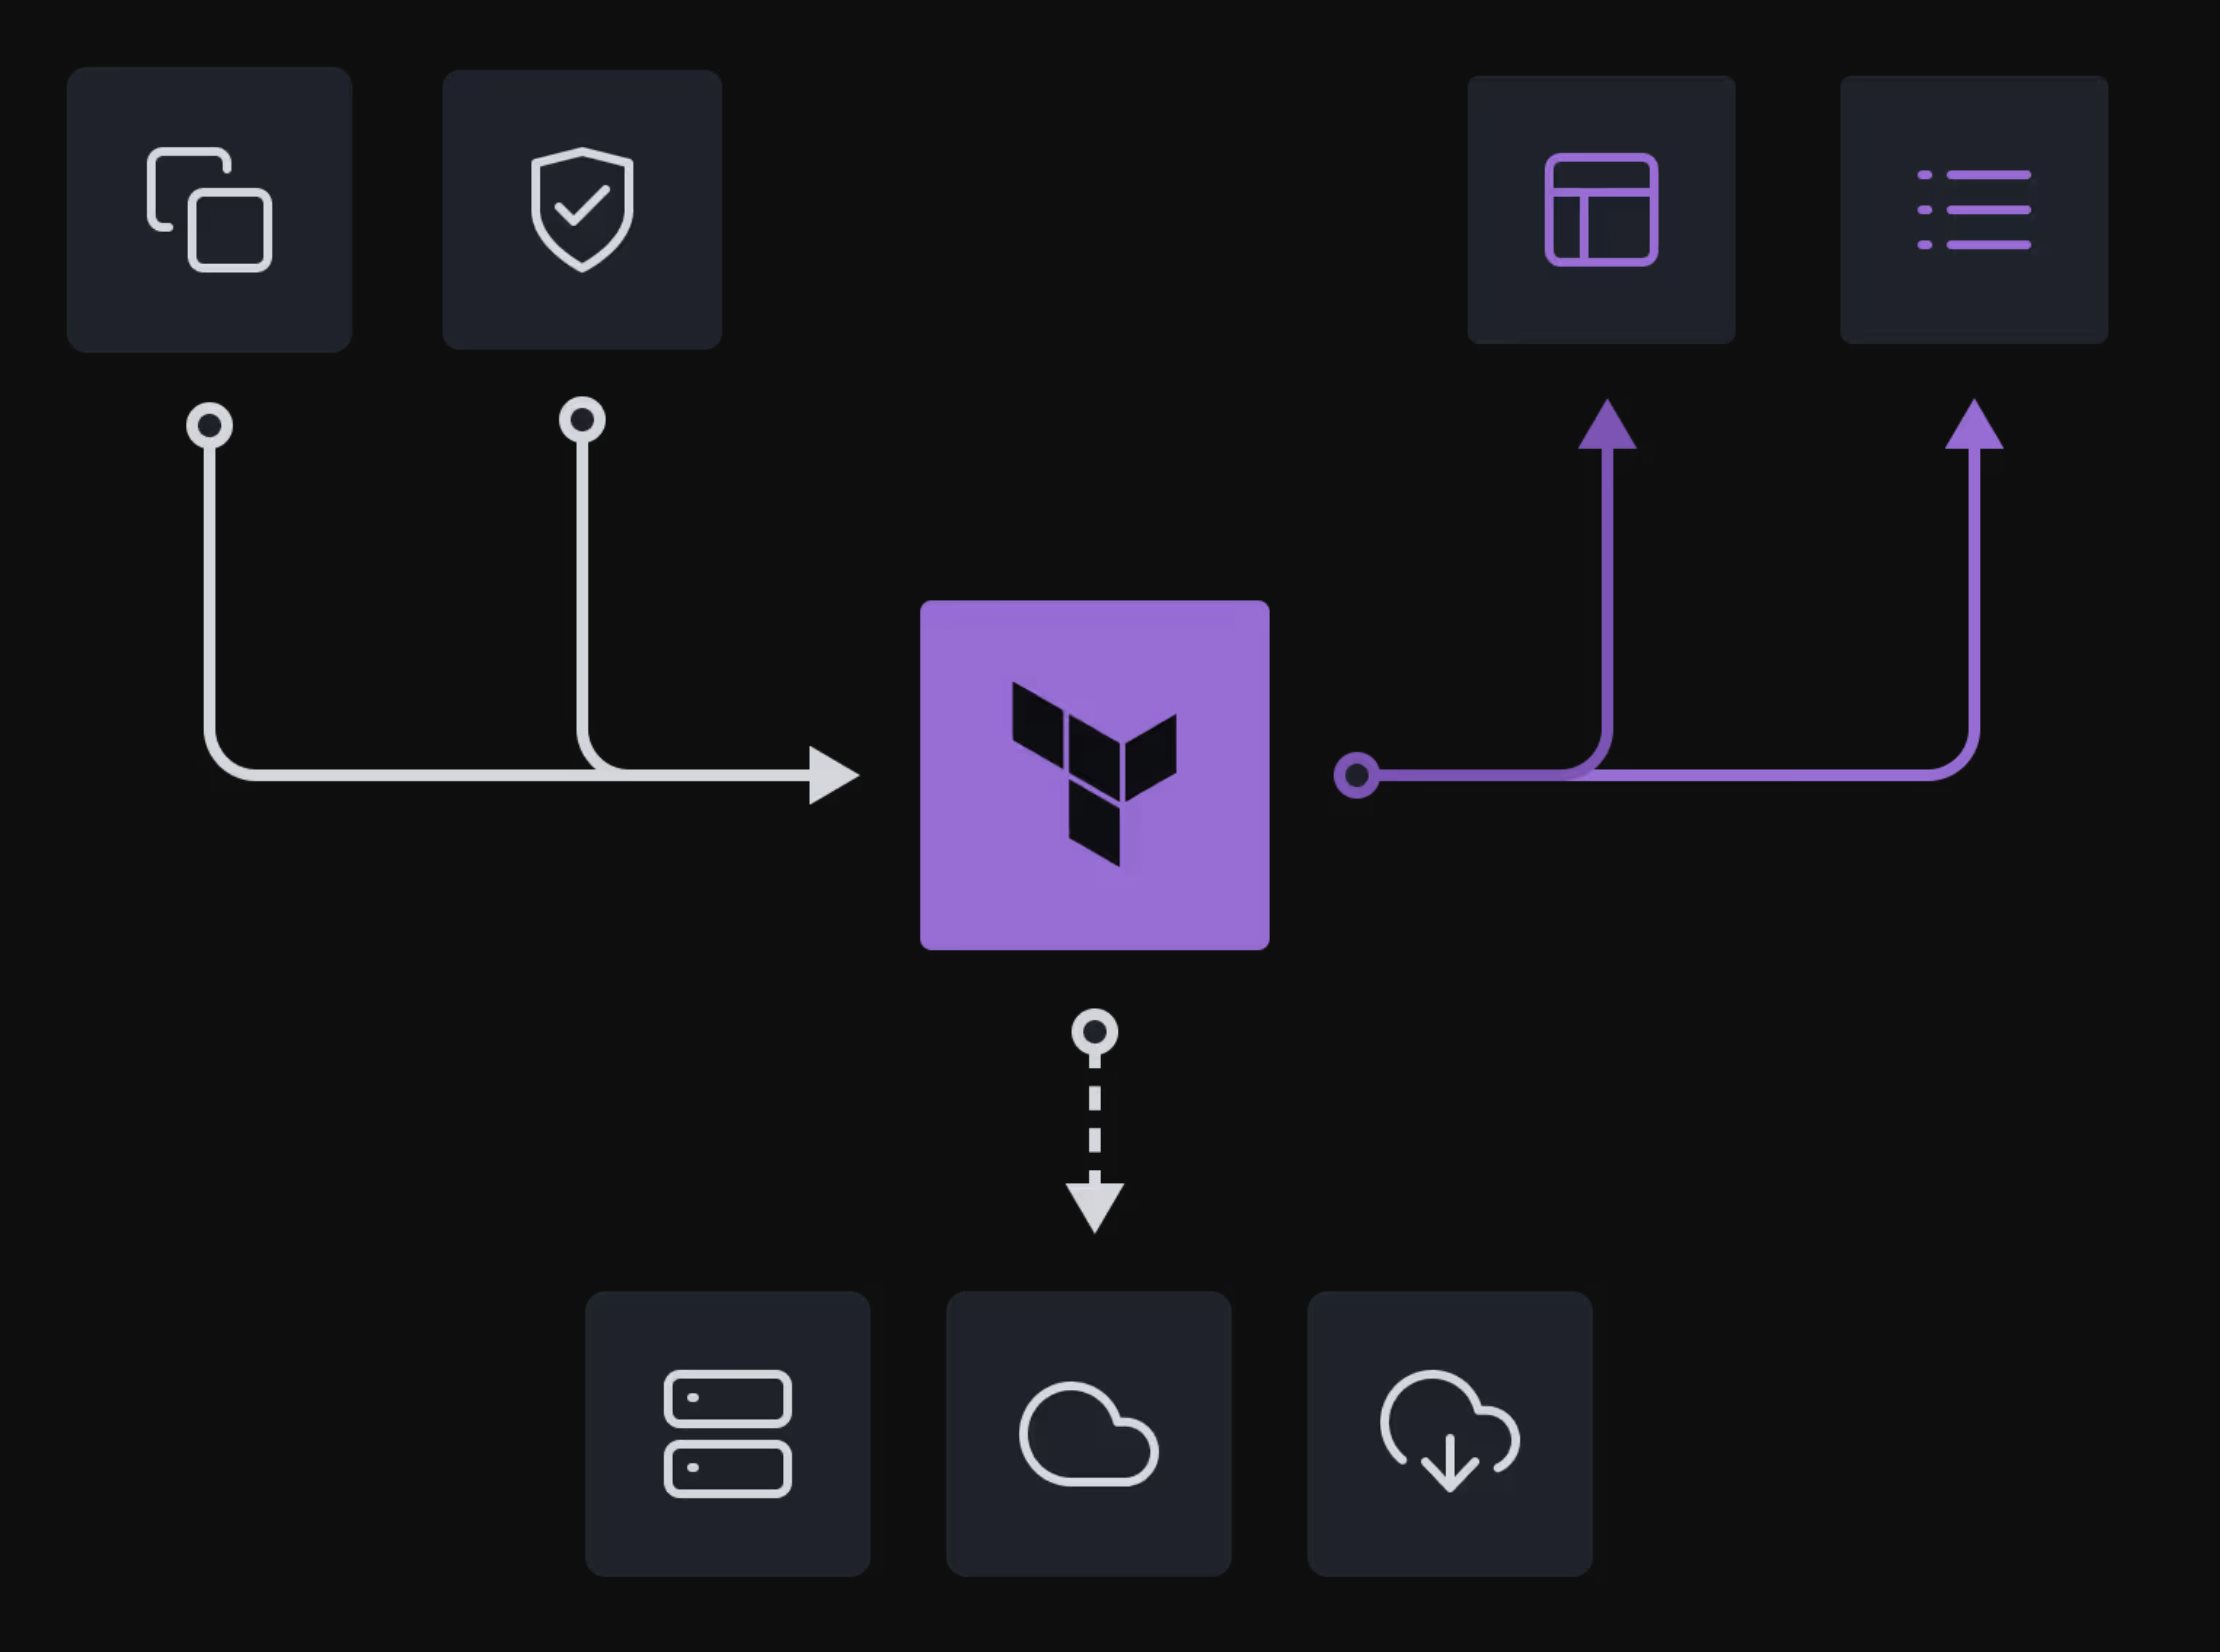 ># Terraform案例演示(学习笔记) [TOC] COS对象存储 ------------ tn2>使用Local存储,并定义远端的COS对象存储。 将状态文件迁移到COS。 ### 开始实践 tn2>我们将Demo01中的复制到新创建的Demo03的文件夹中。 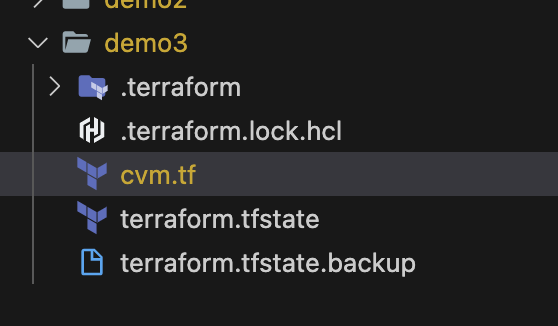 tn2>我们把这里`count`给去掉。 ```bash count = 1 ``` 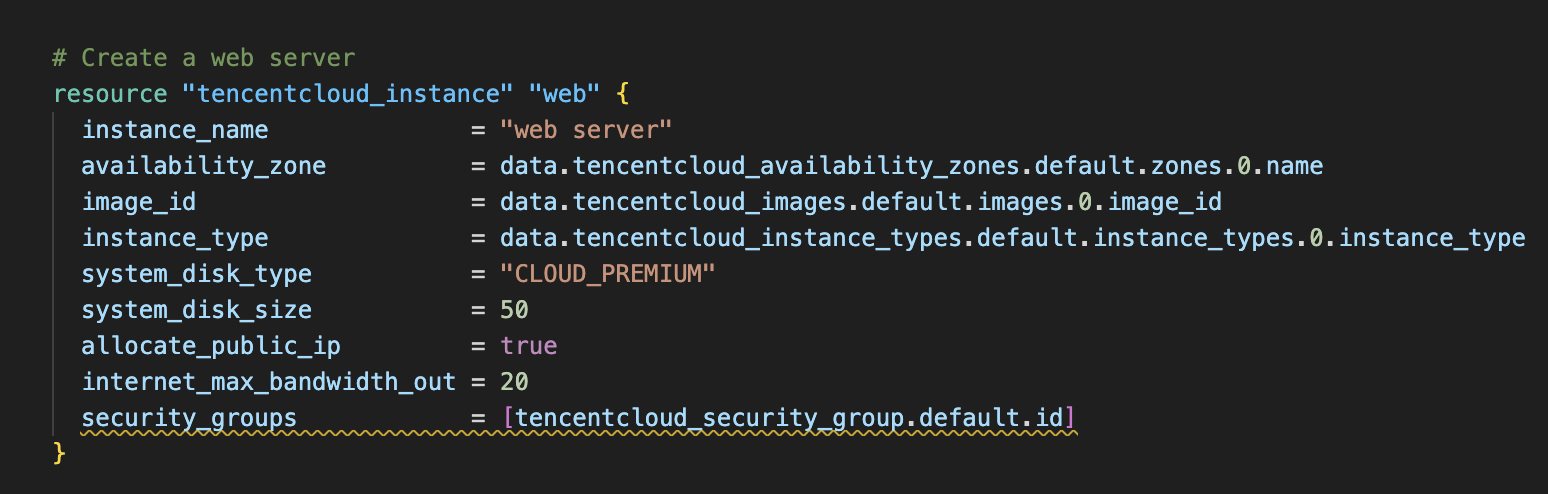 tn2>我们在末尾添加上创建COS对象存储。 ```bash # Add COS bucket data "tencentcloud_user_info" "info" {} locals { app_id = data.tencentcloud_user_info.info.app_id } resource "tencentcloud_cos_bucket" "private_bucket" { bucket = "terraform-bucket-${local.app_id}" acl = "private" encryption_algorithm = "AES256" } ``` tn2>然后我们对其进行创建,首先初始化Terraform,然后进行`apply`。 ```bash terraform init terraform apply -auto-approve ``` 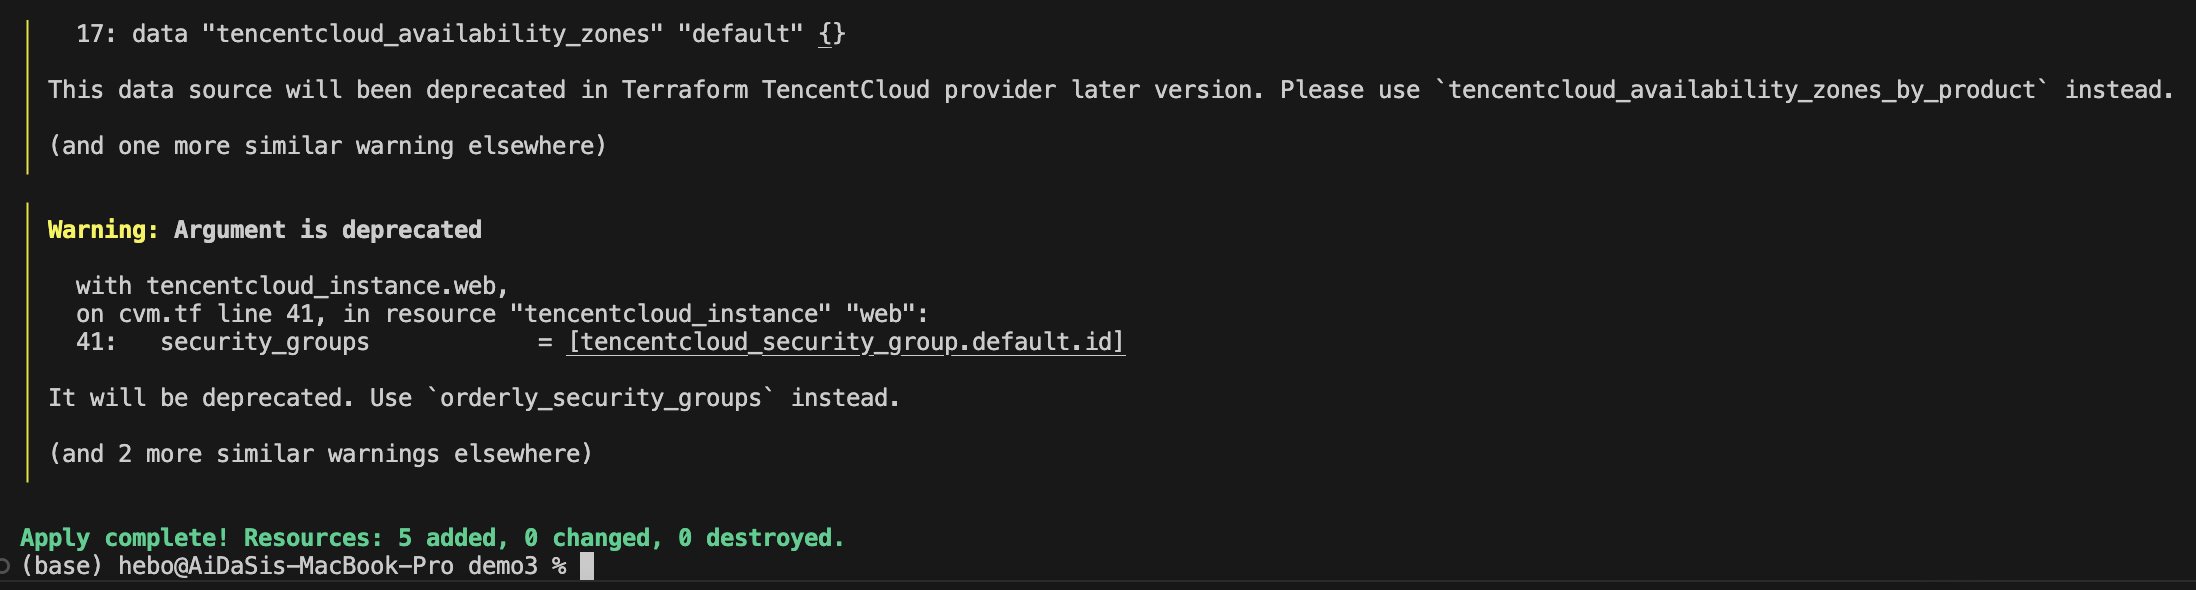 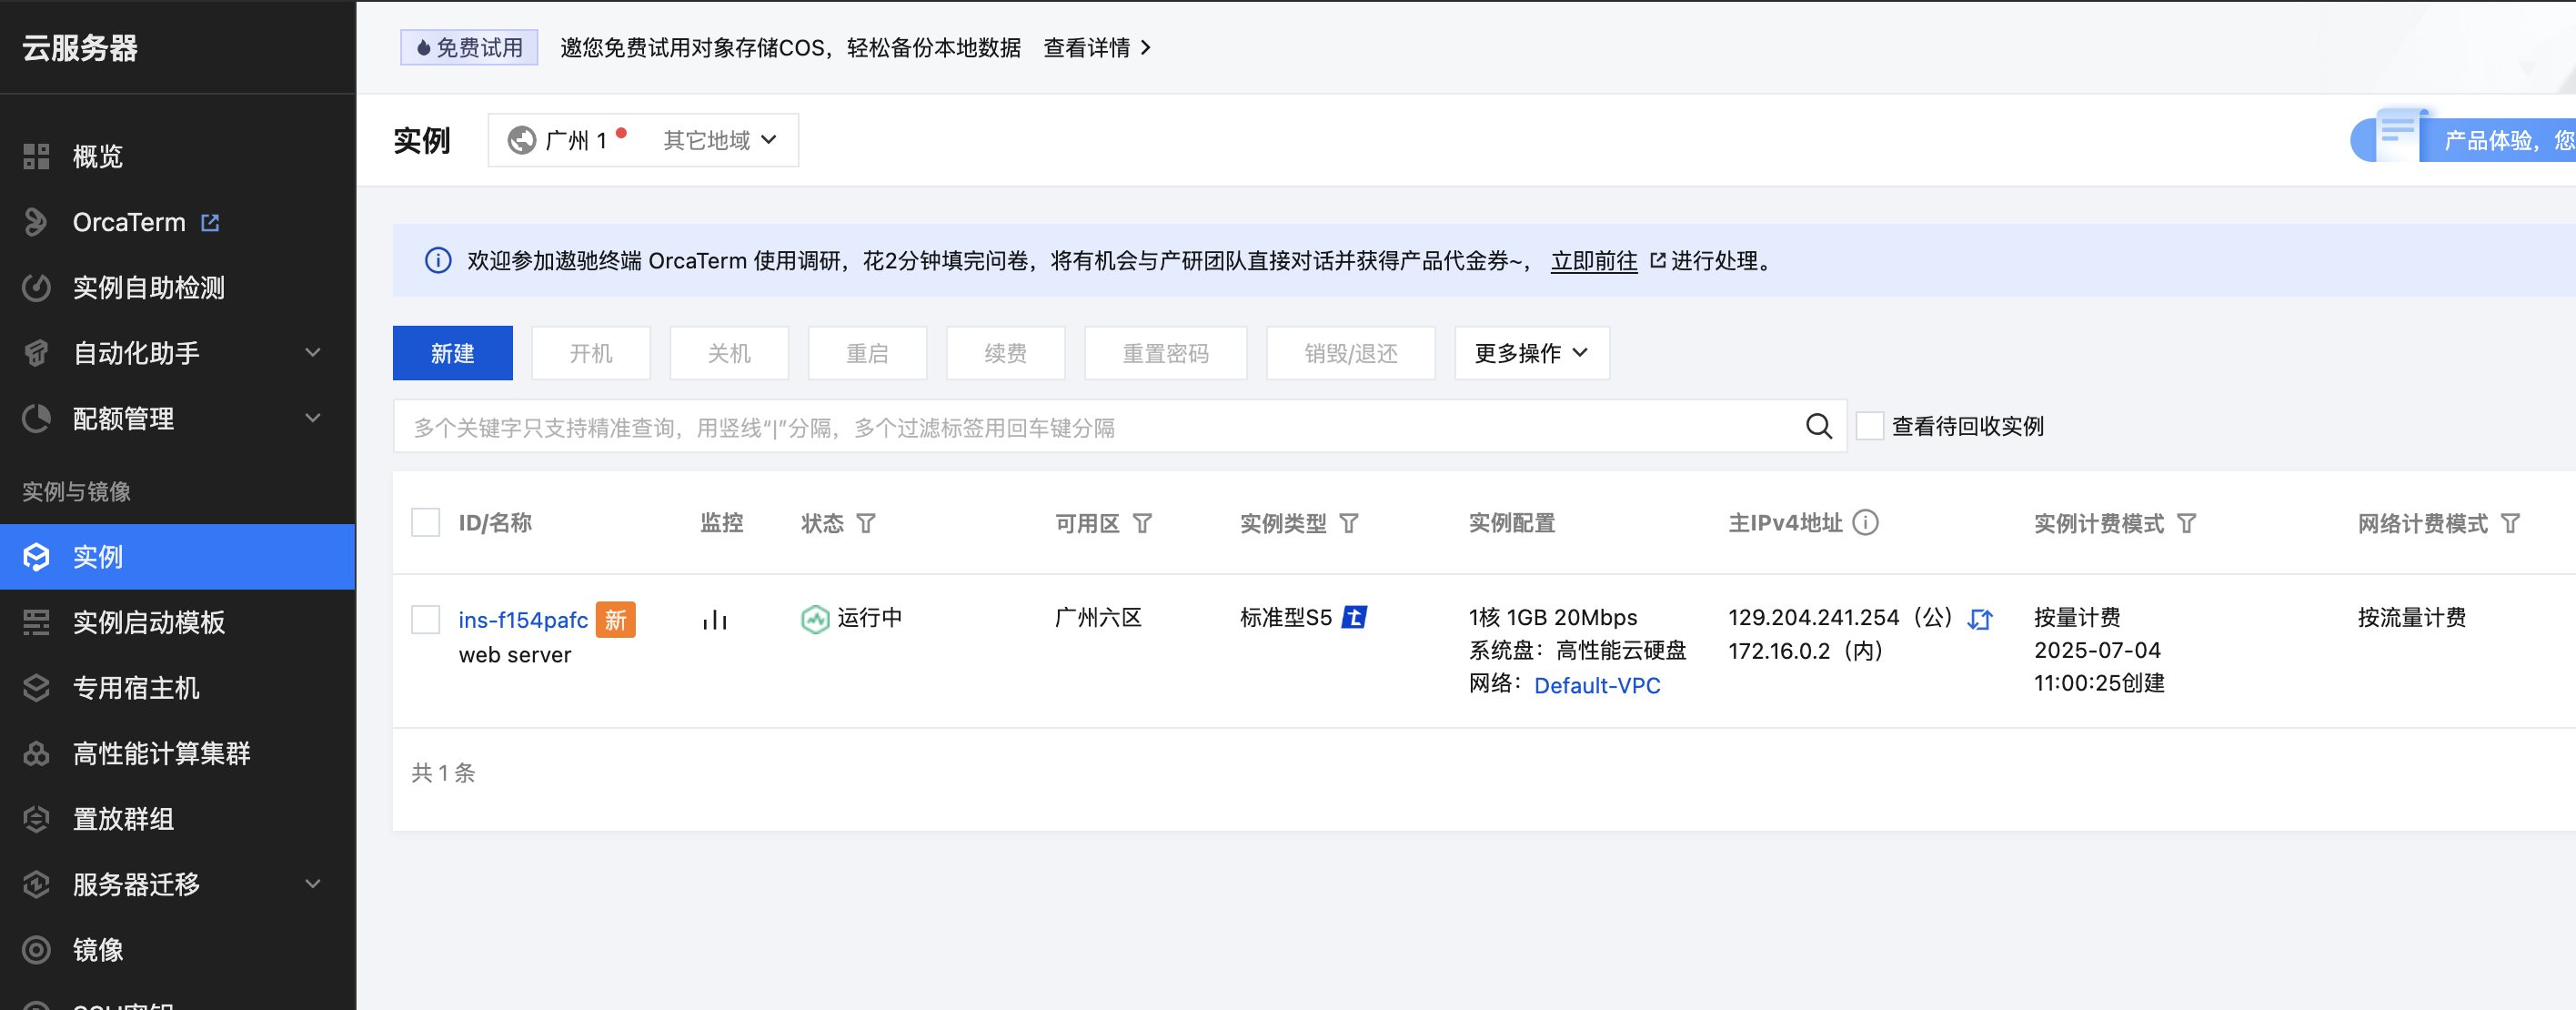 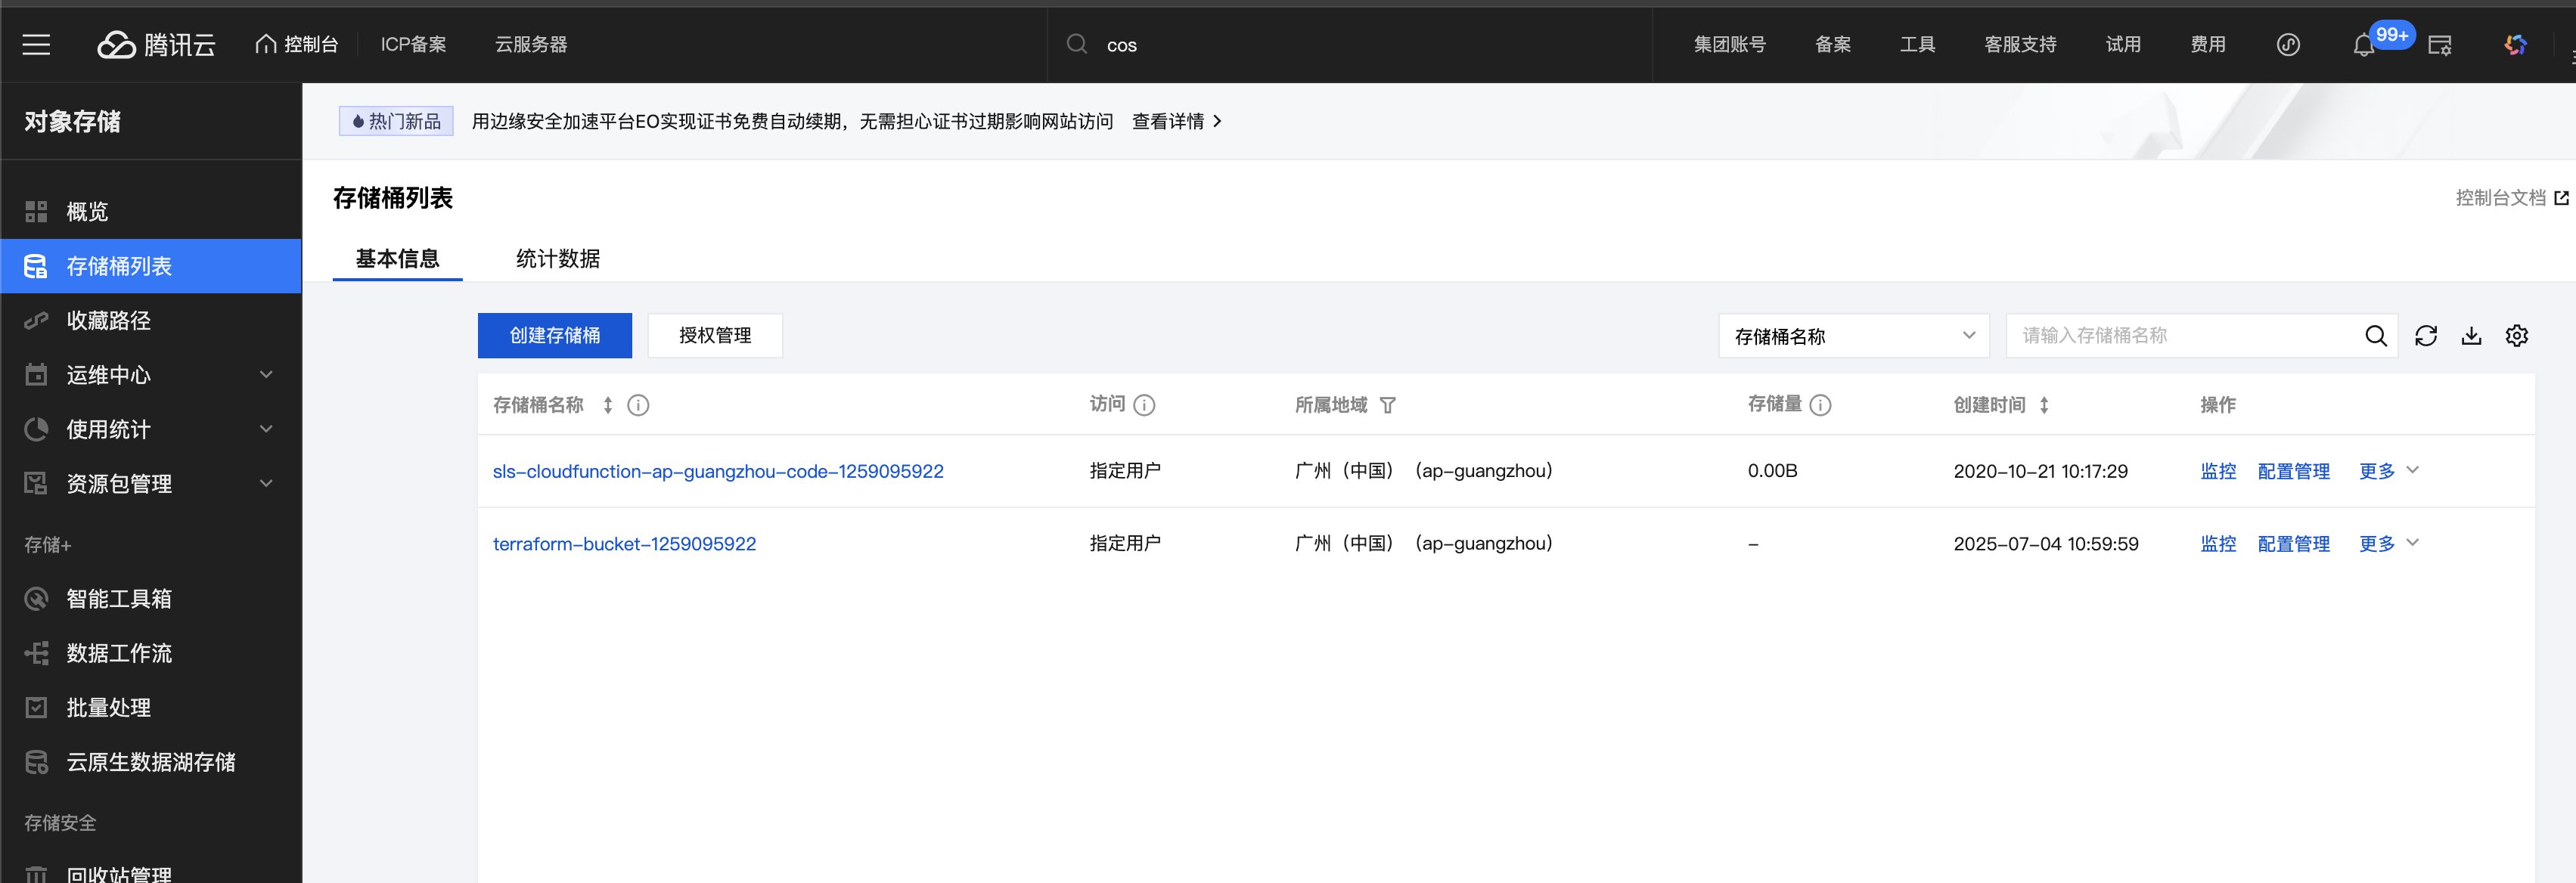 tn2>我们发现资源已经创建成功了。 然后我们把创建COS的这一段注释掉,然后我们添加一下存储的代码。 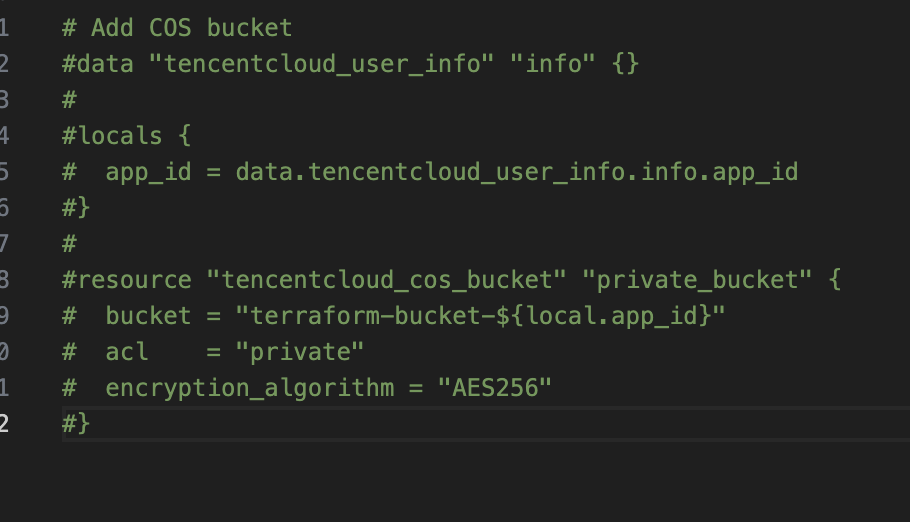 ```json terraform { backend "cos" { secret_id = "你的用户id" secret_key = "你的用户key" region = "ap-guangzhou" bucket = "terraform-bucket-1259095922" prefix = "terraform/state" encrypt = true } } ``` tn2>然后我们初始化,并进行apply。 tn>这里使用`secret_id`和`secret_key`不是很推荐,建议使用环境变量解决。 ```bash terraform init ``` 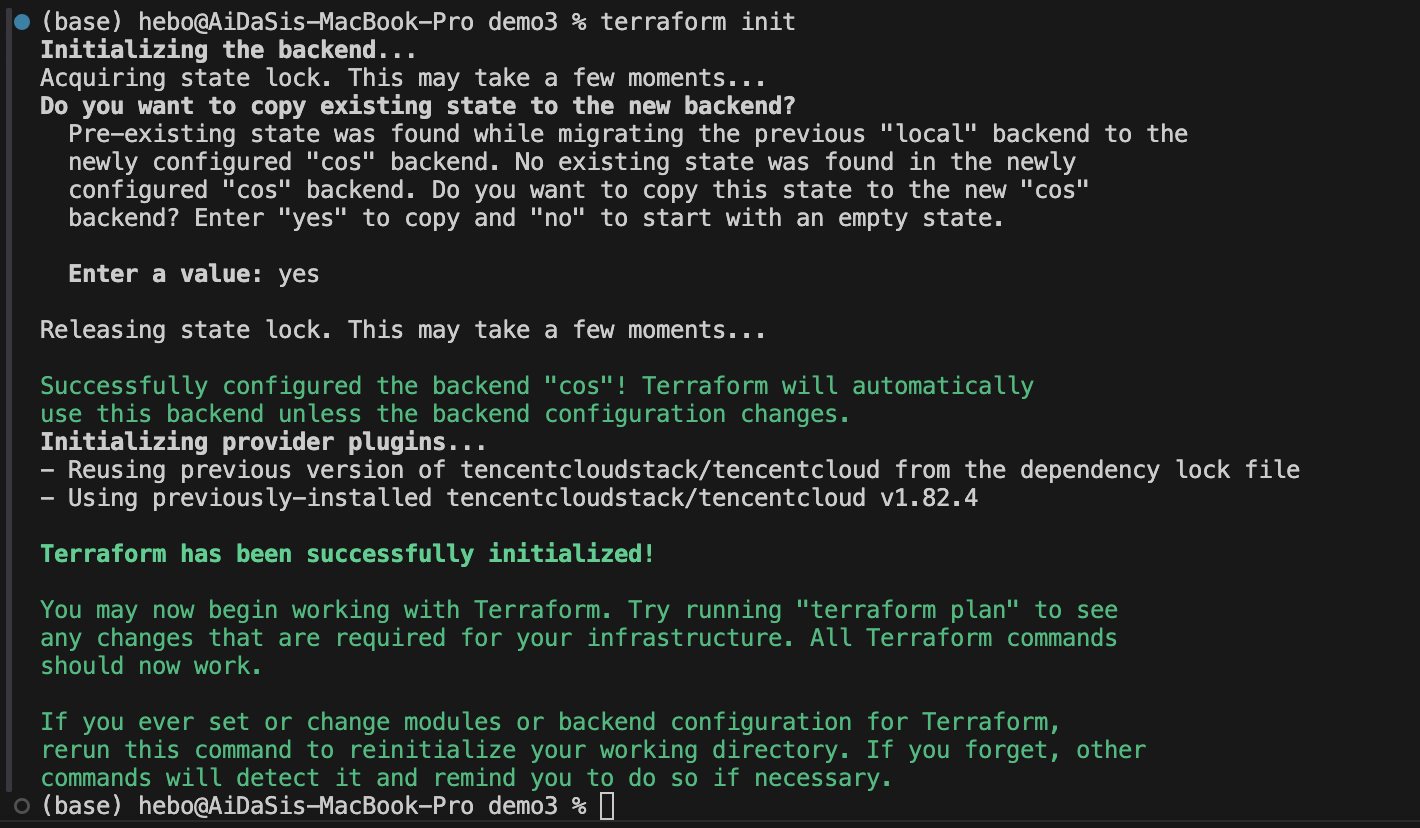  tn2>我们可以看到我们的存储桶已经存储了我们的状态配置文件了,并且本地的`terraform.tfstate`文件已经空了。 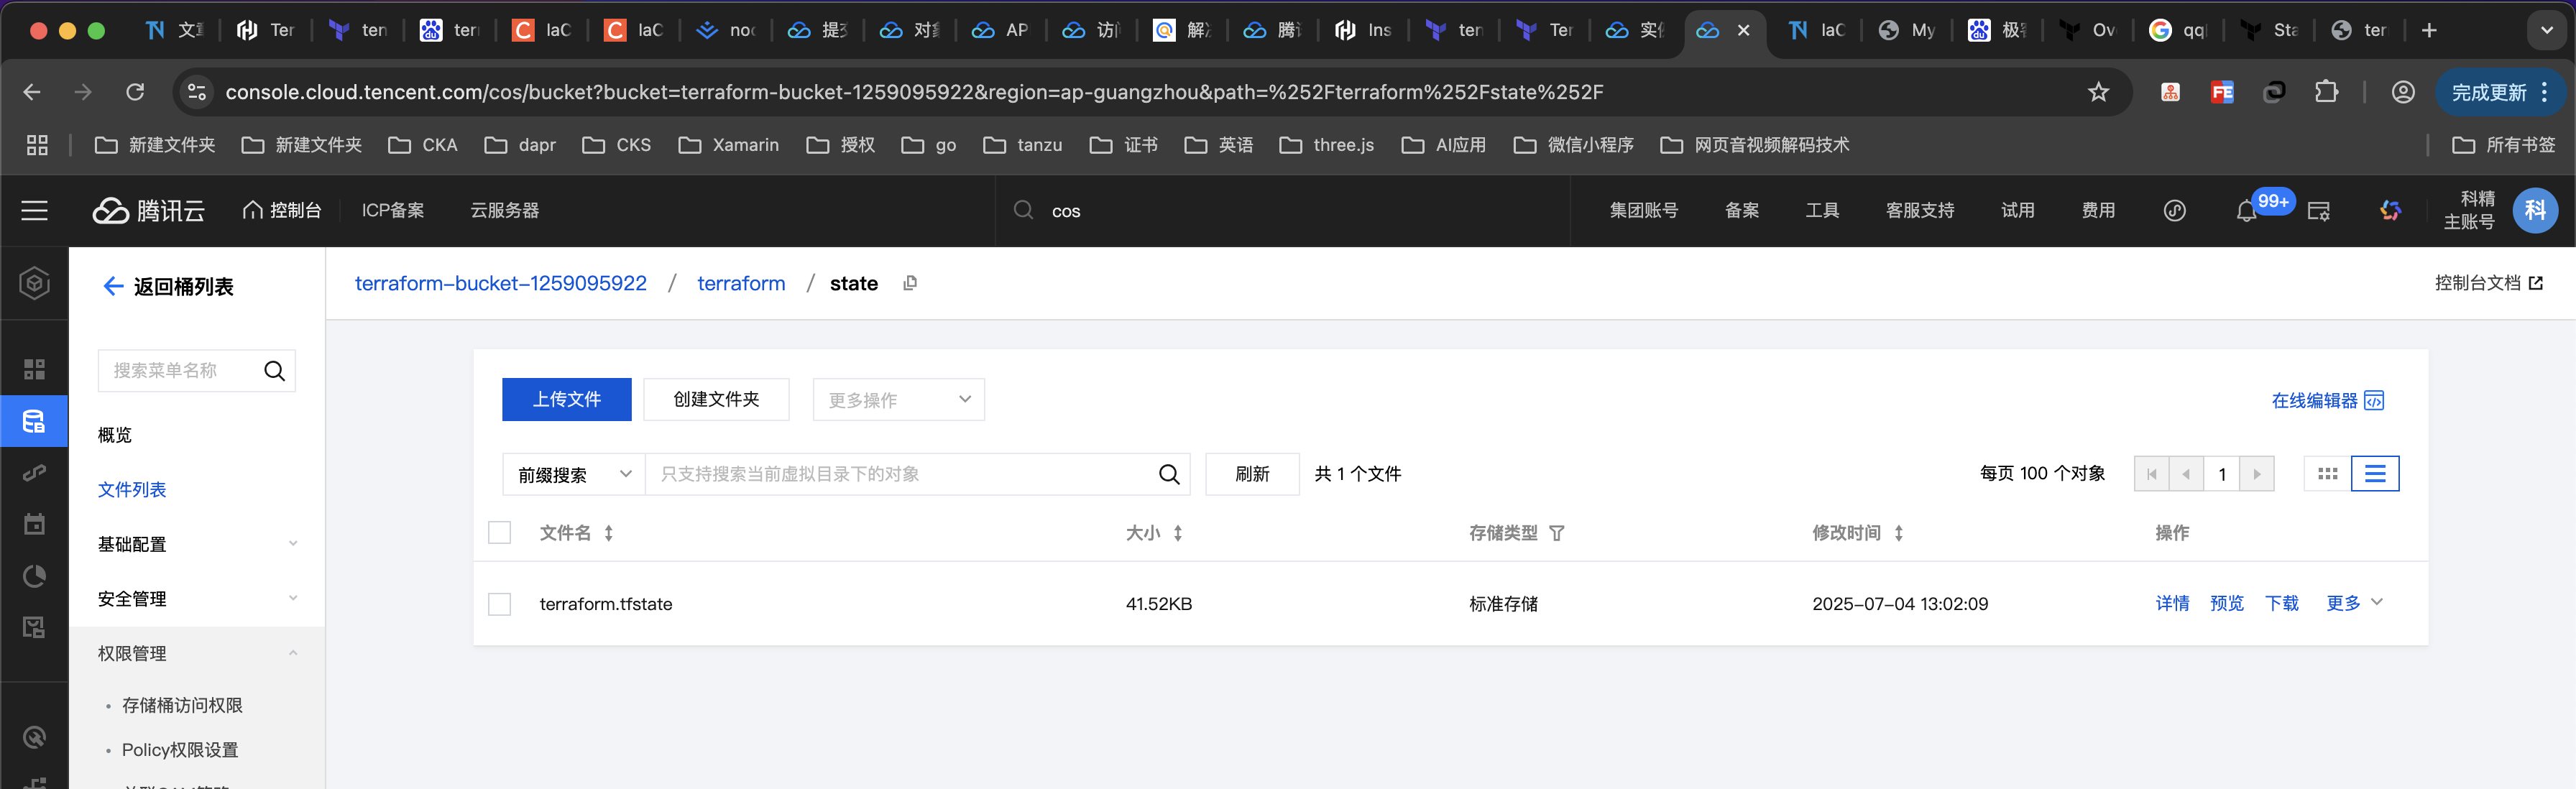 ### 关于State的其他命令 tn2>Terraform 中的 state 命令是用来查看、修改、管理 Terraform 状态文件(state file)的命令集合。 状态文件是 Terraform 的核心组件之一,它记录了 Terraform 管理的所有资源的当前状态。 | 命令 | 描述 | | ------------ | ------------ | | `terraform refresh` | 从基础设施实际轧辊台更新`state`状态 | | `terraform state list` | 列出state记录的资源 | | `terraform state rm` | 删除某些state状态 | | `terraform state pull` | 从远端拉取状态到本地 | | `terraform state push` | 更新本地的状态到远端 | tn2>这里我们尝试一下`terraform state list`命令。 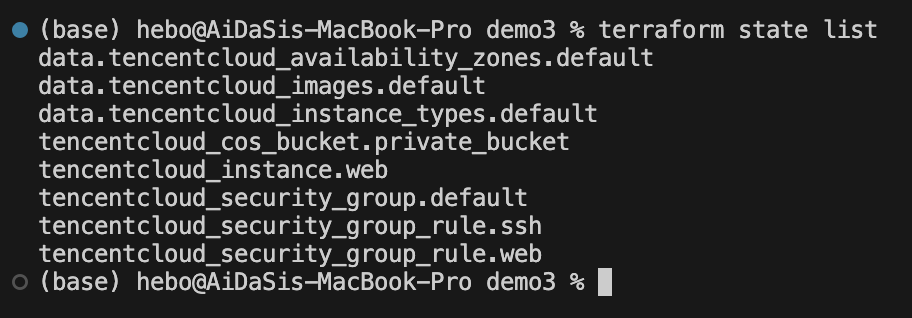 Terraform实战案例 ------------ ### Terraform Layout tn2>Terraform简单的项目结构如下: `main.tf`:主要的业务逻辑。 `outputs.tf`:定义输出内容。 `variables.tf`:定义变量参数。 `version.tf`:定义依赖和版本。 tn2>如果都写到一个文件里面它的维护性是非常差的。 #### main.tf tn2>定义基础设施 `main.tf`也可以拆分为多个子文件,terraform会统一进行加载。 举例:`cos.tf`、`cvm.tf`、`k8s.tf`。 #### outputs.tf tn2>定义运行结束后所需要输出的内容。 可设置是否为敏感数据,敏感数据将不输出。 可以引用其他的resouce的输出内容。 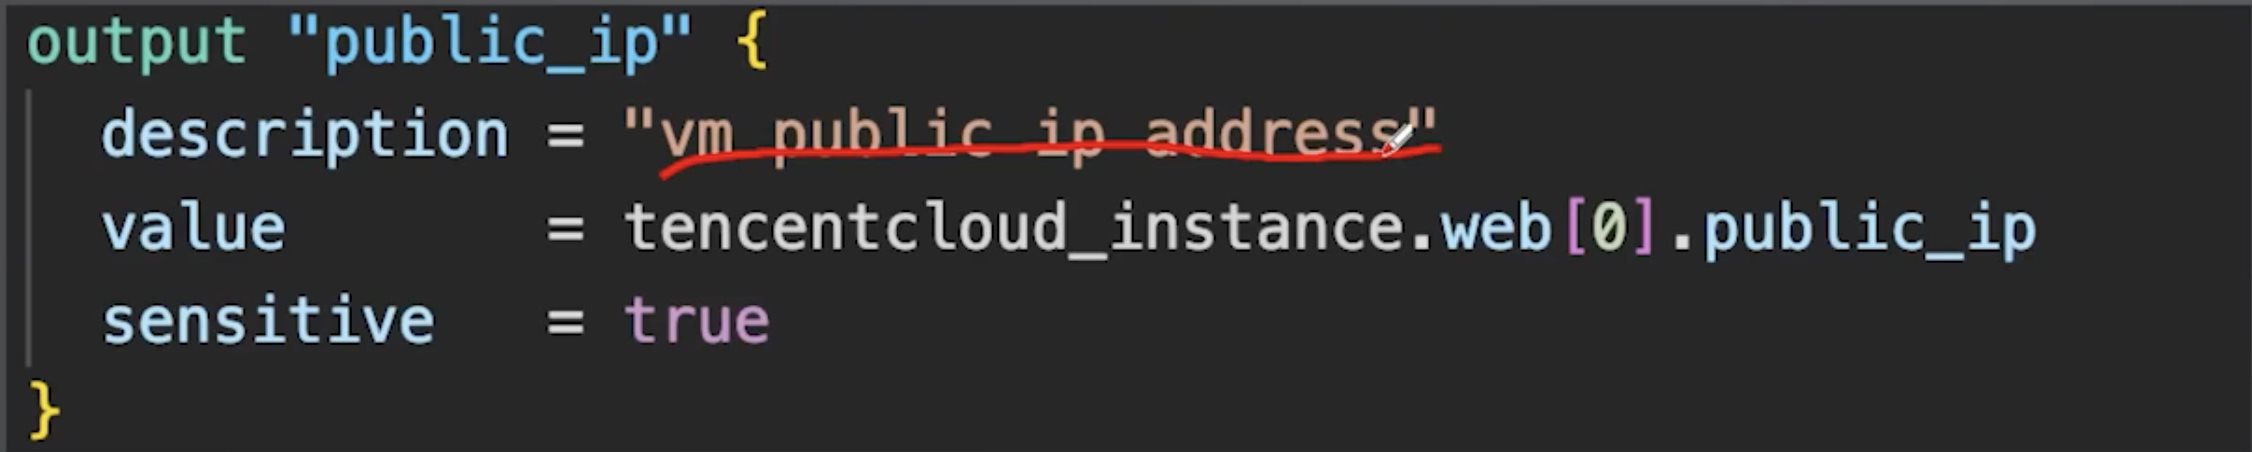 #### variables.tf tn2>定义参数变量,用于在代码中引用。 可定义类型、默认值、描述、验证函数、是否敏感数据(不在plan中显示)  #### 如何设置Veriables tn2>1.通过在命令行配置:`terraform apply -var="perfix=values"` 2.指定配置文件:`terraform apply -var-file="testing.tfvars"` 3.环境变量:`export TF_VAR_prefix=values` 4.定义的默认值 5.交互式输入 tn>优先级从上(1最高)到下(5最低)对值进行覆盖。 #### version.tf tn2>定义项目的provider依赖以及特定版本。 定义Terraform CLI最低要求版本。  实战案例 ------------ tn2>开通VM 安装K3s 安装Argo CD 查看依赖关系:terraform graph | dot -Tsvg > graph.svg 首先我们创建Demo04文件夹,在Demo04下面进行创建。 首先定义`cvm.tf`确定机型。 tn>这里的count通常可以指定N个资源,当需要创建多个相同资源的时候非常有用。 ```bash # Configure the TencentCloud Provider provider "tencentcloud" { secret_id = var.secret_id secret_key = var.secret_key region = var.region } # Get availability zones data "tencentcloud_availability_zones_by_product" "default" { product = "cvm" } # Get availability images data "tencentcloud_images" "default" { image_type = ["PUBLIC_IMAGE"] os_name = "ubuntu" } # Get availability instance types data "tencentcloud_instance_types" "default" { filter { name = "instance-family" values = ["SA5"] } cpu_core_count = 2 memory_size = 4 exclude_sold_out = true } # Create a web server resource "tencentcloud_instance" "web" { depends_on = [ tencentcloud_security_group_lite_rule.default ] count = 1 instance_name = "web server" availability_zone = data.tencentcloud_availability_zones_by_product.default.zones.0.name image_id = data.tencentcloud_images.default.images.0.image_id instance_type = data.tencentcloud_instance_types.default.instance_types.0.instance_type system_disk_type = "CLOUD_BSSD" system_disk_size = 50 allocate_public_ip = true internet_max_bandwidth_out = 100 instance_charge_type = "SPOTPAID" orderly_security_groups = [tencentcloud_security_group.default.id] password = var.password } # Create security group resource "tencentcloud_security_group" "default" { name = "tf-security-group" description = "make it accessible for both production and stage ports" } # Create security group rule allow ssh request resource "tencentcloud_security_group_lite_rule" "default" { security_group_id = tencentcloud_security_group.default.id ingress = [ "ACCEPT#0.0.0.0/0#22#TCP", "ACCEPT#0.0.0.0/0#6443#TCP", ] egress = [ "ACCEPT#0.0.0.0/0#ALL#ALL" ] } ``` tn2>再定义`k3s.tf`创建k8s的集群环境。 ```bash module "k3s" { source = "xunleii/k3s/module" k3s_version = "v1.28.11+k3s2" generate_ca_certificates = true drain_timeout = "30s" global_flags = [ "--tls-san ${tencentcloud_instance.web[0].public_ip}", "--write-kubeconfig-mode 644", "--disable=traefik", "--kube-controller-manager-arg bind-address=0.0.0.0", "--kube-proxy-arg metrics-bind-address=0.0.0.0", "--kube-scheduler-arg bind-address=0.0.0.0" ] k3s_install_env_vars = {} servers = { "k3s" = { ip = tencentcloud_instance.web[0].private_ip connection = { timeout = "60s" type = "ssh" host = tencentcloud_instance.web[0].public_ip password = var.password user = "ubuntu" } } } } # resource "local_sensitive_file" "kubeconfig" { # content = module.k3s.kube_config # filename = "${path.module}/config.yaml" # } resource "null_resource" "fetch_kubeconfig" { provisioner "remote-exec" { connection { type = "ssh" host = tencentcloud_instance.web[0].public_ip user = "ubuntu" password = var.password } inline = [ "mkdir -p ~/.ssh", "echo '${file("${path.module}/sshkey/key.pub")}' >> ~/.ssh/authorized_keys", "chmod 700 ~/.ssh", "chmod 600 ~/.ssh/authorized_keys", "sudo cp /etc/rancher/k3s/k3s.yaml /tmp/k3s.yaml", "sudo chown ubuntu:ubuntu /tmp/k3s.yaml", "sed -i 's/127.0.0.1/${tencentcloud_instance.web[0].public_ip}/g' /tmp/k3s.yaml" ] } depends_on = [module.k3s] } resource "null_resource" "download_k3s_yaml" { provisioner "local-exec" { command = "scp -i ${path.module}/sshkey/key -o StrictHostKeyChecking=no ubuntu@${tencentcloud_instance.web[0].public_ip}:/tmp/k3s.yaml ${path.module}/config.yaml" } depends_on = [null_resource.fetch_kubeconfig] } ``` tn2>创建`helm.tf`插件,并进行安装argocd。 ```bash resource "helm_release" "argo_cd" { depends_on = [module.k3s, null_resource.download_k3s_yaml] name = "argocd" repository = "https://argoproj.github.io/argo-helm" chart = "argo-cd" namespace = "argocd" create_namespace = true } ``` tn2>创建`outputs.tf`输出内容的定义。 ```bash output "public_ip" { description = "vm public ip" value = tencentcloud_instance.web[0].public_ip } output "kube_config" { description = "kubeconfig" value = "${path.module}/config.yaml" } output "password" { description = "vm ssh password" value = var.password } ``` tn2>创建`variables.tf`进行定义变量。 ```bash variable "secret_id" { default = "AKIDSlslQuBLHzVpxrkRu9A3pOvFOK4bv1uZ" } variable "secret_key" { default = "VmfMp6CD0aw50voUwBE4h7TebLrBHDyW" } variable "region" { default = "ap-guangzhou" } variable "password" { default = "86382516@qq.comHmy" } ``` tn2>创建`version.tf`进行定义依赖和版本。 ```bash terraform { required_version = "> 0.13.0" required_providers { tencentcloud = { source = "tencentcloudstack/tencentcloud" version = "1.81.5" } helm = { source = "hashicorp/helm" version = "~> 2.14" } } } provider "helm" { kubernetes { config_path = "${path.module}/config.yaml" } } ``` tn2>然后我们进行初始化。 并生成我们的依赖图。 ```bash terraform init ``` 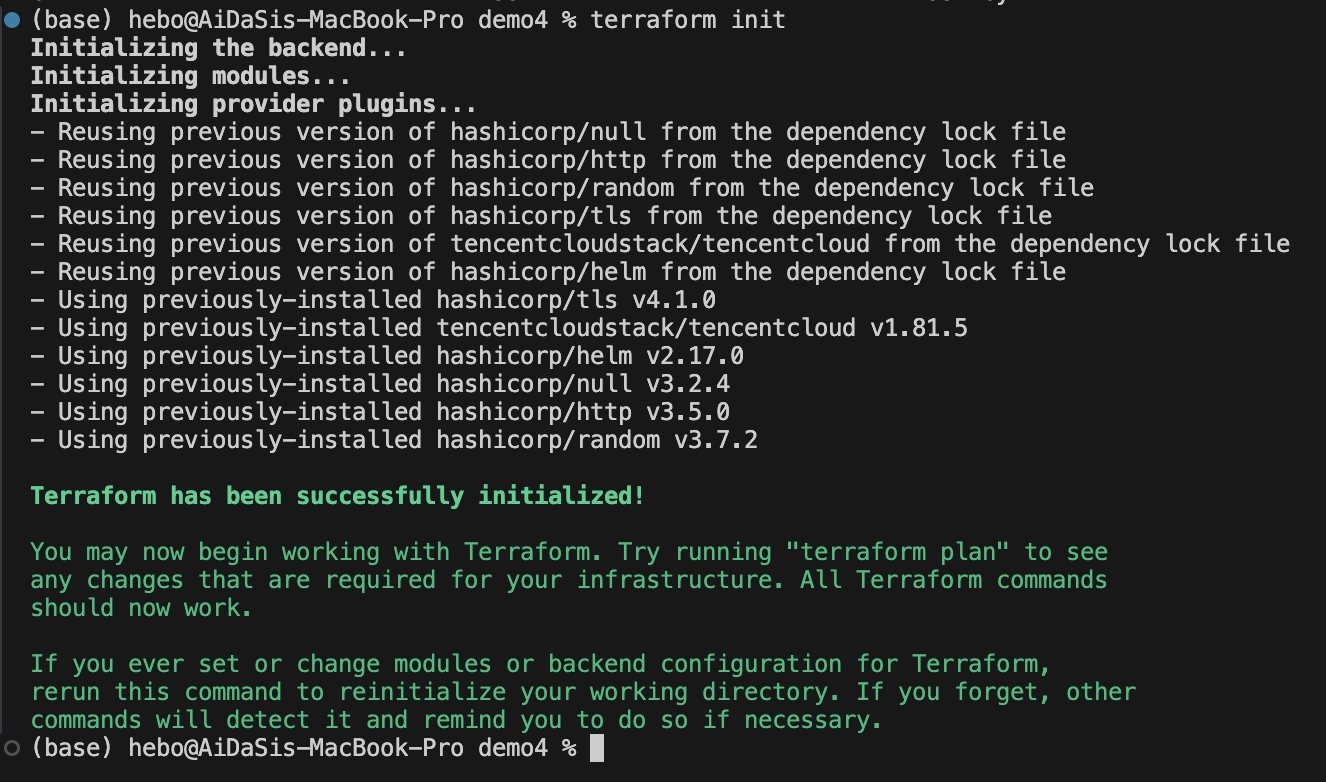 #### 表达式与函数  #### Meta Arguments(元参数) tn2>resource 块声明一个基础设施资源。 module 块引入其他模块。  #### depends_on tn2>Terraform 会根据引用自动生成资源的依赖关系图(DAG:有向无环图) 根据 DAG 来控制创建和销毁过程(有顺序) 可以通过 depends_on 显式指定依赖关系,控制创建和销毁顺序 可用 `terraform graph | dot -Tsvg > graph.svg` 生成依赖图(graphviz)   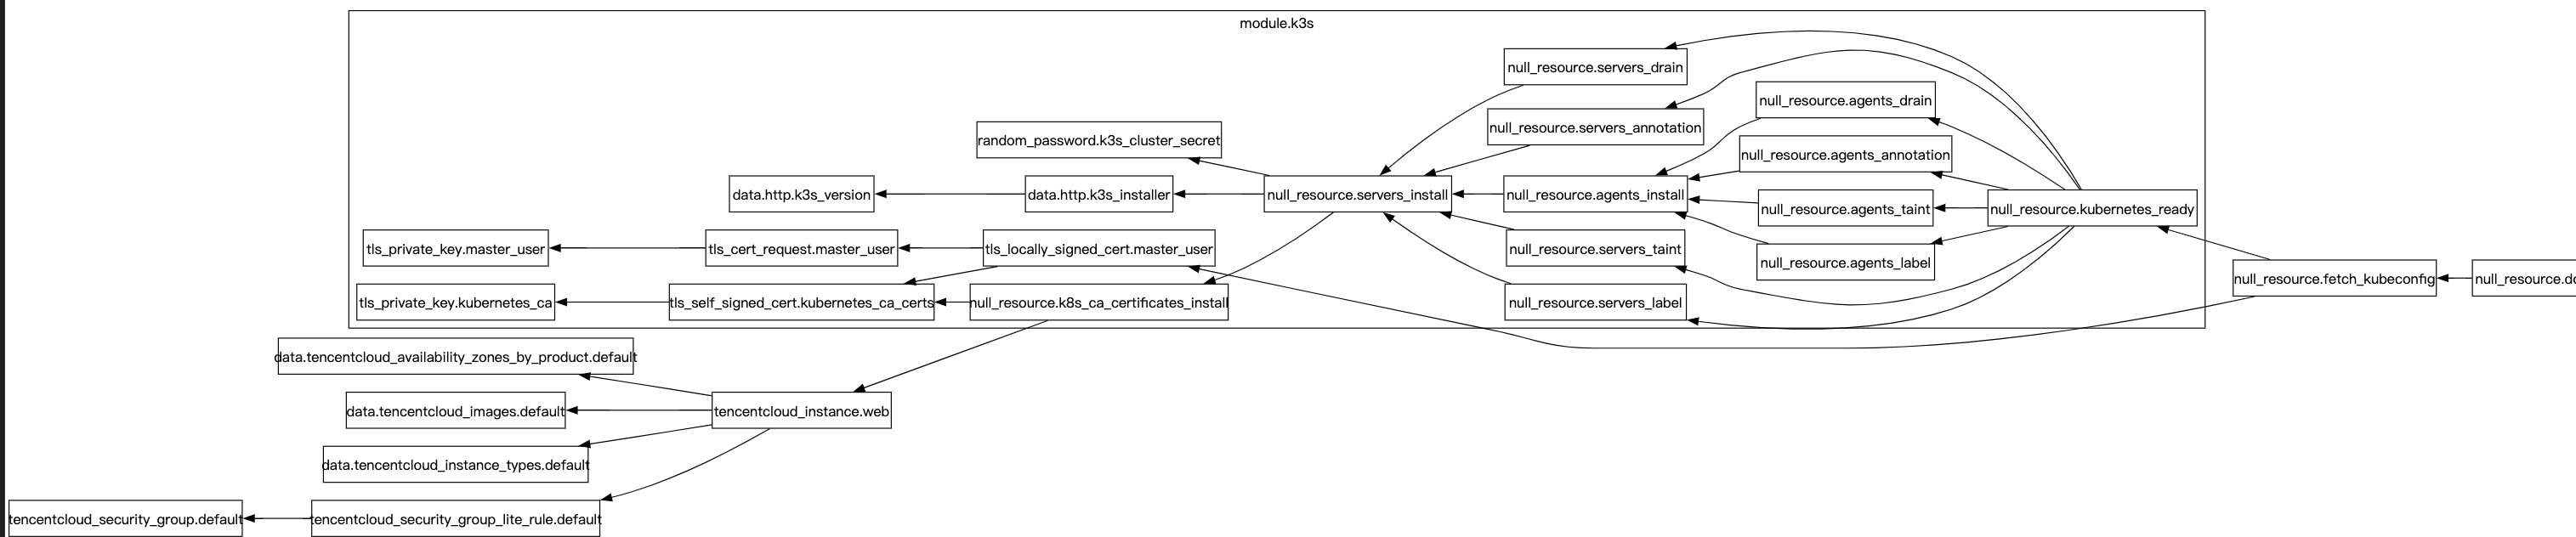 #### for_each tn2>在单个块中创建多个资源 比 count 实现更好的控制。 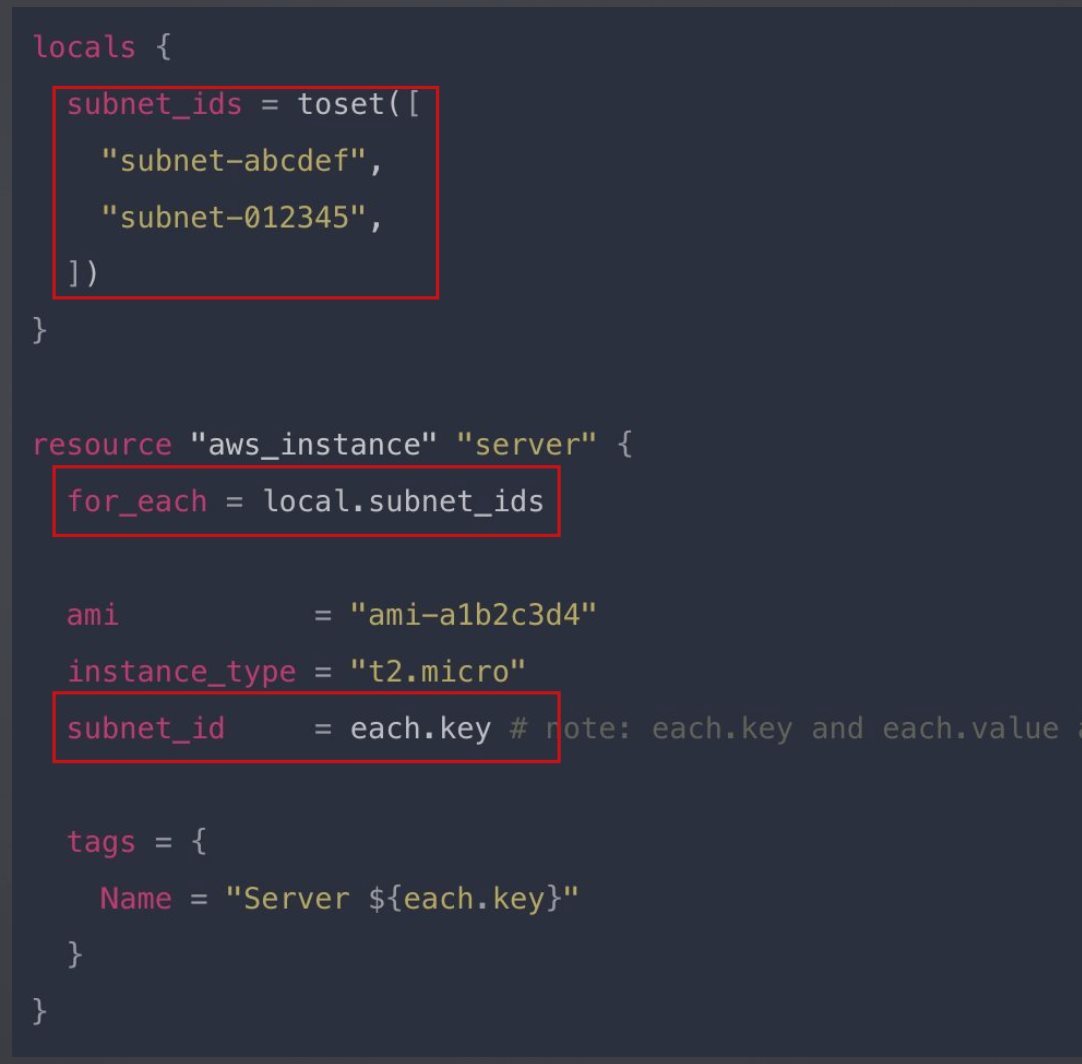 #### lifecycle | 属性 | 描述 | | ------------ | ------------ | | `create_before_destroy` | 在销毁资源前先进行创建,实现 0 停机 | | `prevent_destroy` | 阻止删除 | | `ignore_changes` | 忽略差异 | | `replace_triggered_by` | 当引用项目发生变化时候替换资源 | 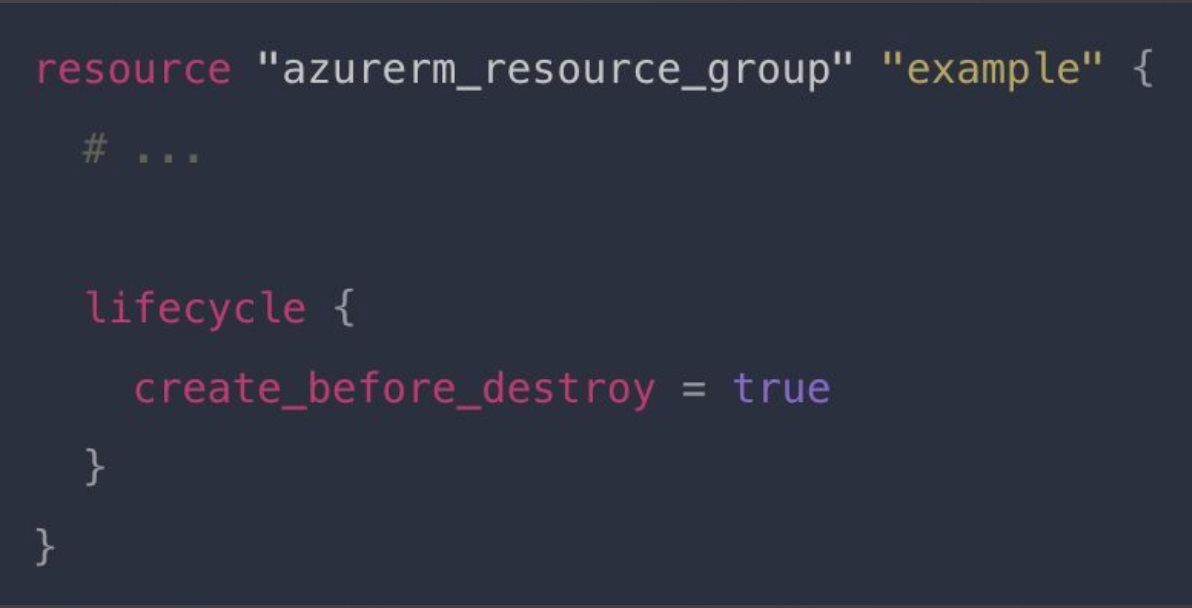 #### Provisioners 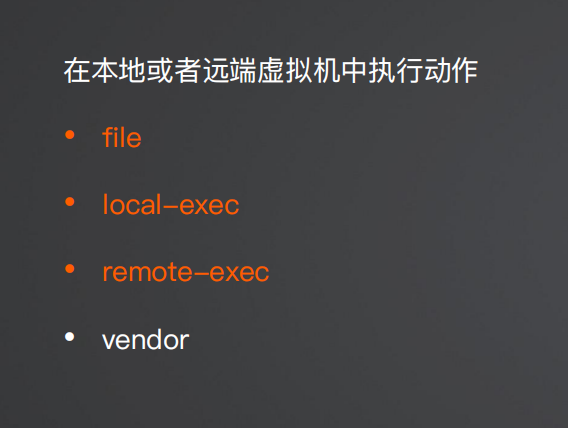 #### file 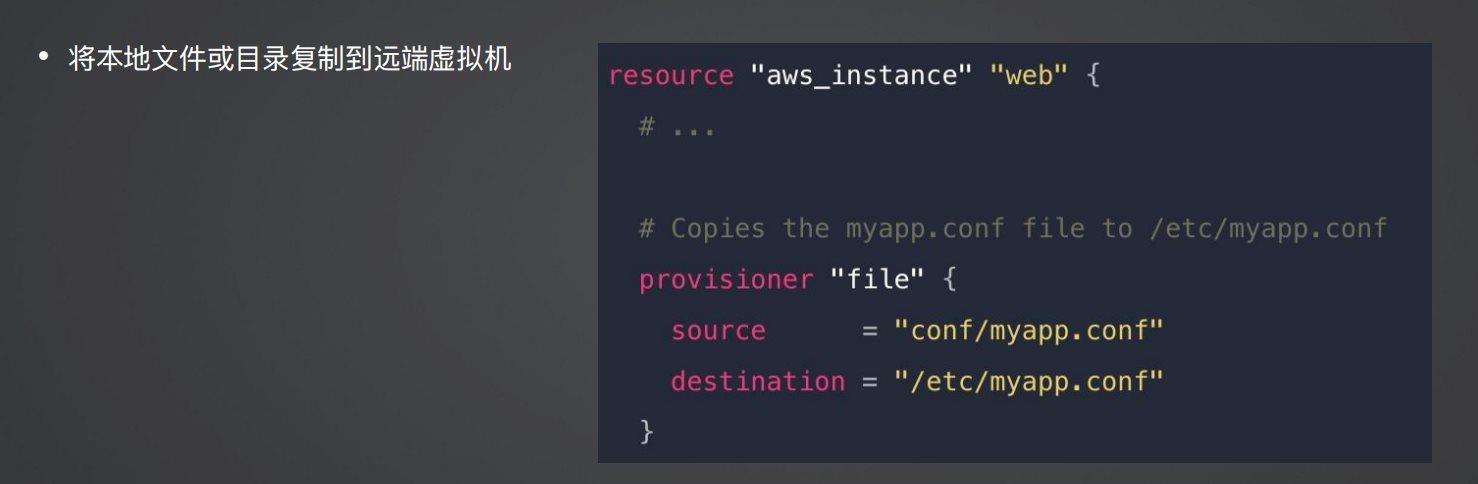 #### local-exec 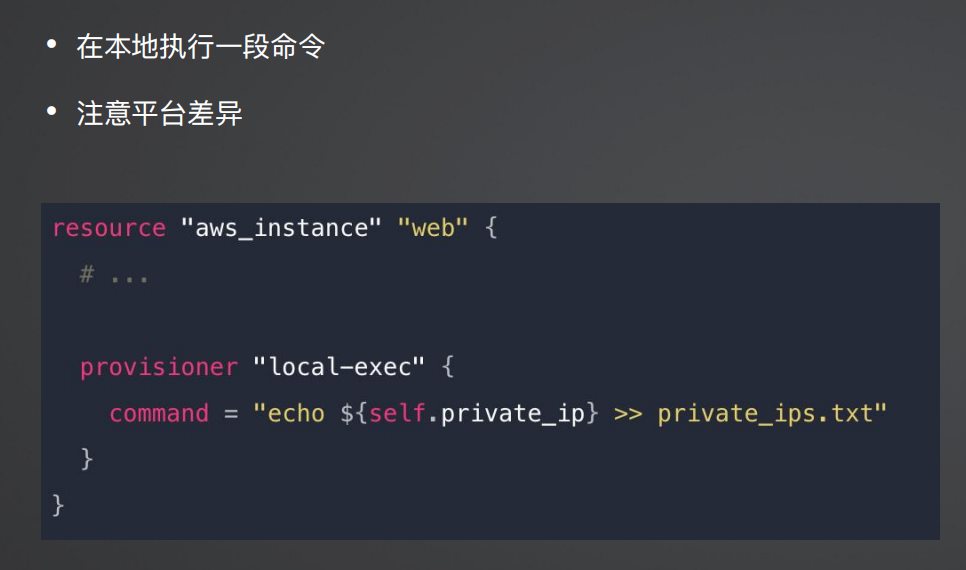 #### remote-exec  如何创建多环境基础设施 ------------ ### 方案一:使用目录区分 tn2>为不同的环境创建对应的目录。 本质上是区分state文件。 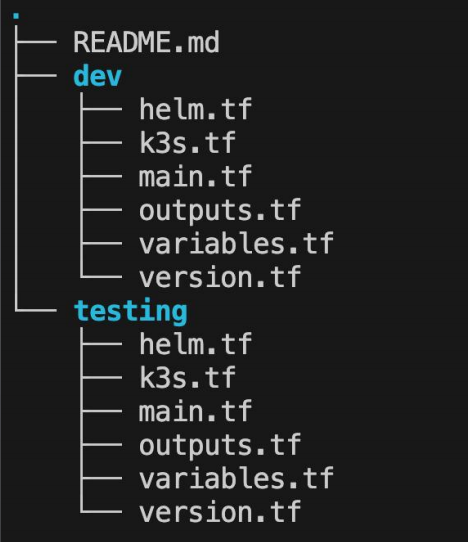 ### 方案二:使用Terraform Workspace 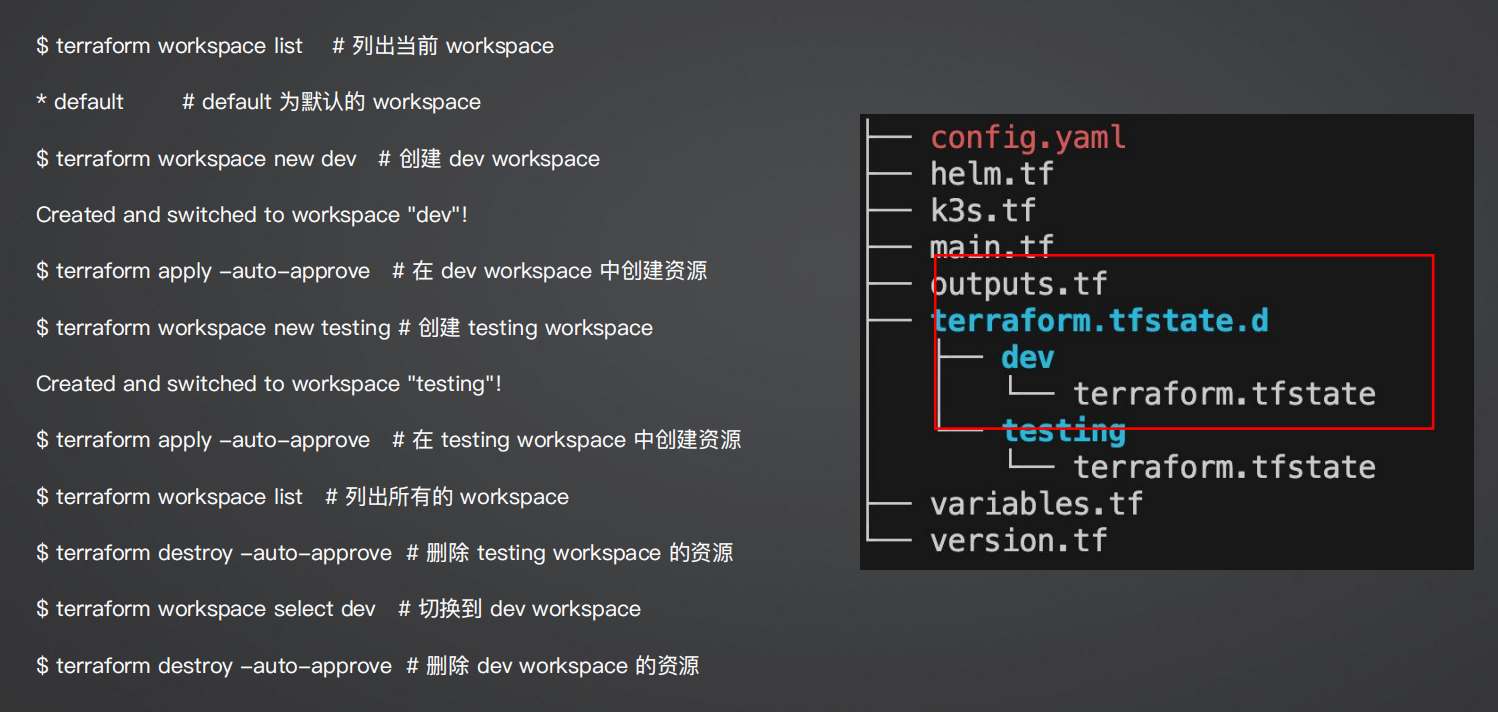 ### Workspace VS 目录隔离 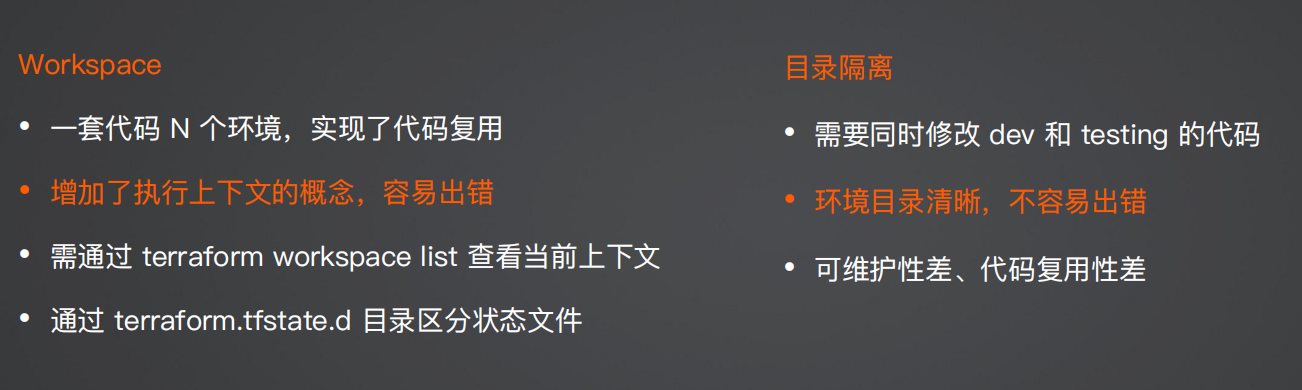 ### Module + 目录隔离 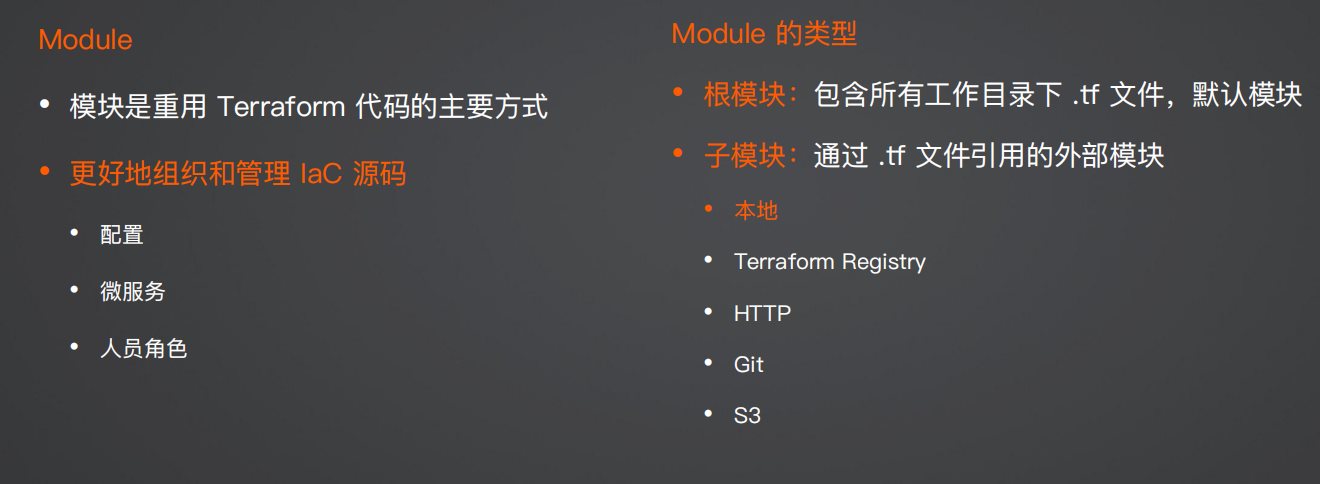 ### Module和代码结构 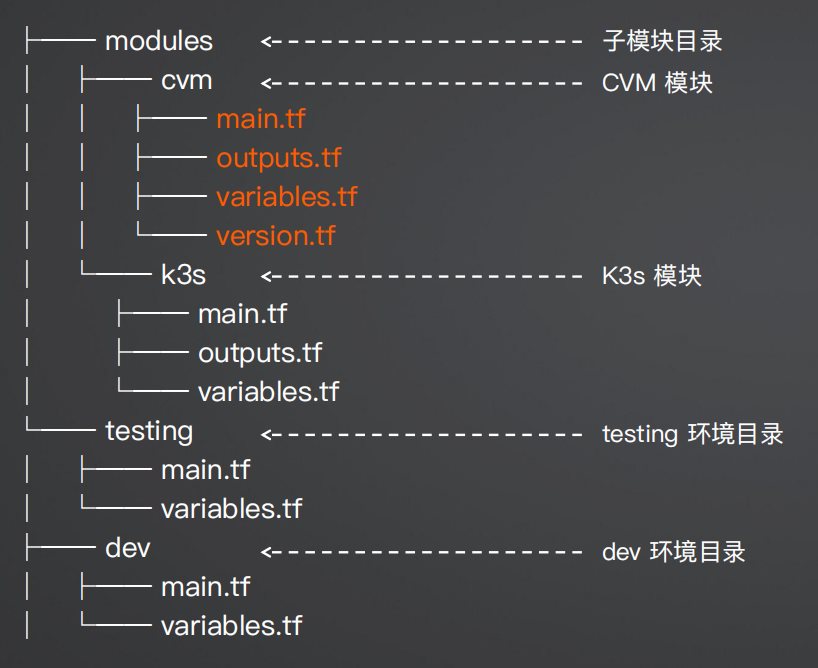 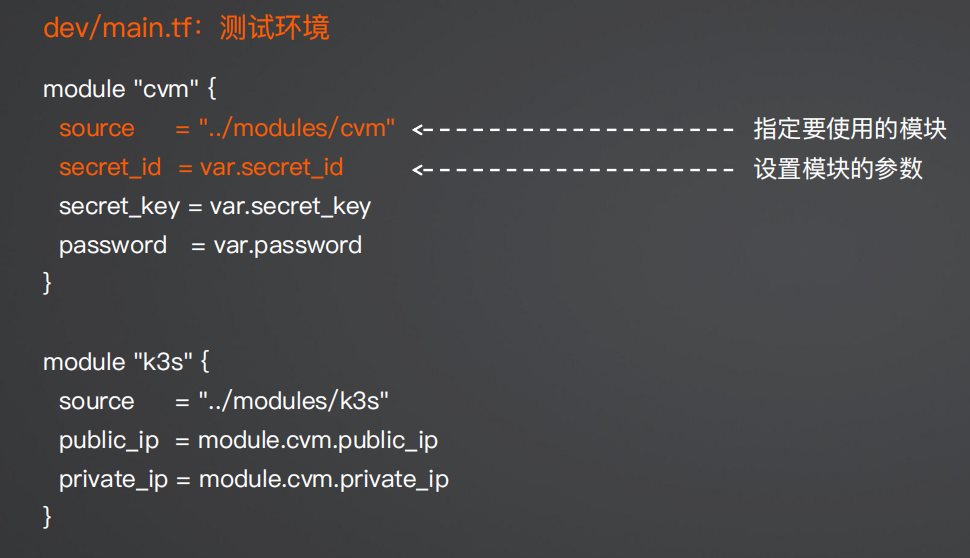 tn2>接下来我们进行实战演练一下,首先我们定义`cvm`和`k3s`的模块,目录如下所示:  tn2>首先我们来定义`cvm`模块中的`variables.tf`文件用于定义变量: ```bash variable "secret_id" { default = "你的secret_id" } variable "secret_key" { default = "你的secret_key" } variable "region" { default = "ap?singapore" } variable "password" { default = "你的密码" } ``` tn2>然后我们在`cvm`模块下创建版本和相关依赖的`version.tf`文件,代码如下: ```bash terraform { required_version = "> 0.13.0" required_providers { tencentcloud = { source = "tencentcloudstack/tencentcloud" version = "1.81.5" } } } ``` tn2>然后我们在`main.tf`中定义我们的基础设施的资源相关的代码: ```bash # Configure the TencentCloud Provider provider "tencentcloud" { region = var.region secret_id = var.secret_id secret_key = var.secret_key } # Get availability zones data "tencentcloud_availability_zones_by_product" "default" { product = "cvm" } # Get availability images data "tencentcloud_images" "default" { image_type = ["PUBLIC_IMAGE"] os_name = "ubuntu" } # Get availability instance types data "tencentcloud_instance_types" "default" { filter { name = "instance-family" values = ["SA5"] } cpu_core_count = 2 memory_size = 4 exclude_sold_out = true } # Create security group resource "tencentcloud_security_group" "default" { name = "tf-security-group" description = "make it accessible for both production and stage ports" } # Create security group rule allow ssh request resource "tencentcloud_security_group_lite_rule" "default" { security_group_id = tencentcloud_security_group.default.id ingress = [ "ACCEPT#0.0.0.0/0#22#TCP", "ACCEPT#0.0.0.0/0#6443#TCP", ] egress = [ "ACCEPT#0.0.0.0/0#ALL#ALL" ] } # Create a web server resource "tencentcloud_instance" "web" { depends_on = [tencentcloud_security_group_lite_rule.default] count = 1 instance_name = "web server" availability_zone = data.tencentcloud_availability_zones_by_product.default.zones.0.name image_id = data.tencentcloud_images.default.images.0.image_id instance_type = data.tencentcloud_instance_types.default.instance_types.0.instance_type system_disk_type = "CLOUD_BSSD" system_disk_size = 50 allocate_public_ip = true internet_max_bandwidth_out = 100 instance_charge_type = "SPOTPAID" orderly_security_groups = [tencentcloud_security_group.default.id] password = var.password } ``` tn2>然后我们定义一下`output.tf`,这里我们只输出一下IP就好了。 ```bash output "public_ip" { description = "vm public ip address" value = tencentcloud_instance.web[0].public_ip } output "private_ip" { description = "vm private ip address" value = tencentcloud_instance.web[0].private_ip } ``` tn2>接下来我们来定义`k3s`模块,大致文件与上面类似我这儿直接贴代码好了。 `variables.tf` ```bash variable "password" { default = "你的密码" } variable "public_ip" {} variable "private_ip" {} ``` tn2>`output.tf` ```bash output "kube_config" { value = module.k3s.kube_config } output "kubernetes" { value = module.k3s.kubernetes } ``` tn2>`main.tf` ```bash module "k3s" { source = "xunleii/k3s/module" k3s_version = "v1.28.11+k3s2" generate_ca_certificates = true global_flags = [ "--tls-san ${var.public_ip}", "--write-kubeconfig-mode 644", "--disable=traefik", "--kube-controller-manager-arg bind-address=0.0.0.0", "--kube-proxy-arg metrics-bind-address=0.0.0.0", "--kube-scheduler-arg bind-address=0.0.0.0" ] k3s_install_env_vars = {} servers = { "k3s" = { ip = var.private_ip connection = { timeout = "60s" type = "ssh" host = var.public_ip password = var.password user = "ubuntu" } } } } ``` tn2>接下来我们定义dev的环境,首先我们定义我们的变量`variables.tf`文件。 ```bash variable "secret_id" { default = "你的secret_id" } variable "secret_key" { default = "你的secret_key" } variable "region" { default = "ap-singapore" } variable "password" { default = "你的密码" } ``` tn2>然后我们定义`main.tf`定义需要调用哪些模块。 ```bash module "cvm" { source = "../modules/cvm" secret_id = var.secret_id secret_key = var.secret_key password = var.password region = var.region } module "k3s" { source = "../modules/k3s" public_ip = module.cvm.public_ip private_ip = module.cvm.private_ip } resource "local_sensitive_file" "kubeconfig" { content = module.k3s.kube_config filename = "${path.module}/config.yaml" } ``` tn2>然后我们进行初始化Terraform,并进行apply。 ```bash terraform init terraform apply -auto-approve ```  tn2>然后我们在云上查看一下是否进行了创建,我们发现已经创建成功了。 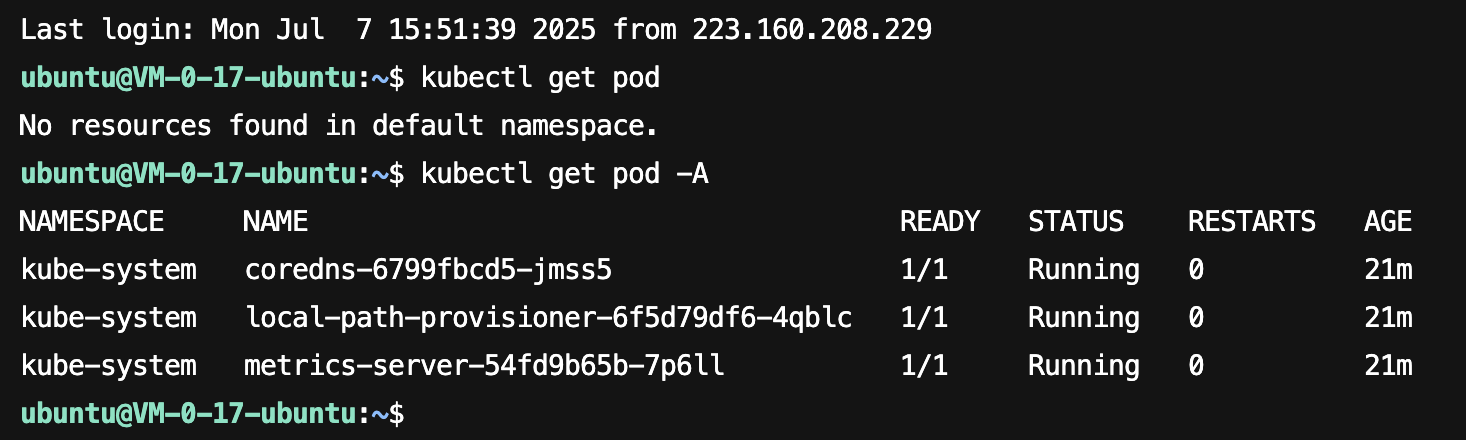 tn2>并且在我们本地创建了`config.yaml`,我们可以通过命令使用`config.yaml`进行访问集群。 ```bash kubectl --kubeconfig=config.yaml get pods -A ```  ### Model抽象原则 tn2>以产品或者功能拆分为模块。 为模块设置必要的入参和逻辑条件判断。 为模块的输入提供有用的输入值。 设置输出,便于和其他模块进一步集成。 借助Crossplane自建Paas平台 ------------  ### Crossplane IaC工具介绍 tn2>Crossplane 就像是一个“会写代码的云管理员”,而且是“住”在 Kubernetes 里的管理员。 它的主要功能就是: 通过 Kubernetes 的方式,来管理云资源,比如说在 AWS 创建数据库、在 Azure 创建虚拟机、在 GCP 部署网络等等。 | 特点 | | ------------ | | k8s控制器,CRD方式定义资源 | | 无需代码,声明式API | | 基础设施控制平面 | | 多云和混合云 | | 在k8s里运行Terraform | ### Crossplane 工作原理 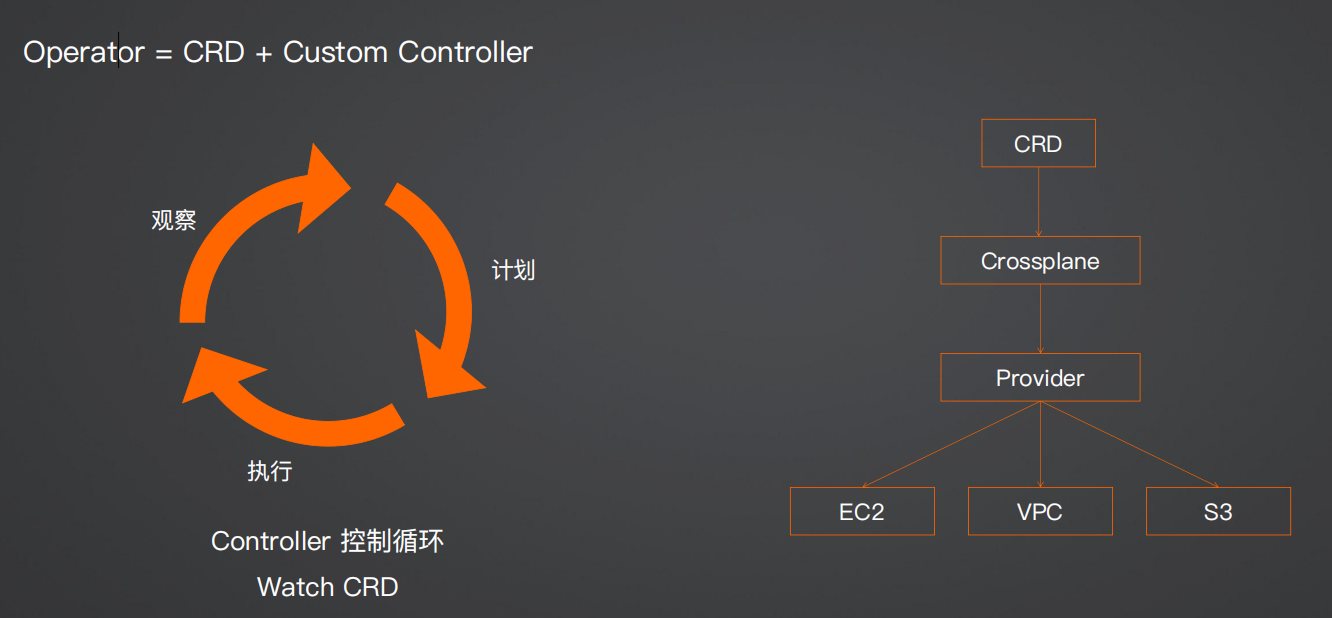 ### CRD和云厂商资源 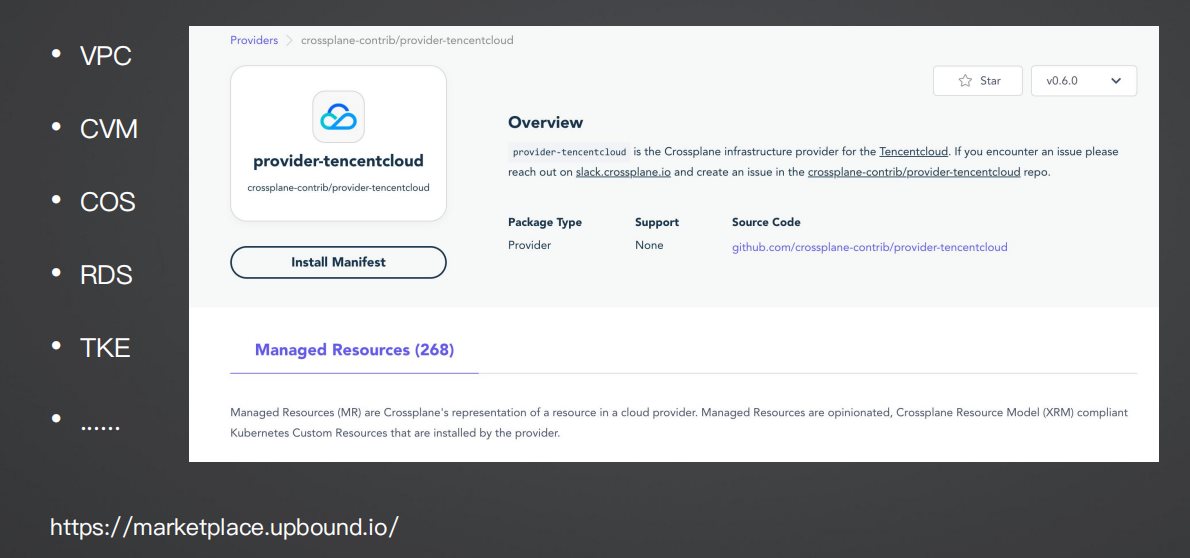 ### Demo6:以创建CVM为例子 tn2>`cvm.tf` ```bash # Configure the TencentCloud Provider provider "tencentcloud" { region = var.region secret_id = var.secret_id secret_key = var.secret_key } # Get availability zones data "tencentcloud_availability_zones_by_product" "default" { product = "cvm" } # Get availability images data "tencentcloud_images" "default" { image_type = ["PUBLIC_IMAGE"] os_name = "ubuntu" } # Get availability instance types data "tencentcloud_instance_types" "default" { # 机型族 filter { name = "instance-family" values = ["SA5"] } cpu_core_count = 2 memory_size = 4 exclude_sold_out = true } # Create a web server resource "tencentcloud_instance" "web" { depends_on = [tencentcloud_security_group_lite_rule.default] count = 1 instance_name = "web server" availability_zone = data.tencentcloud_availability_zones_by_product.default.zones.0.name image_id = data.tencentcloud_images.default.images.0.image_id instance_type = data.tencentcloud_instance_types.default.instance_types.0.instance_type system_disk_type = "CLOUD_BSSD" system_disk_size = 50 allocate_public_ip = true internet_max_bandwidth_out = 100 instance_charge_type = "SPOTPAID" orderly_security_groups = [tencentcloud_security_group.default.id] password = var.password } # Create security group resource "tencentcloud_security_group" "default" { name = "tf-security-group" description = "make it accessible for both production and stage ports" } # Create security group rule allow ssh request resource "tencentcloud_security_group_lite_rule" "default" { security_group_id = tencentcloud_security_group.default.id ingress = [ "ACCEPT#0.0.0.0/0#22#TCP", "ACCEPT#0.0.0.0/0#6443#TCP", "ACCEPT#0.0.0.0/0#ALL#ALL" ] egress = [ "ACCEPT#0.0.0.0/0#ALL#ALL" ] } ``` tn2>`helm.tf`定义创建我们的`crossplane`。 ```bash resource "helm_release" "crossplane" { depends_on = [module.k3s, null_resource.download_k3s_yaml] name = "crossplane" repository = "https://charts.crossplane.io/stable" chart = "crossplane" namespace = "crossplane-system" create_namespace = true } ``` tn2>`k3s.tf`创建集群。 ```bash module "k3s" { source = "xunleii/k3s/module" k3s_version = "v1.28.11+k3s2" generate_ca_certificates = true drain_timeout = "90s" global_flags = [ "--tls-san ${tencentcloud_instance.web[0].public_ip}", "--write-kubeconfig-mode 644", "--disable=traefik", "--kube-controller-manager-arg bind-address=0.0.0.0", "--kube-proxy-arg metrics-bind-address=0.0.0.0", "--kube-scheduler-arg bind-address=0.0.0.0" ] k3s_install_env_vars = {} servers = { "k3s" = { ip = tencentcloud_instance.web[0].private_ip connection = { timeout = "60s" type = "ssh" host = tencentcloud_instance.web[0].public_ip password = var.password user = "ubuntu" } } } } # resource "local_sensitive_file" "kubeconfig" { # content = module.k3s.kube_config # filename = "${path.module}/config.yaml" # } resource "null_resource" "fetch_kubeconfig" { provisioner "remote-exec" { connection { type = "ssh" host = tencentcloud_instance.web[0].public_ip user = "ubuntu" password = var.password } inline = [ "mkdir -p ~/.ssh", "echo '${file("${path.module}/sshkey/key.pub")}' >> ~/.ssh/authorized_keys", "chmod 700 ~/.ssh", "chmod 600 ~/.ssh/authorized_keys", "sudo cp /etc/rancher/k3s/k3s.yaml /tmp/k3s.yaml", "sudo chown ubuntu:ubuntu /tmp/k3s.yaml", "sed -i 's/127.0.0.1/${tencentcloud_instance.web[0].public_ip}/g' /tmp/k3s.yaml" ] } depends_on = [module.k3s] } resource "null_resource" "download_k3s_yaml" { provisioner "local-exec" { command = "scp -i ${path.module}/sshkey/key -o StrictHostKeyChecking=no ubuntu@${tencentcloud_instance.web[0].public_ip}:/tmp/k3s.yaml ${path.module}/config.yaml" } depends_on = [null_resource.fetch_kubeconfig] } ``` tn2>创建输出`output.tf`。 ```bash output "public_ip" { description = "vm public ip address" value = tencentcloud_instance.web[0].public_ip } output "kube_config" { description = "kubeconfig" value = "${path.module}/config.yaml" } output "password" { description = "vm password" value = var.password } output "selected_region" { value = var.region } ``` tn2>`variables.tf` ```bash variable "secret_id" { default = "你的secret_id" } variable "secret_key" { default = "你的secret_key" } variable "region" { default = "ap-singapore" } variable "password" { default = "你的密码" } ``` tn2>`version.tf` ```bash terraform { required_version = "> 0.13.0" required_providers { tencentcloud = { source = "tencentcloudstack/tencentcloud" version = "1.81.5" } helm = { source = "hashicorp/helm" version = "~> 2.11" } } } provider "helm" { kubernetes { config_path = "${path.module}/config.yaml" } } ``` tn2>然后我们开始初始化并开始创建相关资源。 ```bash terraform init terraform apply -auto-approve ``` 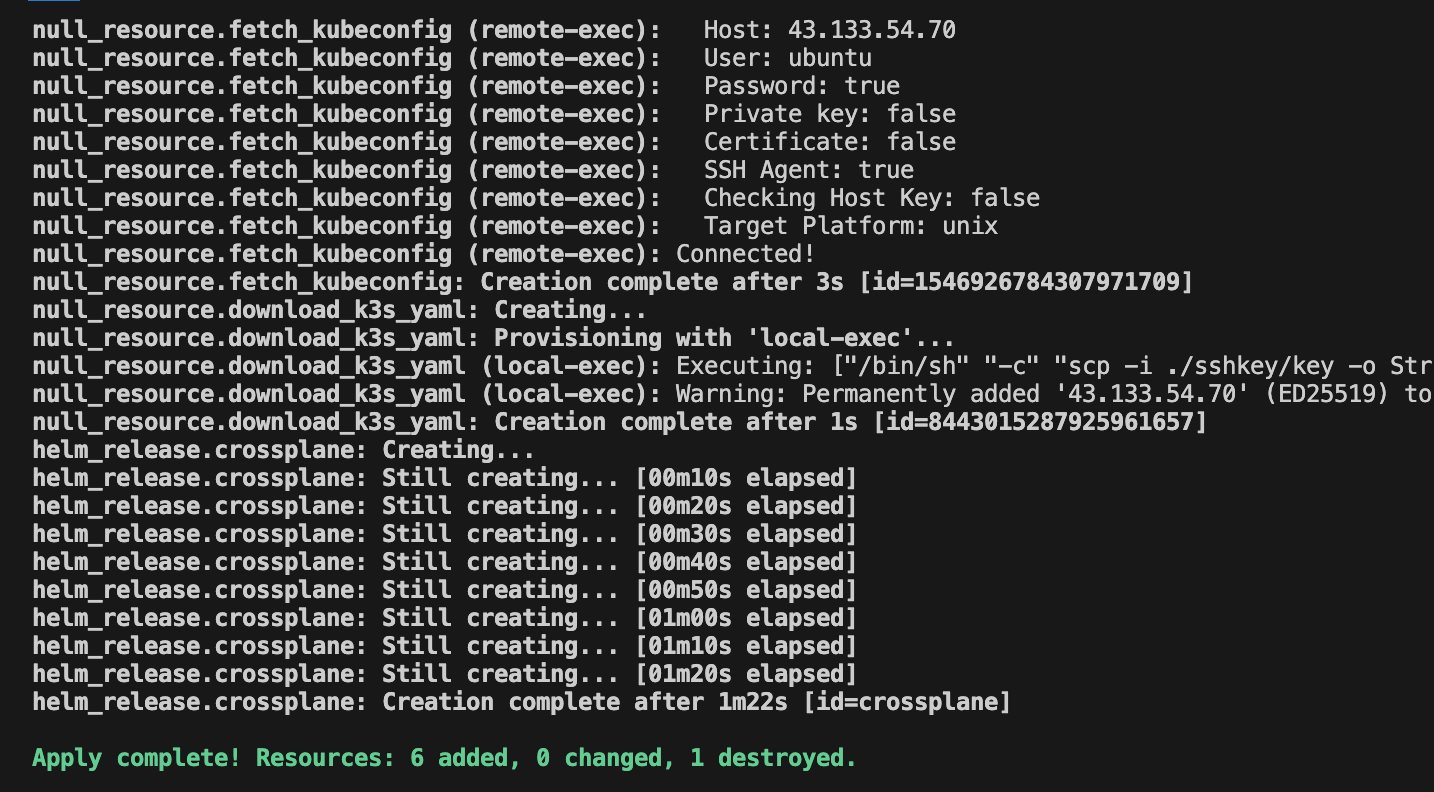 tn2>创建成功了并创建了`config.yaml`文件。 接着我们设置一下Kubeconfig。 ```bash export KUBECONFIG="$(pwd)/config.yaml" kubectl get pod -A ``` 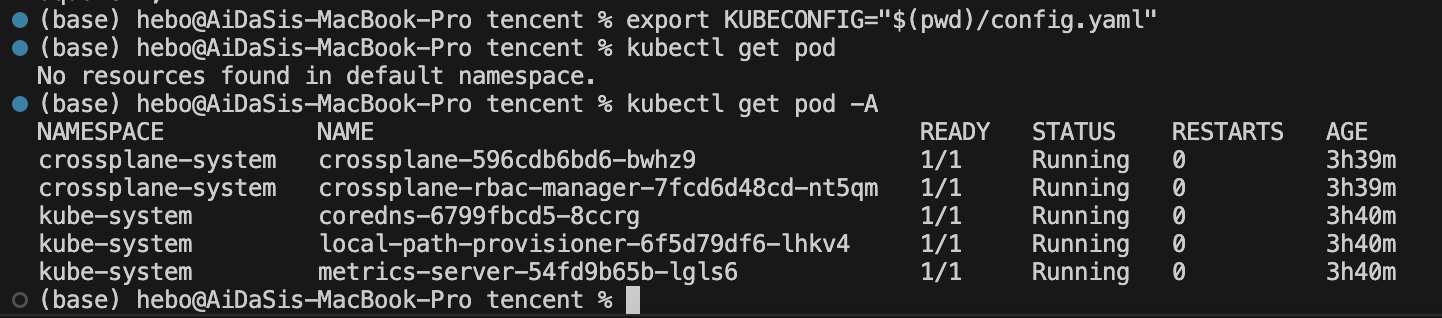 tn2>接着我们创建 Crossplane 的`tencentcloud`provider资源。 `provider.yaml` ```yaml apiVersion: pkg.crossplane.io/v1 kind: Provider metadata: name: provider-tencentcloud spec: package: xpkg.upbound.io/crossplane-contrib/provider-tencentcloud:v0.8.3 ``` tn2>定义相关的配置文件。 `providerConfig.yaml` ```yaml apiVersion: tencentcloud.crossplane.io/v1alpha1 kind: ProviderConfig metadata: name: default spec: credentials: secretRef: key: credentials name: example-creds namespace: crossplane-system source: Secret ``` tn2>定义相关的`secret.yaml`配置,区域我选择香港方便外网访问。 ```yaml apiVersion: v1 kind: Secret metadata: name: example-creds namespace: crossplane-system type: Opaque stringData: credentials: | { "secret_id": "AKIDSlslQuBLHzVpxrkRu9A3pOvFOK4bv1uZ", "secret_key": "VmfMp6CD0aw50voUwBE4h7TebLrBHDyW", "region": "ap-hongkong" } ``` tn2>执行下面的命令来创建相关资源。 ```bash kubectl apply -f provider.yaml kubectl apply -f providerConfig.yaml kubectl apply -f secret.yaml ``` 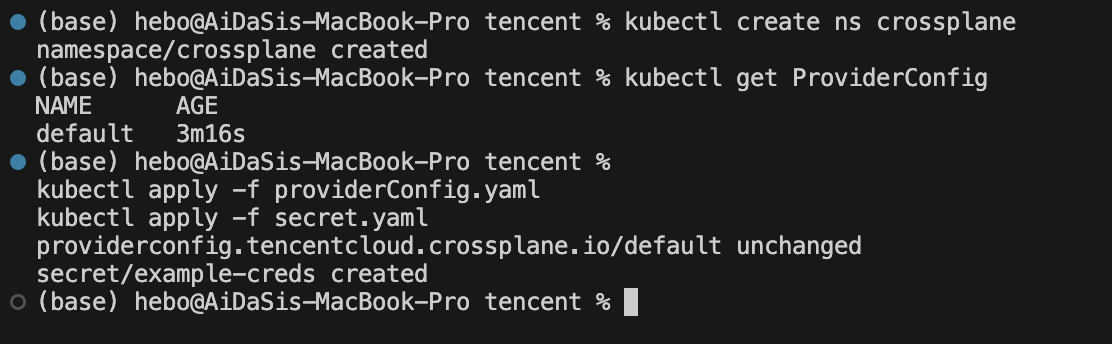 tn2>接着我们定义一下我们的cvm可以参考下面的官方文档:https://marketplace.upbound.io/providers/crossplane-contrib/provider-tencentcloud/v0.8.6 首先创建一个`cvm`的文件夹,分别定义一下`cvm.yaml`主机、`subnet.yaml`子网以及`vpc.yaml`VPC私有云。 ```yaml apiVersion: cvm.tencentcloud.crossplane.io/v1alpha1 kind: Instance metadata: name: example-cvm spec: forProvider: instanceName: "test-crossplane-cvm" availabilityZone: "ap-hongkong-2" instanceChargeType: "SPOTPAID" imageId: "img-487zeit5" instanceType: "SA5.MEDIUM4" systemDiskType: "CLOUD_BSSD" vpcIdRef: name: "example-cvm-vpc" subnetIdRef: name: "example-cvm-subnet" ``` ```yaml apiVersion: vpc.tencentcloud.crossplane.io/v1alpha1 kind: Subnet metadata: name: example-cvm-subnet spec: forProvider: availabilityZone: "ap-hongkong-2" cidrBlock: "10.2.2.0/24" name: "test-crossplane-cvm-subnet" vpcIdRef: name: "example-cvm-vpc" ``` ```yaml apiVersion: vpc.tencentcloud.crossplane.io/v1alpha1 kind: VPC metadata: name: example-cvm-vpc spec: forProvider: cidrBlock: "10.2.0.0/16" name: "test-crossplane-cvm-vpc" ``` tn2>接着我们来创建资源,这里我是在它们的上一级进行创建,目录结构如下: 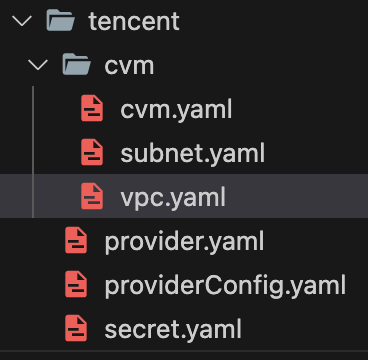 ```yaml kubectl apply -f cvm ``` 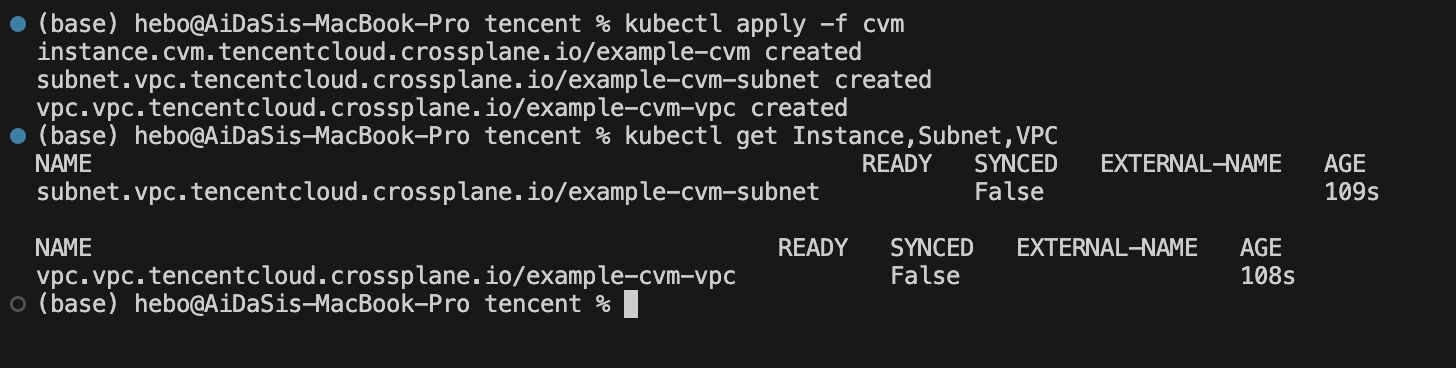 tn2>等了一小会终于成功了。 ```bash kubectl get instance.cvm.tencentcloud.crossplane.io,Subnet,VPC ```  tn2>接着我们来腾讯云上面查看服务器。 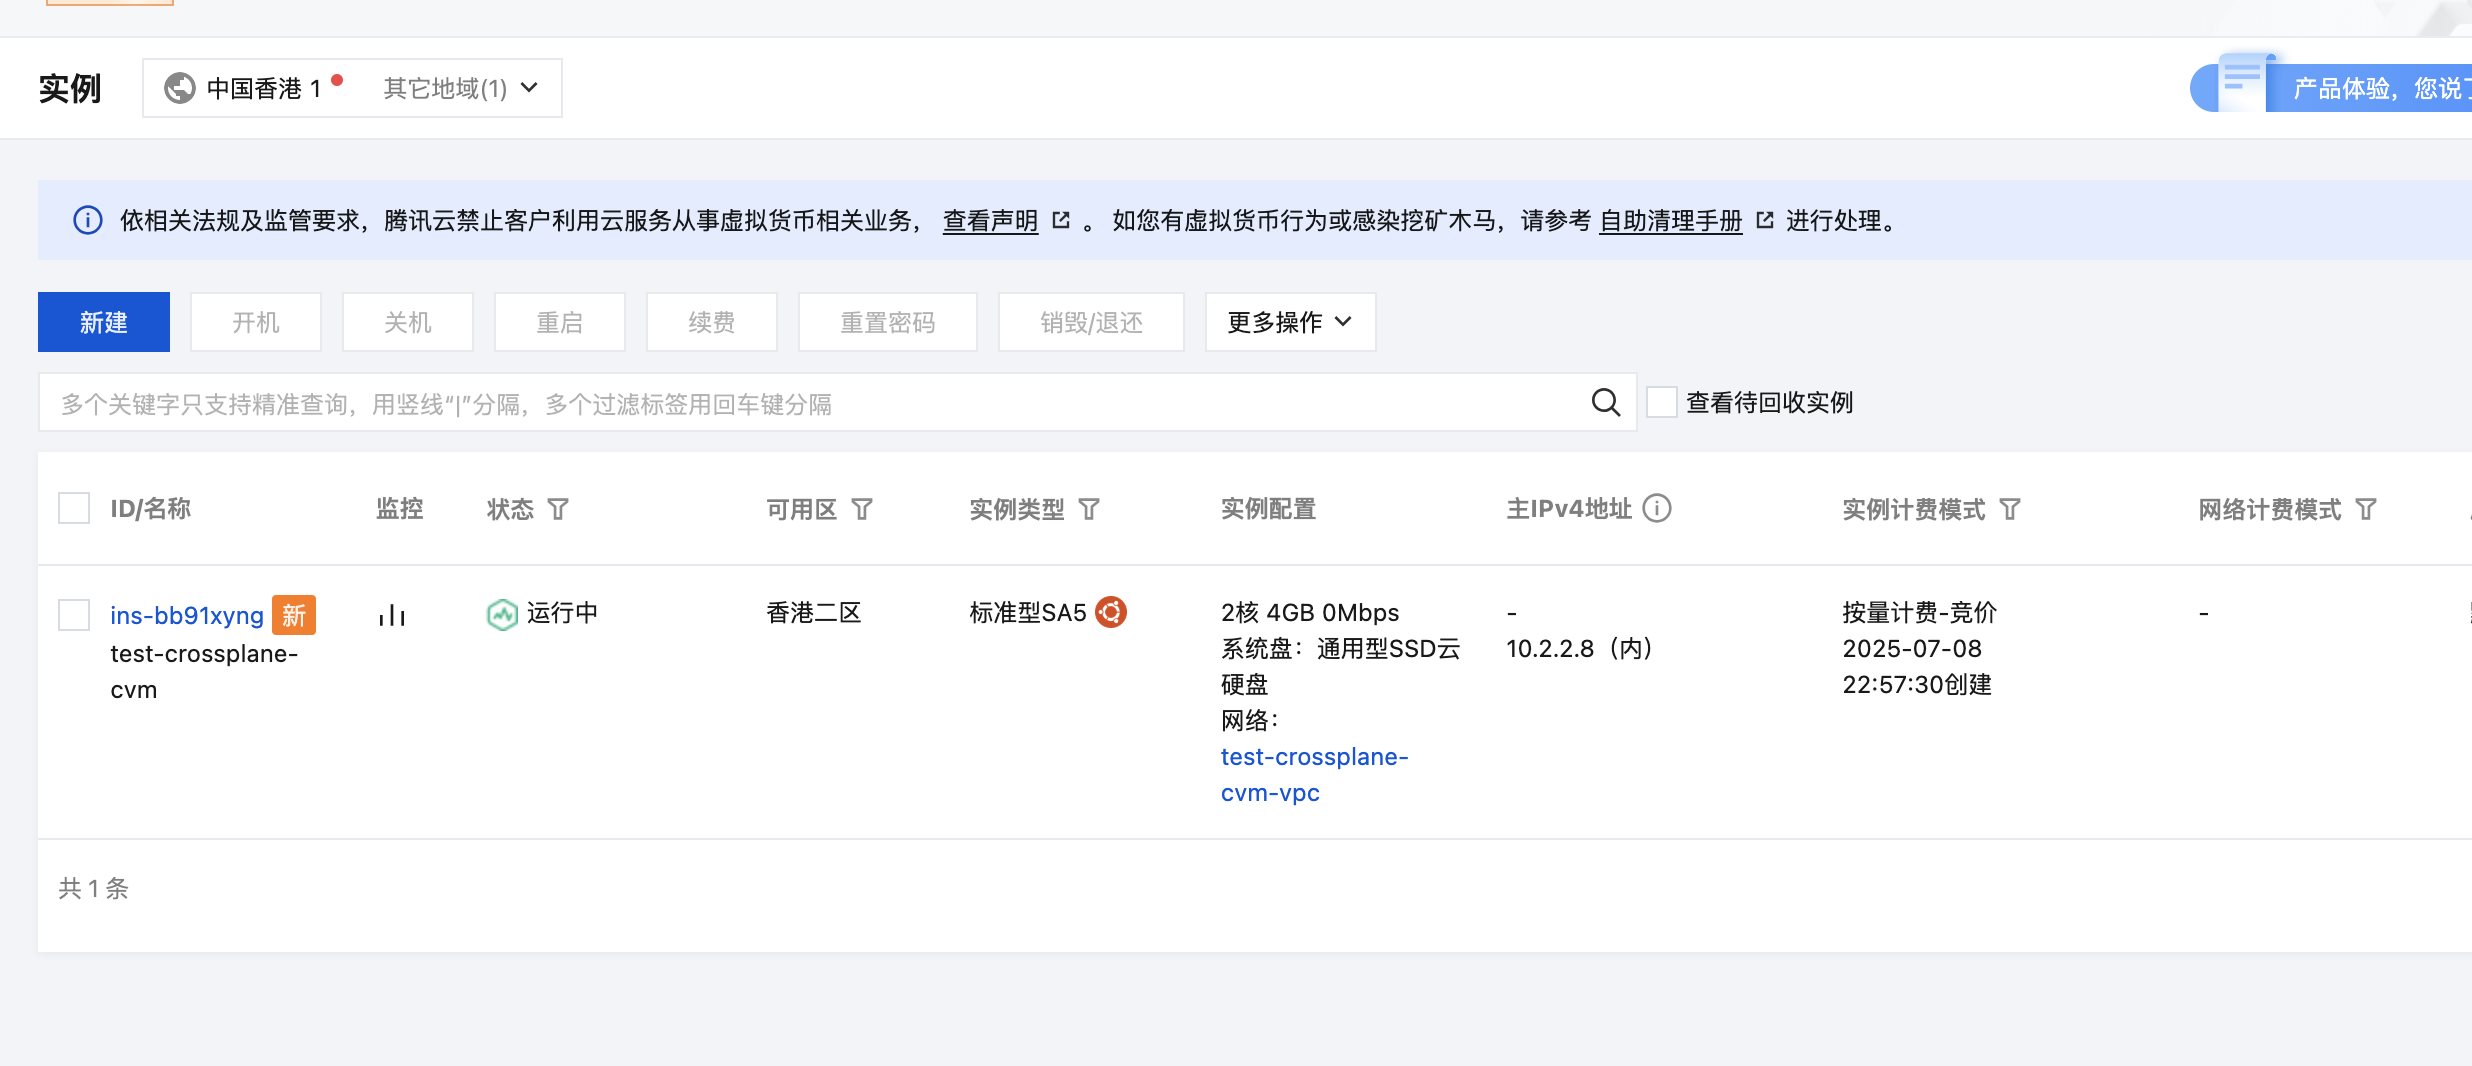 tn2>创建成功。

