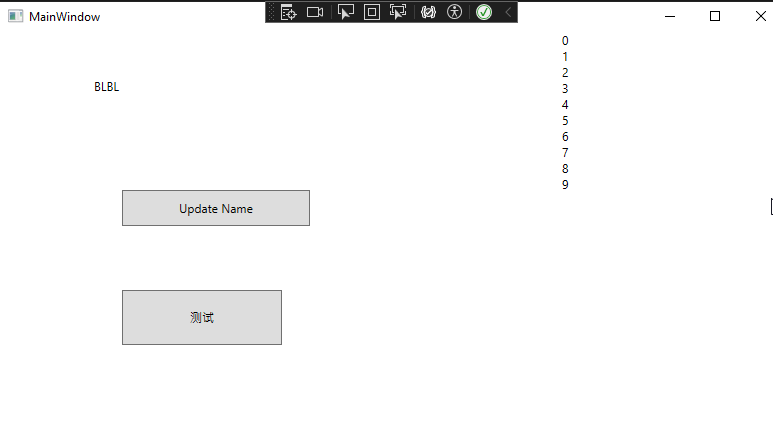
WPF MvvmLight Messager学习 电脑版发表于:2025/4/17 11:35  ># WPF MvvmLight Messager学习 [TOC] NotificationMessage ------------ tn2>在 MVVM Light 中,NotificationMessage 是一种消息类型,用于在 ViewModel 和 View 之间传递简单的通知消息。 以下是一个使用 NotificationMessage 的示例,展示如何在 ViewModel 中发送消息并在 View 中接收和处理这些消息 ### 示例:使用 NotificationMessage 传递通知消息 tn2>1.在 MainViewModel 中,我们发送一个 NotificationMessage 消息。 ```csharp public class MainViewModel : ViewModelBase { public MainViewModel() { UpdateNameCommand = new RelayCommand(UpdateName); } private string _name; public string Name { get => _name; set => Set(ref _name, value); } public RelayCommand UpdateNameCommand { get; } private void UpdateName() { //发送消息给View端 Messenger.Default.Send(new NotificationMessage("Hello NotificationMessage, MVVM Light!")); } } ``` tn>注意这里有在ViewModelLocator中注册。 tn2>在 MainWindow.xaml中修改以下代码,创建一个按钮`Update Name`以及一个`CC`的文本框。 ```csharp <Window x:Class="WpfLearningMvvmlightApp.MainWindow" xmlns="http://schemas.microsoft.com/winfx/2006/xaml/presentation" xmlns:x="http://schemas.microsoft.com/winfx/2006/xaml" xmlns:d="http://schemas.microsoft.com/expression/blend/2008" xmlns:mc="http://schemas.openxmlformats.org/markup-compatibility/2006" xmlns:local="clr-namespace:WpfLearningMvvmlightApp" mc:Ignorable="d" DataContext="{Binding Source={StaticResource Locator},Path=Main}" Title="MainWindow" Height="450" Width="800"> <Grid Loaded="Grid_Loaded"> <TextBlock Name="CC" Text="{Binding Name}" Margin="94,46,366,311" /> <Button Content="Update Name" Command="{Binding UpdateNameCommand}" Margin="122,158,474,217" /> <Button Content="测试" HorizontalAlignment="Left" Margin="453,185,0,0" VerticalAlignment="Top" Height="55" Width="160" Click="Button_Click_1"/> </Grid> </Window> ``` tn2>我们将注册通知消息,当我们收到通知时改变一下CC文本框的值 ```csharp public partial class MainWindow : Window { public MainWindow() { InitializeComponent(); Messenger.Default.Register<NotificationMessage>(this, (message) => { this.CC.Text = message.Notification; }); } private void Grid_Loaded(object sender, RoutedEventArgs e) { } private void Button_Click_1(object sender, RoutedEventArgs e) { new SubWindow().Show(); } } ``` tn2>当点击Update Name按钮的时候我们发现值被改变了。   NotificationMessageAction ------------ tn2>在 MVVM Light 中,NotificationMessageAction 是一种消息类型,用于在 ViewModel 和 View 之间传递通知消息,并可以接收一个回调结果。 以下是一个使用 NotificationMessageAction 的示例,展示如何在 ViewModel 中发送消息并在 View 中接收和处理这些消息。 ### 使用 NotificationMessageAction 传递通知消息 tn2>在 MainViewModel 中,我们发送一个 NotificationMessageAction 消息,并定义一个回调方法来处理消息的响应。 ```csharp private void UpdateName() { //Name = "Hello, MVVM Light!"; //发送消息给View端 //Messenger.Default.Send(new NotificationMessage("Hello NotificationMessage, MVVM Light!")); // 创建一个 NotificationMessageAction 并发送 NotificationMessageAction<MessageBoxResult> message = new NotificationMessageAction<MessageBoxResult>( "这是一个通知消息", // 消息内容 (result) => HandleNotificationResult(result) // 回调方法 ); Messenger.Default.Send(message); } private void HandleNotificationResult(MessageBoxResult result) { // 处理回调结果 if (result == MessageBoxResult.OK) { Debug.WriteLine("Click OK!"); } else if (result == MessageBoxResult.Cancel) { Debug.WriteLine("Click Cancel!"); } } ``` tn2>在 MainWindow 中,我们注册 NotificationMessageAction 消息,并定义一个方法来处理消息。 ```csharp public MainWindow() { InitializeComponent(); //Messenger.Default.Register<NotificationMessage>(this, (message) => //{ // this.CC.Text = message.Notification; //}); // 注册 NotificationMessageAction 消息 Messenger.Default.Register<NotificationMessageAction<MessageBoxResult>>(this, HandleNotificationMessage); } private void HandleNotificationMessage(NotificationMessageAction<MessageBoxResult> message) { // 显示消息框并获取用户响应 MessageBoxResult result = MessageBox.Show( message.Notification, // 消息内容 "通知", // 标题 MessageBoxButton.OKCancel // 按钮 ); // 执行回调方法 message.Execute(result); } ``` tn2>然后我们尝试一下,首先我们点击Update Name按钮,然后我们点OK,发现它有输出`Click OK!`。  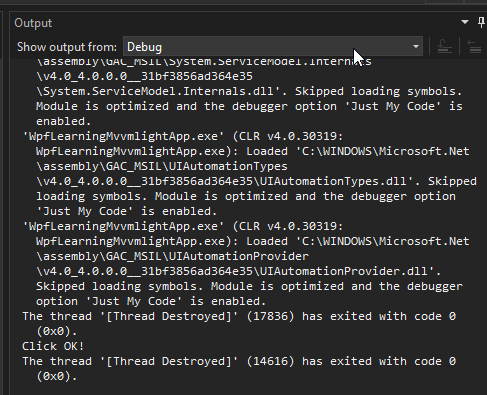 PropertyChangedMessage ------------ tn2>`PropertyChangedMessage<T>` 是一种消息类型,用于在 ViewModel 和 View 之间传递属性值的变化。 以下是一个使用 `PropertyChangedMessage<string>` 的示例,展示如何在 ViewModel 中发送消息并在 View 中接收和处理这些消息。 ### 示例:使用 PropertyChangedMessage 传递属性变化 tn2>在 MainViewModel 中,我们定义一个属性,并在属性值发生变化时发送 `PropertyChangedMessage<string>` 消息。 ```csharp public class MainViewModel : ViewModelBase { public MainViewModel() { UpdateNameCommand = new RelayCommand(UpdateName); _name = "BLBL"; } private string _name; public string Name { get => _name; set { string oldvalue = _name; if (Set(ref _name, value)) { // 发送属性变化消息 Messenger.Default.Send(new PropertyChangedMessage<string>(oldvalue, _name, "Name")); } } } public RelayCommand UpdateNameCommand { get; } private void UpdateName() { // 初始化属性 Name = "Initial Value"; } private void HandleNotificationResult(MessageBoxResult result) { // 处理回调结果 if (result == MessageBoxResult.OK) { Debug.WriteLine("Click OK!"); } else if (result == MessageBoxResult.Cancel) { Debug.WriteLine("Click Cancel!"); } } } ``` tn2>在 View 中,我们注册 `PropertyChangedMessage<string>` 消息,并处理属性变化。 ```csharp public MainWindow() { InitializeComponent(); // 注册 NotificationMessageAction 消息 Messenger.Default.Register<NotificationMessageAction<MessageBoxResult>>(this, HandleNotificationMessage); Messenger.Default.Register<PropertyChangedMessage<string>>(this, HandlePropertyChangedMessage); } private void HandlePropertyChangedMessage(PropertyChangedMessage<string> message) { if (message.PropertyName == "Name") { // 处理属性变化 MessageBox.Show($"Property '{message.PropertyName}' changed from '{message.OldValue}' to '{message.NewValue}'"); } } ``` 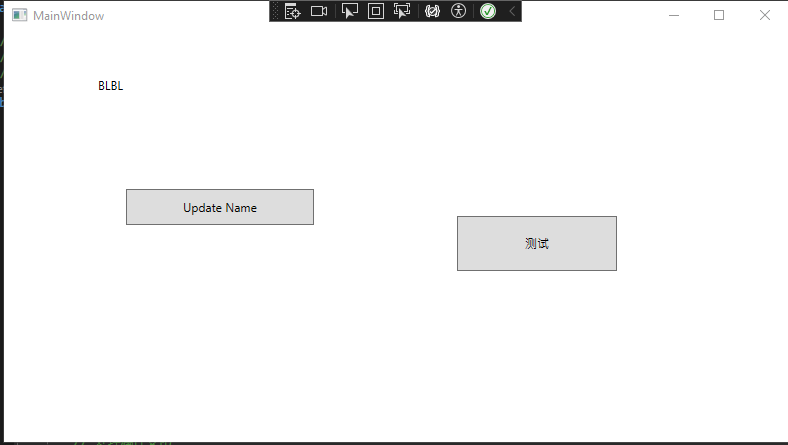 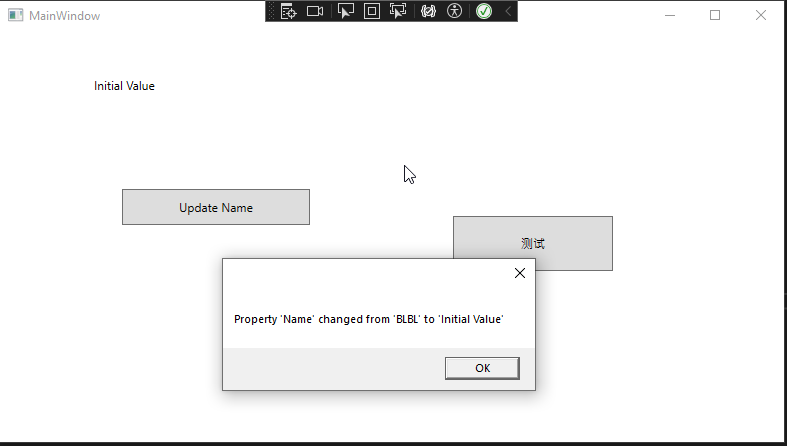 DispatcherHelper帮助类 ------------ tn2>当我们需要做一些UI线程进行处理的时候,MVVMLight为我们提供了DispatcherHelper类进行支持,下面将会用一个简单的例子进行说明: 当有一个集合对象需要在前端进行显示的时候我们如果异步加载数据会报错,但是加上`DispatcherHelper`的`CheckBeginInvokeOnUI`方法进行前端调用将没问题。 首先我们需要在`MainViewModel`类中添加集合对象。 ```csharp public MainViewModel() { UpdateNameCommand = new RelayCommand(UpdateName); _name = "BLBL"; Task.Run(() => { for (int i = 0; i < 10; i++) { var temp = i; // 在非UI线程下添加集合对象会报错,MVVM给我们提供了这个方法来解决 DispatcherHelper.CheckBeginInvokeOnUI(() => { OCValues.Add(temp); }); } }); } public ObservableCollection<int> OCValues { get; set; } = new ObservableCollection<int>(); ``` tn2>我们还需要在`App.cs`类中,添加如下代码进行初始化`DispatcherHelper`。 ```csharp public partial class App : Application { public App() { DispatcherHelper.Initialize(); } } ``` tn2>然后在`MainWindow.xaml`中添加集合标签。 ```csharp <Window x:Class="WpfLearningMvvmlightApp.MainWindow" xmlns="http://schemas.microsoft.com/winfx/2006/xaml/presentation" xmlns:x="http://schemas.microsoft.com/winfx/2006/xaml" xmlns:d="http://schemas.microsoft.com/expression/blend/2008" xmlns:mc="http://schemas.openxmlformats.org/markup-compatibility/2006" xmlns:local="clr-namespace:WpfLearningMvvmlightApp" mc:Ignorable="d" DataContext="{Binding Source={StaticResource Locator},Path=Main}" Title="MainWindow" Height="450" Width="800"> <Grid Loaded="Grid_Loaded"> <TextBlock Name="CC" Text="{Binding Name}" Margin="94,46,366,311" /> <Button Content="Update Name" Command="{Binding UpdateNameCommand}" Margin="122,158,474,217" /> <Button Content="测试" HorizontalAlignment="Left" Margin="122,258,0,0" VerticalAlignment="Top" Height="55" Width="160" Click="Button_Click_1"/> <ItemsControl ItemsSource="{Binding OCValues}" Margin="562,0,0,0"> <ItemsControl.ItemTemplate> <DataTemplate> <TextBlock Text="{Binding}"/> </DataTemplate> </ItemsControl.ItemTemplate> </ItemsControl> </Grid> </Window> ``` 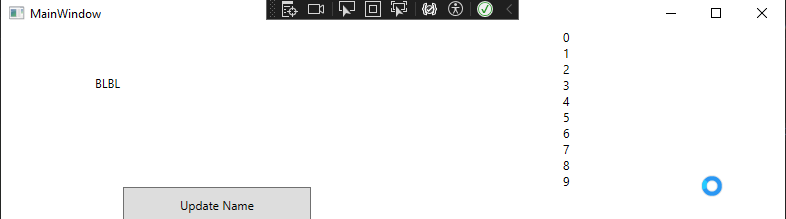 tn2>当然我们也可以用`Application`的方式进行解决。 ```csharp Application.Current.Dispatcher.Invoke(() => { OCValues.Add(i); }); ```