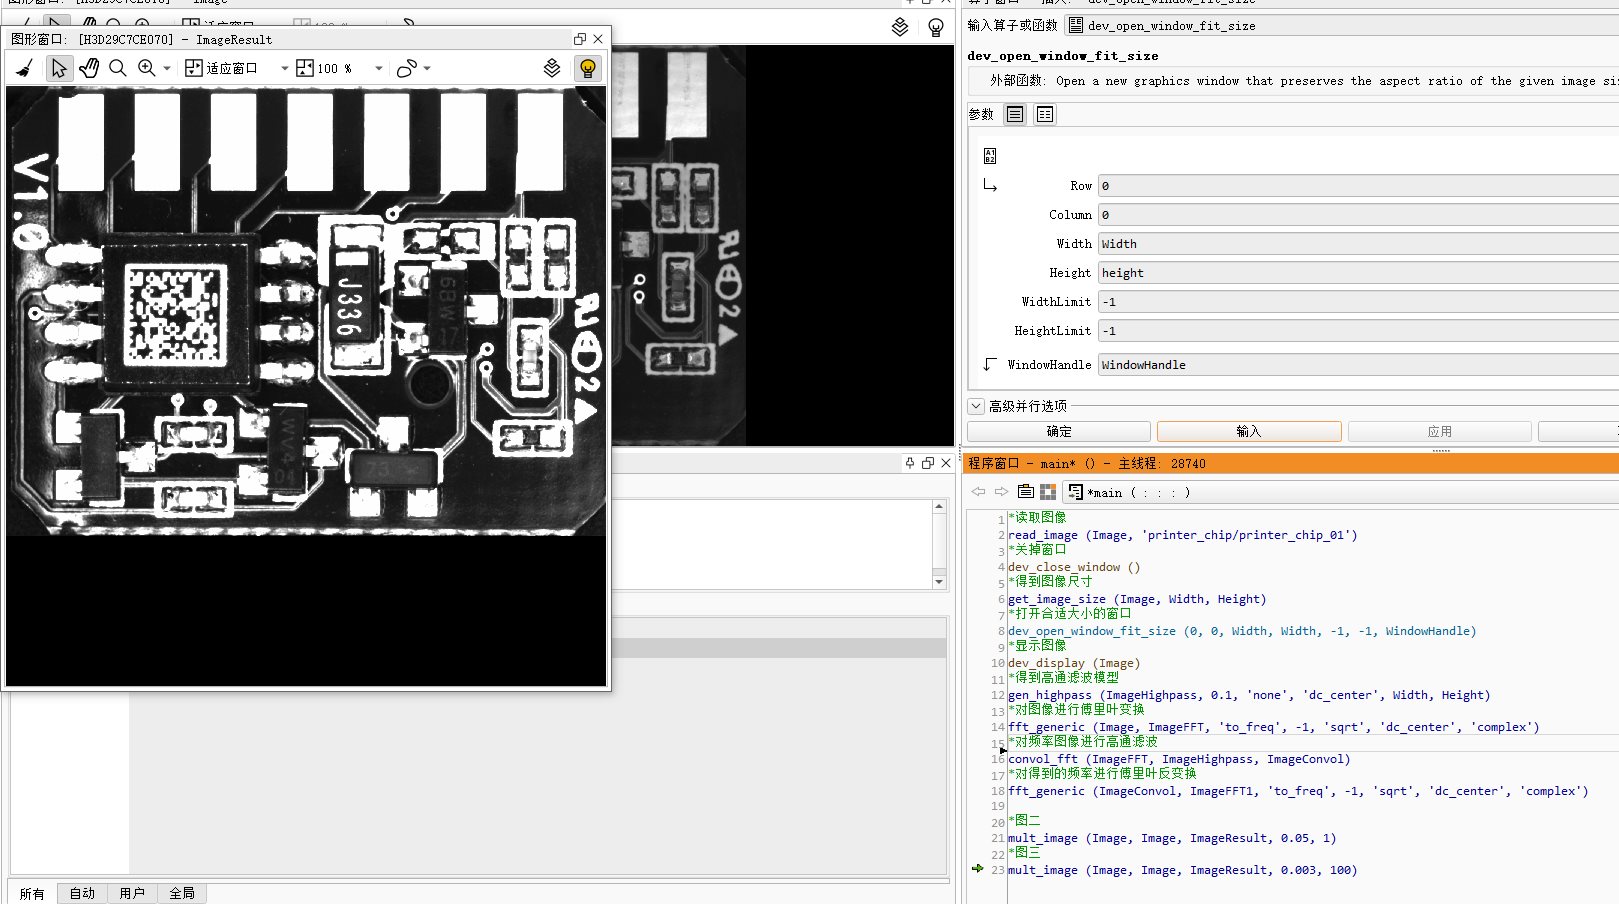
Halcon 图像增强 电脑版发表于:2024/4/30 11:23  >#Halcon 图像增强 [TOC] 概念和分类 ------------ tn2>图像增强:有目的的强调图像的整体或局部特性,将原来不清晰的图像变得清晰或强调某些感兴趣的特征,扩大图像中不同特征之间的差别,抑制不感兴趣特征,改善图像质量,丰富信息量,满足分析需要。 图像增强技术基本分为两类: 1、**空间域法:**包含图像像素的空间,在空间域中,直接对图像进行各种线性或非线性运算,对图像的像素灰度做增强处。分为点运算(作用于像素领域的处理方法,包括灰度变换,直方图修正,伪彩色增强等)和模板处理(作用于像素领域的处理方法,包括平滑,图像锐化等)两大类。 2、**频域法:**在图像的变换域中把图像看作一种二维信号,对其进行基于二维傅里叶变换的信号增强,常用的方法有低通滤波,高通滤波及同态滤波。 灰度变换 ------------ tn2>灰度变换是根据某种目标条件按一定变换关系逐像素点改变图像中灰度值的方法,也称对比度增强或对比度拉伸。常用的灰度变换方法有:线性灰度变换;分段线性灰度变换;非线性灰度变换。 线性变换算子 ------------ ### 反转图像 tn2>invert_image(image输入图像:imageinvert输出图像::) ### 增强图像对比度 tn2>emphasize(image输入图像:imageemphasize输出图像:maskwidth低通掩膜宽,maskheight低通掩膜高,factor对比度强度:) tn>原理:首先,该过程使用低通(mean_image)进行过滤。由得到的灰度值(mean)和原始灰度值(orig)计算得到的灰度值(res)如下:  通过参数3、4控制均值滤波模板的大小,数值越大,则图像对比度越强,一般配合参数5—Factor(对比度强度)一起对图像进行增强处理。 作用:增强图像的高频区域(边缘和拐角),使图像看起来更清晰。 ### 缩放图像的灰度值 tn2>scale_image(image输入图像:imagescaled缩放后图像:mult比例因子,add补偿值:) 1、扩展动态范围:当mult>1时,结果会使图像灰度取值的动态范围展宽,图像对比度增大,可以改善曝光不足的缺陷,或充分利用图像显示设备的动态范围 2、改变取值空间:当mult=1时,变化后灰度动态范围不变,灰度取值区间会随a和c的大小而上下平移,效果是使整个图像更暗或更亮 3、缩小动态范围:当`0<mult<1`,则变换后图像动态范围会变窄,图像对比度变小 4、反转或取反:当`mult<0`,则变化后图像的灰度值会反转,即图像中亮的变暗,暗的变量;当mult=-1时,输出图像为输入图像的底片效果 ```bash *读取图像 read_image (Image, 'printer_chip/printer_chip_01') *关掉窗口 dev_close_window () *得到图像尺寸 get_image_size (Image, Width, Height) *打开合适大小的窗口 dev_open_window_fit_size (0, 0, Width, Width, -1, -1, WindowHandle) *显示图像 dev_display (Image) *保存图像 dump_window (WindowHandle, 'bmp', 'halcon_dump') *图像取反 invert_image (Image, ImageInvert) *增加对比度 emphasize (ImageInvert, ImageEmphasize, Width, Height, 1) *减小对比度 scale_image (ImageInvert, ImageScaled, 0.5, 0) *增加亮度 scale_image (ImageInvert, ImageScaled1, 1, 100) *减小亮度 scale_image (ImageInvert, ImageScaled2, 1, -100) ``` 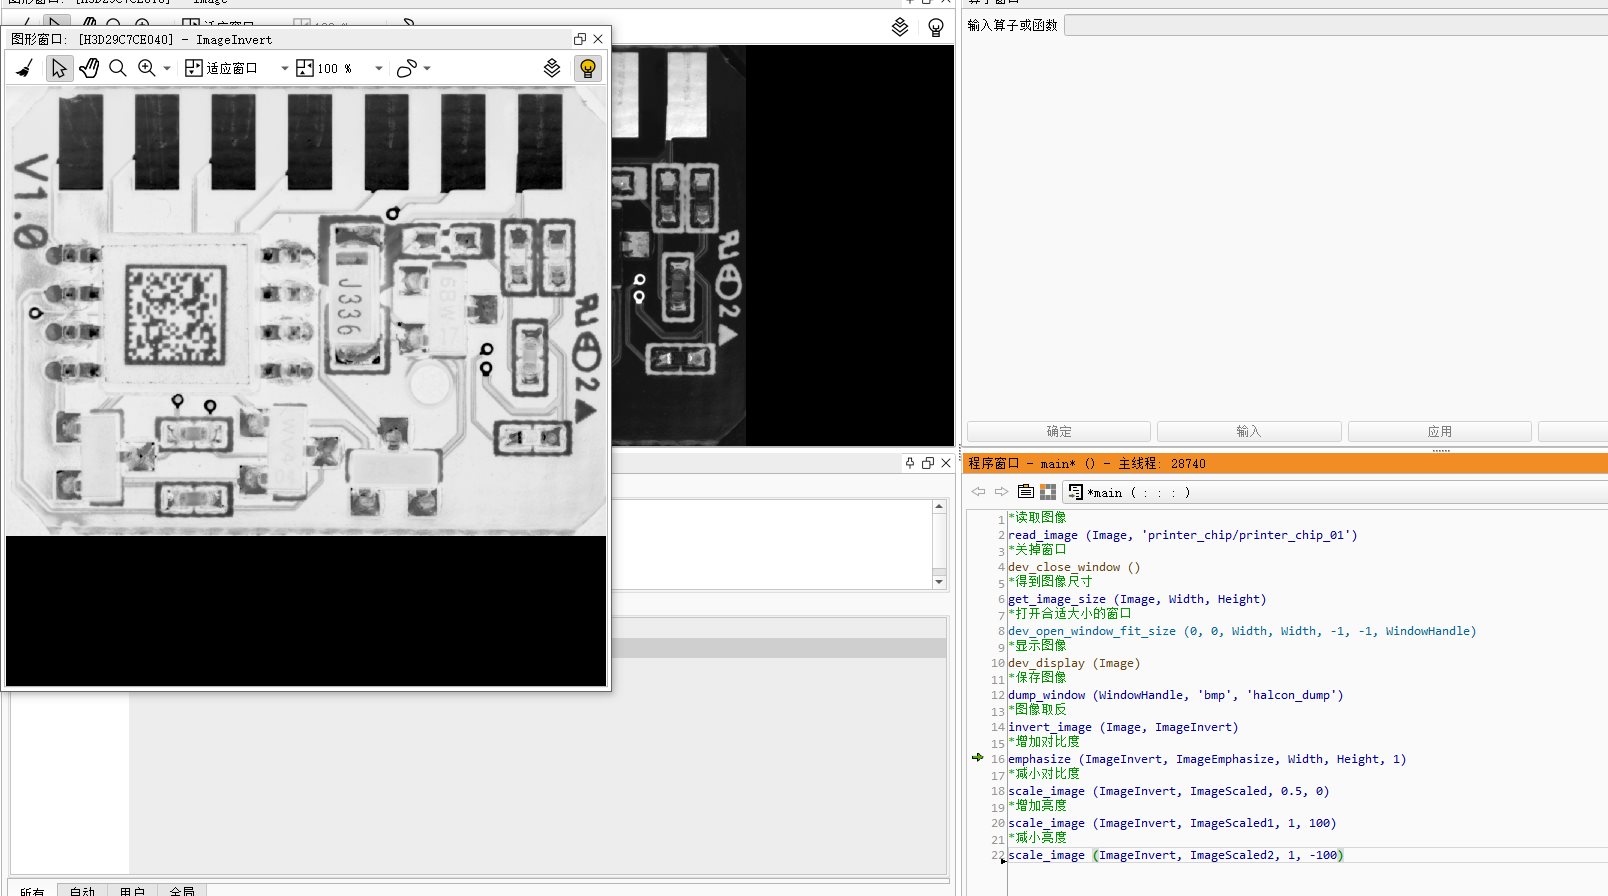 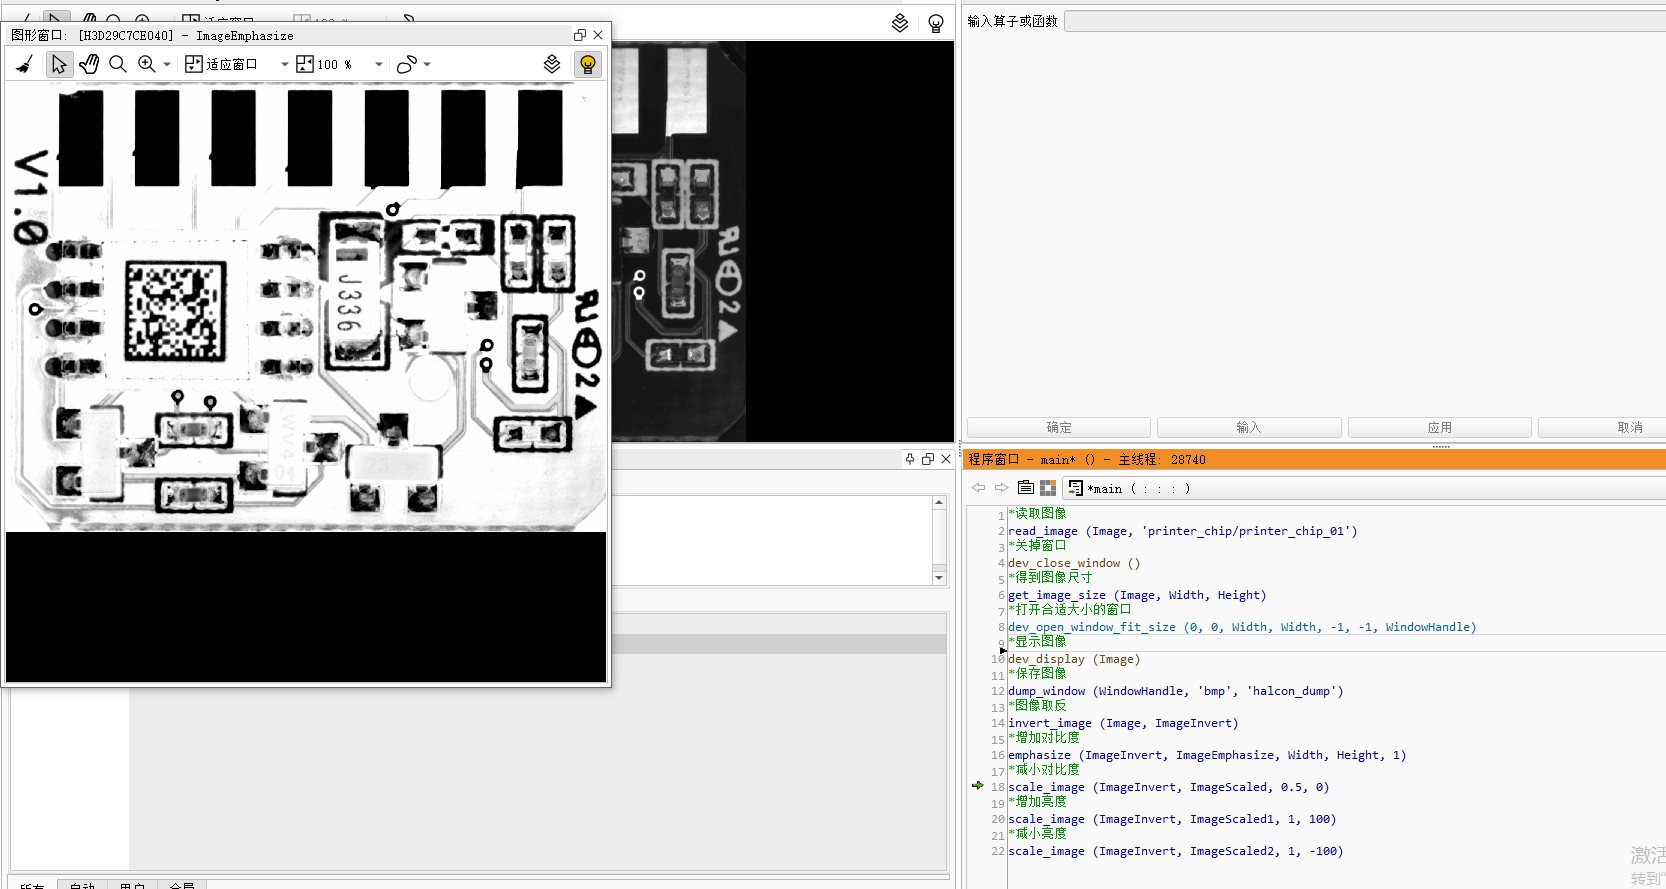 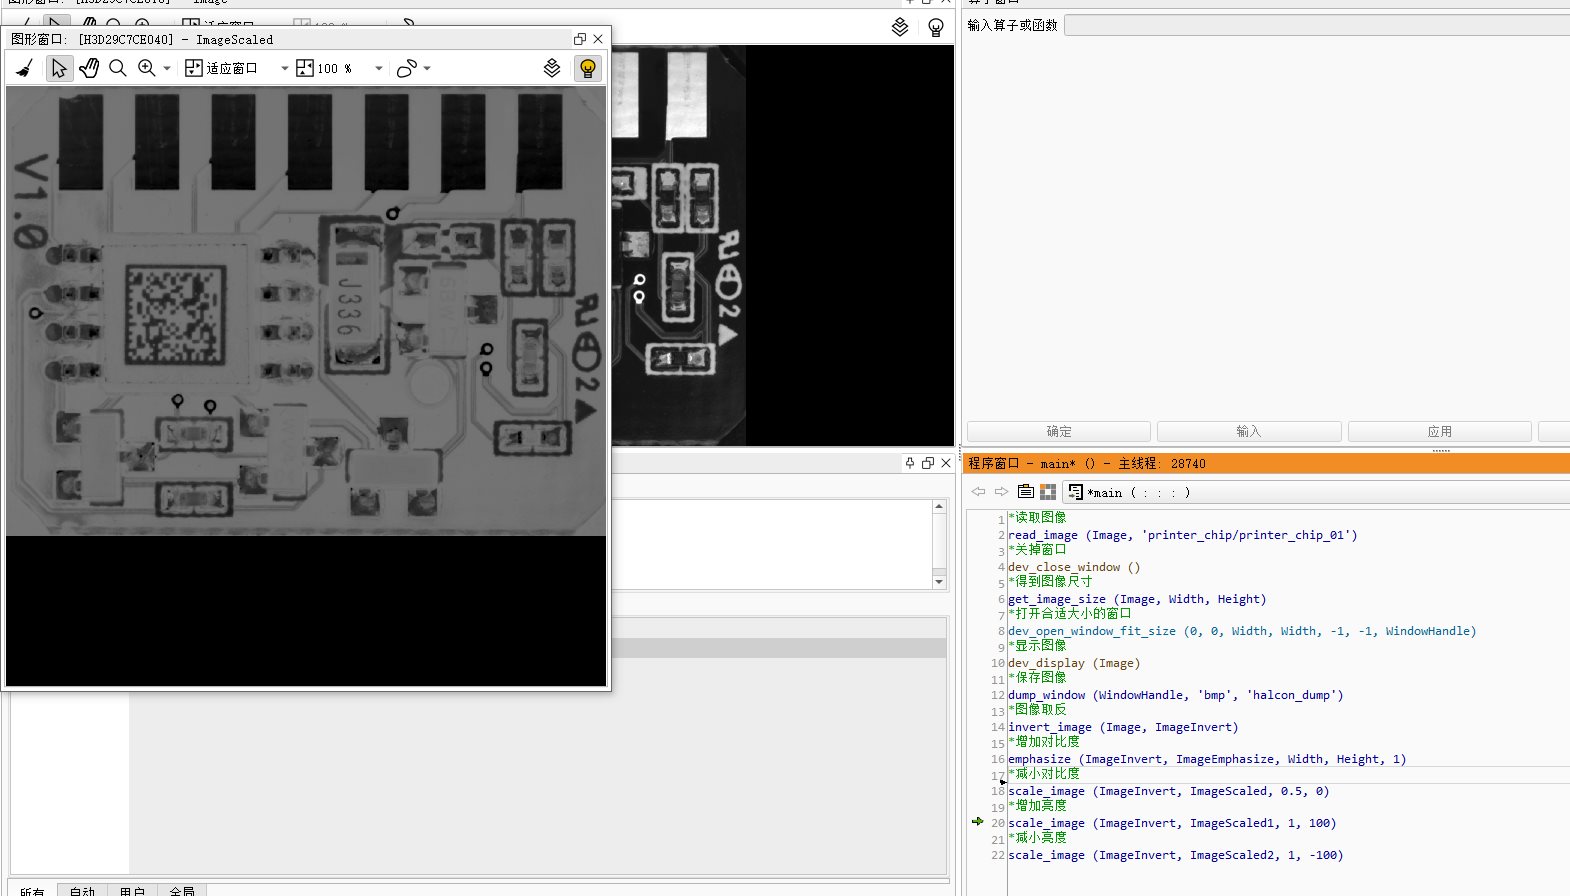 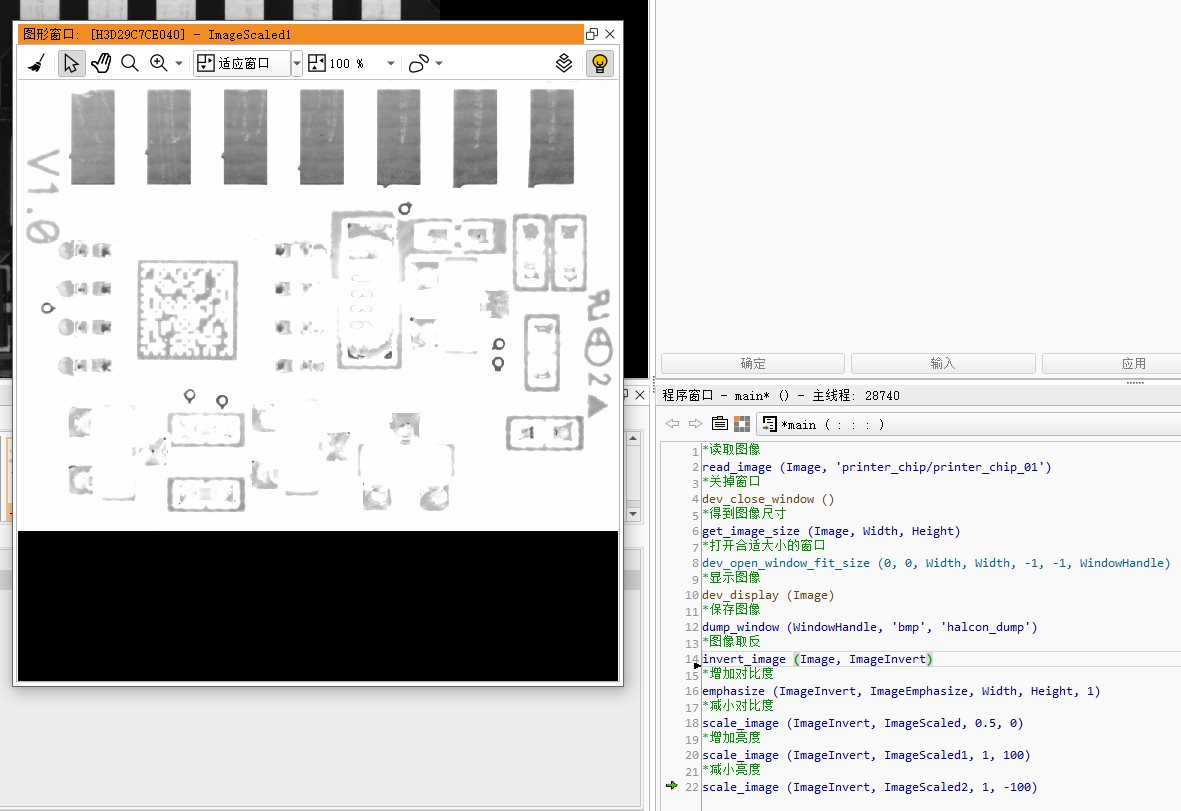 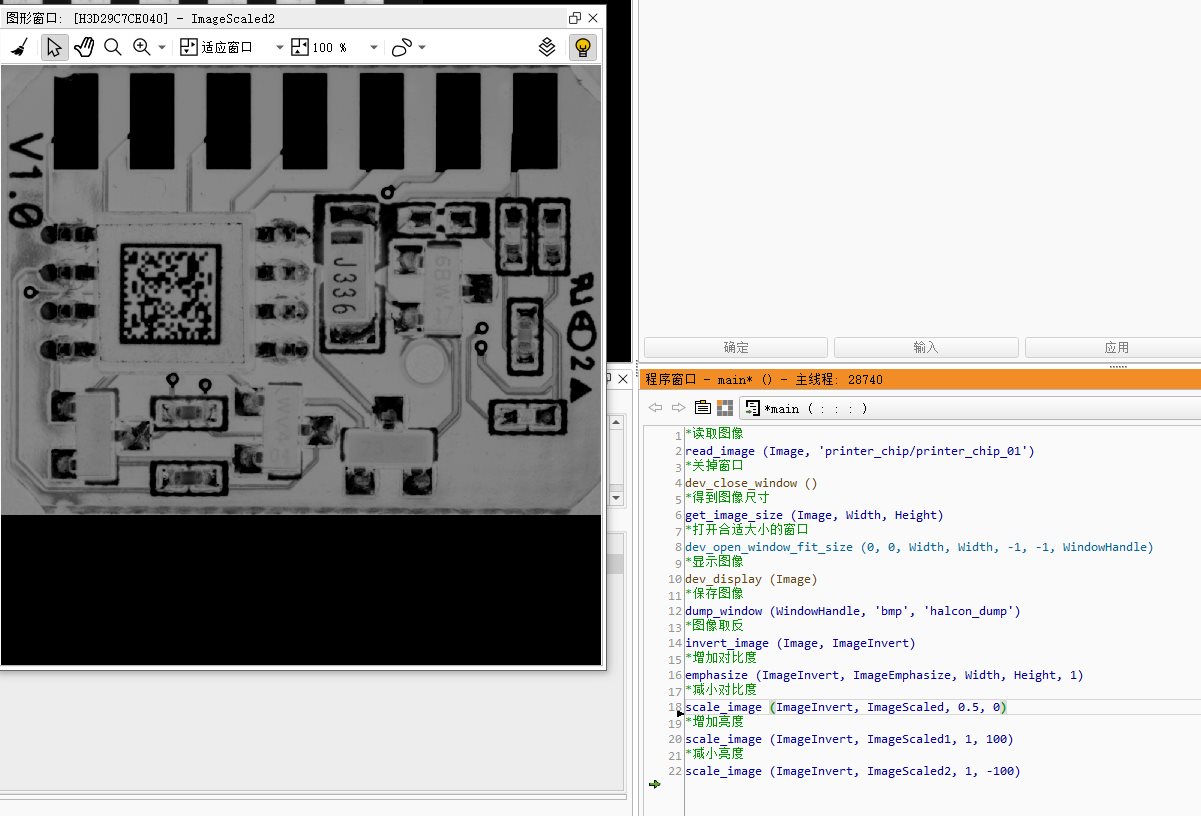 分段线性灰度变换相关算子 ------------ ### 确定区域内的最小和最大灰度值 min_max_gray(regions需要计算的区域,image输入的图像::percent低于或高于绝对最大值或最低值的百分比:min最小灰度值,max最大灰度值,range最大最小的差值) ### 最大灰度值在取值范围为0到255之间展开 scale_image_max(image输入图像:imagscalemax增强后图像::) ```bash *读取图像 read_image (Image, 'printer_chip/printer_chip_01') *关掉窗口 dev_close_window () *得到图像尺寸 get_image_size (Image, Width, Height) *打开合适大小的窗口 dev_open_window_fit_size (0, 0, Width, Height, -1, -1, WindowHandle) *显示图像 dev_display (Image) *得到最大和最小灰度值 min_max_gray (Image, Image, 0, Min, Max, Range) *扩展灰度范围 scale_image_max (Image, ImageScaleMax) *保存图像 write_image (ImageScaleMax, 'bmp', 0, 'D:/ai/Halcon/Zhaoxi.Halco.Learning.Core/sc/1.bmp') ``` 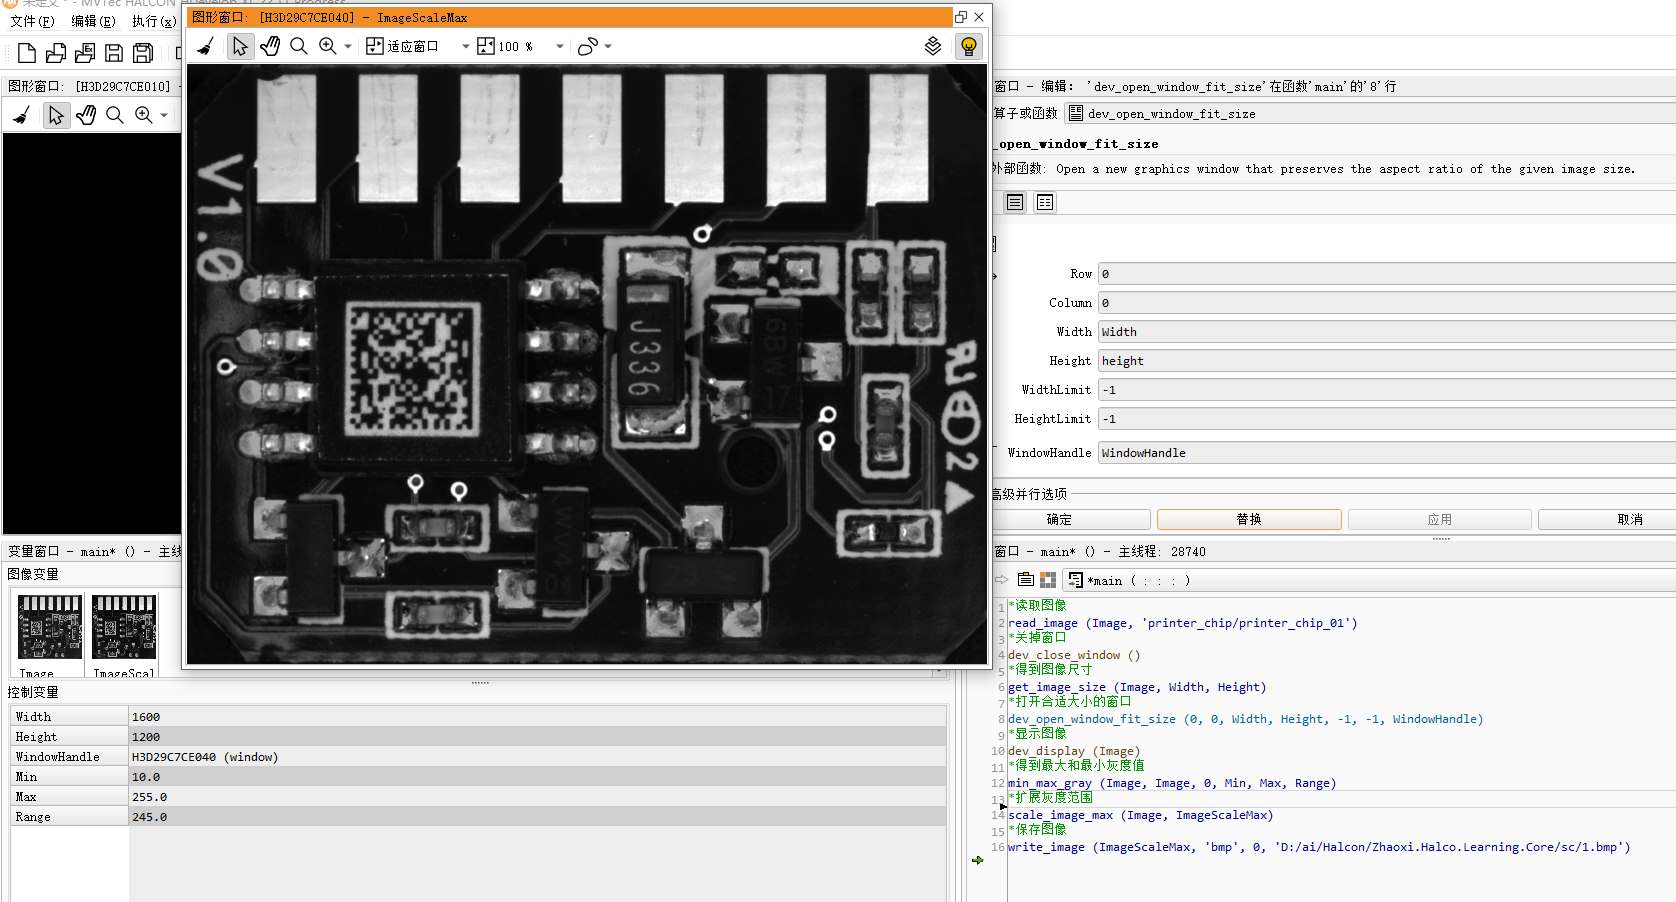 非线性灰度变换 ------------ ### 对数变换 tn2>可以扩张数值较小的灰度范围或者压缩数值较大的灰度范围;是一种有用的非线性映射交换函数,用于扩展输入图像中范围较窄的低灰度像素,压缩输入图像中范围较宽的高灰度像素,使原本低灰度值的像素部分更好的呈现。 ### 对图像进行对数变换 tn2>log_image(image输入图像:logimage变换后的图像:base对数的底数:) 指数变换:可以有选择性的增强低灰度区域的对比度或高灰度区域的对比度。 ### 对图像进行指数变换 tn2>pow_image(Image输入图像:powimage变换后图像:exponent指数:) ```bash *读取图像 read_image (Image, 'printer_chip/printer_chip_01') *关掉窗口 dev_close_window () *得到图像尺寸 get_image_size (Image, Width, Height) *打开合适大小的窗口 dev_open_window_fit_size (0, 0, Width, Width, -1, -1, WindowHandle) *显示图像 dev_display (Image) ** 对数变换 log_image (Image, LogImage,2) ** 指数变换 pow_image (Image, PowImage, 3) ``` 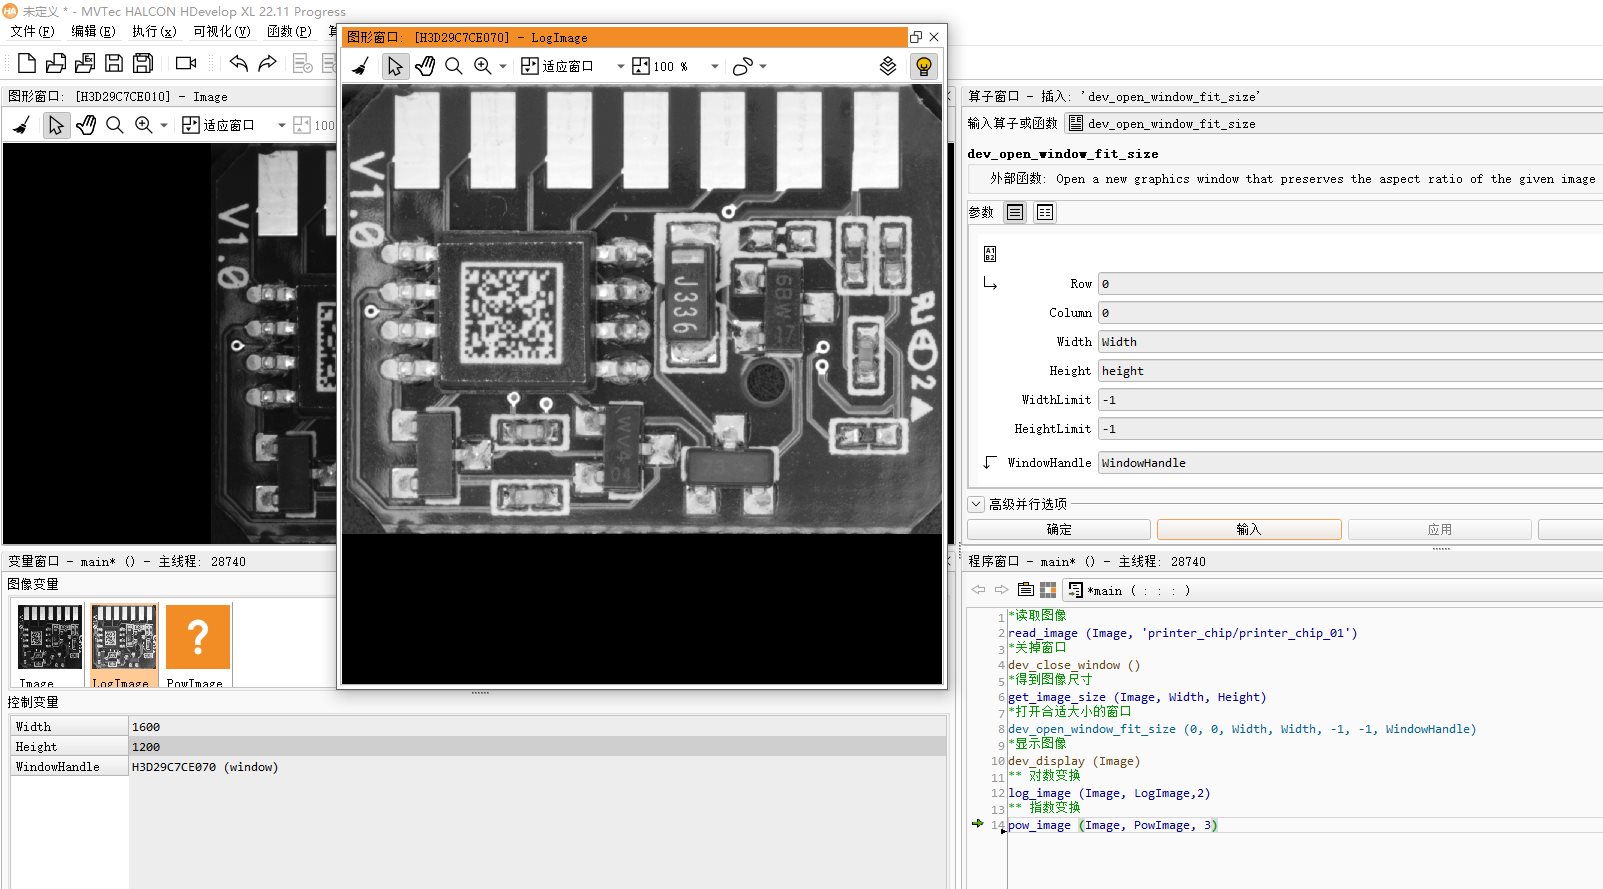 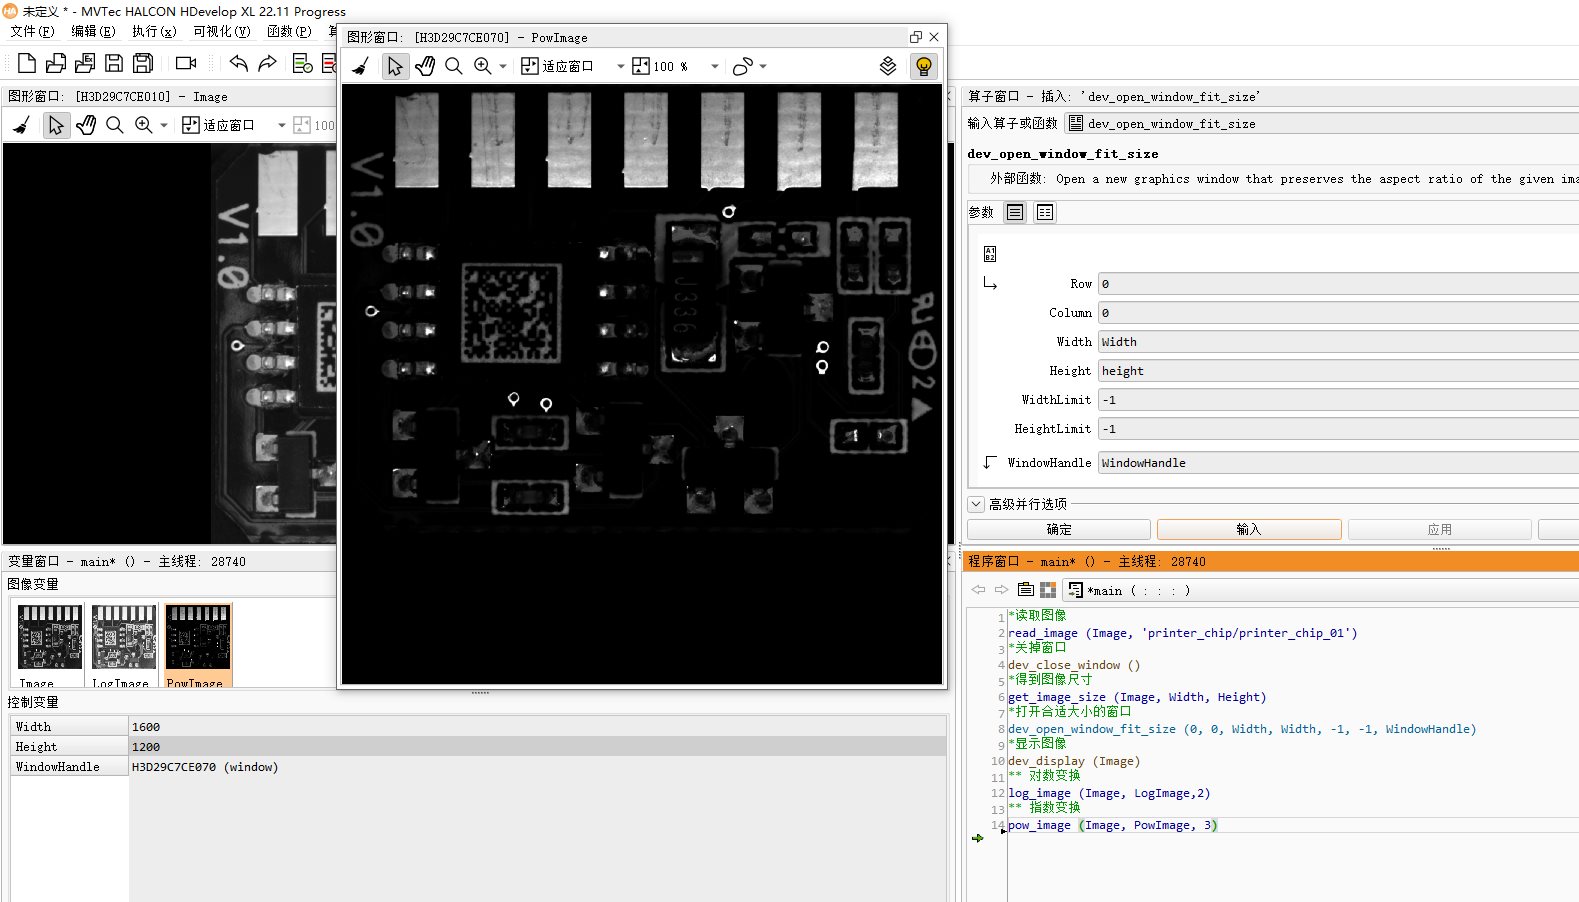 直方图 ------------ tn2>灰度直方图:数字图像中每一个灰度值与其出现频率的统计关系 直方图特征: 1、没有位置信息 2、与图像之间为一对多的映射关系,任意一幅图像都有唯一确定的一个直方图与之对应,但不同的图像可能有相同的直方图 3、可叠加性,各个子区域之和等于该图像全图的直方图 ### 相关算算子 tn2>gray_histo(regions需要计算的区域,image输入的图像:::absolutehisto绝对分布,relativehisto相对分布) ### 得到直方图 tn2>gen_reigon_histo(:region需要输入的区域:histogram灰度分布,row直方图中心行坐标,column直方图中心列坐标,scale直方图比例:) ```bash *方法一 *读取图像 read_image (Image, 'printer_chip/printer_chip_01') *关掉窗口 dev_close_window () *得到图像尺寸 get_image_size (Image, Width, Height) *打开合适大小的窗口 dev_open_window_fit_size (0, 0, Width, Width, -1, -1, WindowHandle) *显示图像 dev_display (Image) *点击菜单栏的“灰度直方图”按钮,得到结果 *方法二 *读取图像 read_image (Image, 'printer_chip/printer_chip_01') *关掉窗口 dev_close_window () *得到图像尺寸 get_image_size (Image, Width, Height) *打开合适大小的窗口 dev_open_window_fit_size (0, 0, Width, Width, -1, -1, WindowHandle) *显示图像 dev_display (Image) *计算图像的灰度值分布 gray_histo(Image, Image, AbsoluteHisto, RelativeHisto) *获得灰度直方图 gen_region_histo (Region, AbsoluteHisto, 255, 255, 1) ```   ### 直方图均衡 tn2>直方图均衡化:把原始图像的直方图变换为均匀分布的形式,增加像素灰度值的动态范围。即是使原图像中具有相近灰度且占有大量像素点的区域的灰度范围展宽,使大区域中的微小灰度变化显现出来,增强图像整体对比对效果,使图像更加清晰。 equ_histo_image(image输入图像:imageequhisto均衡后的图像::) 直方图规范化:通过一个灰度映射函数,将原灰度直方图改造成所希望的特定形状直方图。 ```bash *读取图像 read_image (Image, 'printer_chip/printer_chip_01') *关掉窗口 dev_close_window () *得到图像尺寸 get_image_size (Image, Width, Height) *打开合适大小的窗口 dev_open_window_fit_size (0, 0, Width, Width, -1, -1, WindowHandle) *显示图像 dev_display (Image) equ_histo_image (Image, ImageEquHisto) ``` 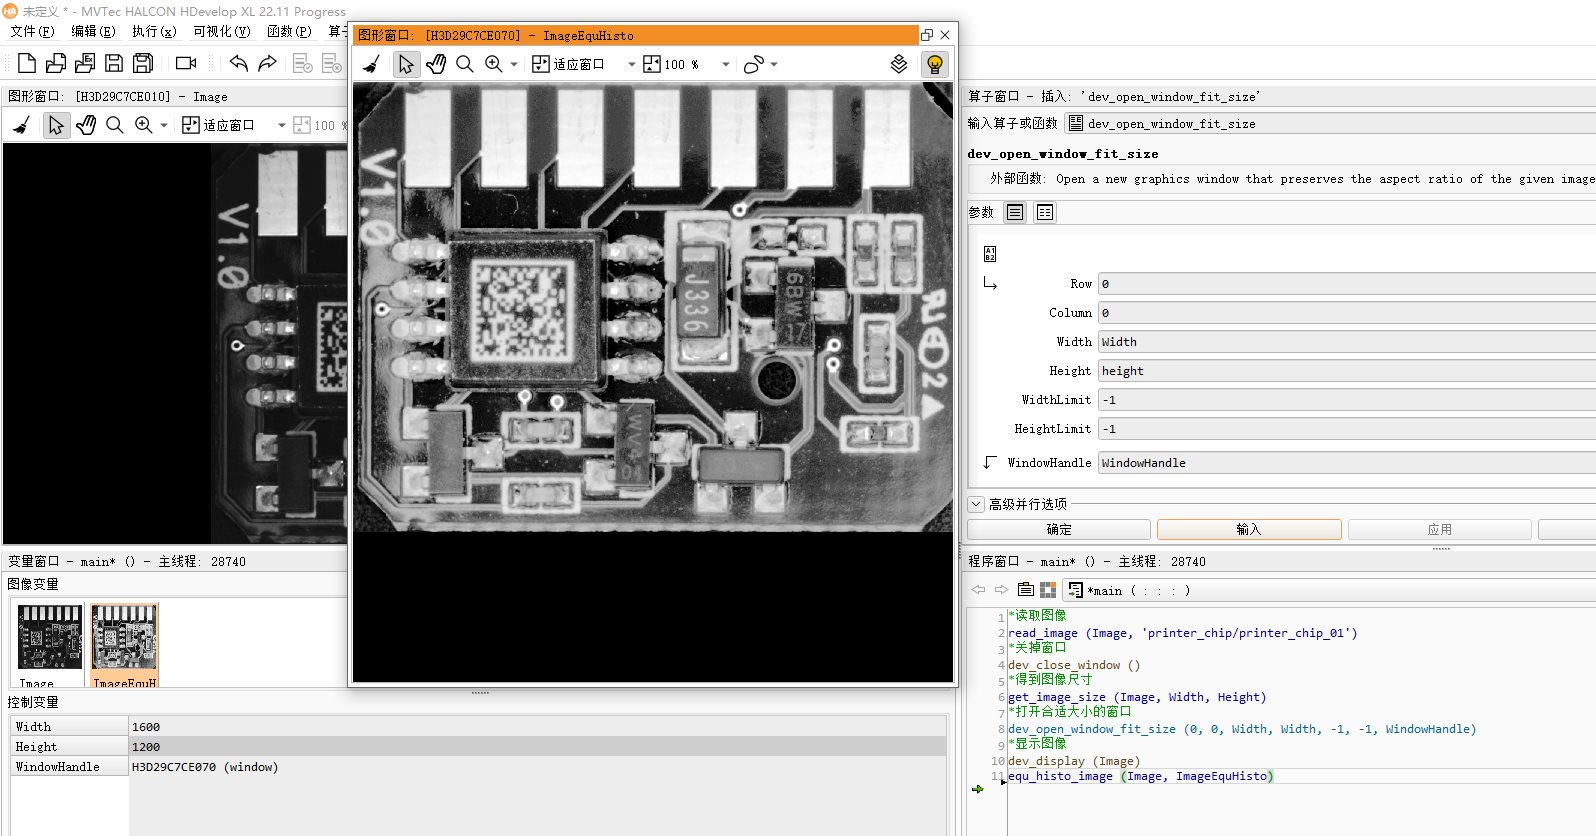 图像的平滑或者滤波 ------------ tn2>作用减少噪声 ### 空域平滑法 tn2>1、**领域平均法:**进行运算的结果不仅跟本像素点灰度值有关,和其他周围的像素点的灰度值有关。核心思想为选择一个子图像(邻域),用该领域里所有像素灰度的平均值去替换领域中心像素的灰度值。平滑效果与所用的邻域半径有关,半径越大,图像模糊程度越大。 2、**加权平均法:**加权平均与邻域平均类似,区别在于加权平均的每个点对于平均数的贡献并不相等。 3、**多图像平均法:**在相同条件下采集同一目标物的若干幅图像,然后通过采集到的多幅图像进行平均的方法来消减随机噪声。 ### 均值滤波 tn2>mean_image(image需要滤波的图像:imagemean滤波后的图像:maskwidth掩膜宽度,maskheight掩膜高度:) ```bash *读取图像 read_image (Image, 'printer_chip/printer_chip_01') *关掉窗口 dev_close_window () *得到图像尺寸 get_image_size (Image, Width, Height) *打开合适大小的窗口 dev_open_window_fit_size (0, 0, Width, Width, -1, -1, WindowHandle) *显示图像 dev_display (Image) *获得一个高斯噪声分布 gauss_distribution (20, Distribution) *将高斯噪声添加到图像 add_noise_distribution (Image, ImageNoise, Distribution) *将噪声图像进行均值滤波 mean_image (ImageNoise, ImageMean,9, 9) ``` 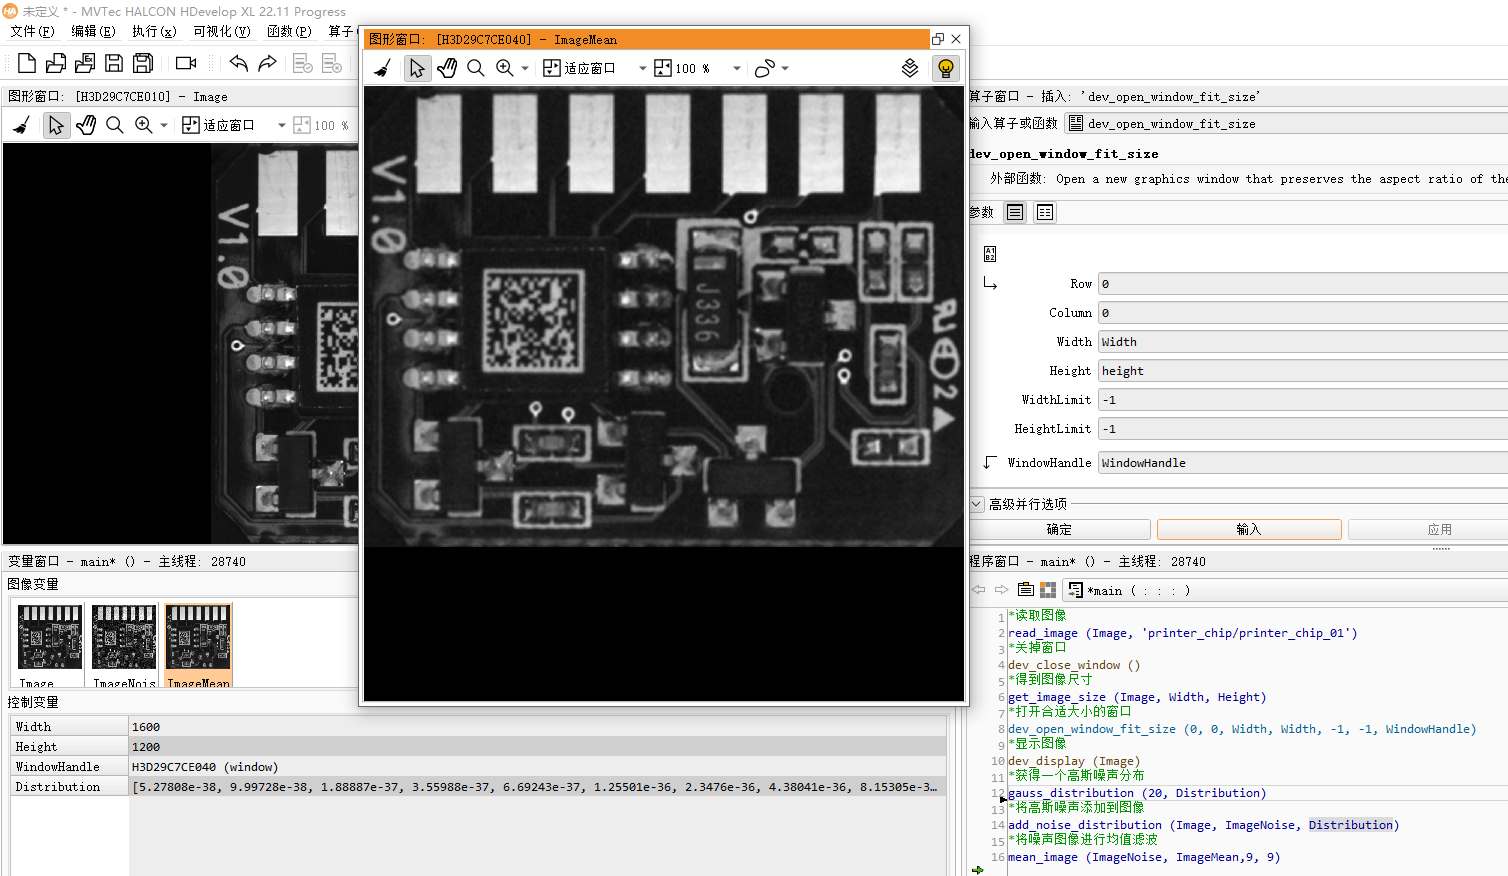 ### 中值滤波 tn2>中值滤波:每一像素点的灰度值设置为该邻域窗口内的所有像素点灰度值的中值 median_image(image输入图像:imagemedian滤波后图像:masktype掩膜类型,radius掩膜尺寸,margin边界处理:) ```bash *读取图像 read_image (Image, 'printer_chip/printer_chip_01') *关掉窗口 dev_close_window () *得到图像尺寸 get_image_size (Image, Width, Height) *打开合适大小的窗口 dev_open_window_fit_size (0, 0, Width, Width, -1, -1, WindowHandle) *显示图像 dev_display (Image) *获得椒盐噪声分布 sp_distribution (5, 5, Distribution) *添加椒盐噪声到图像 add_noise_distribution (Image, ImageNoise, Distribution) *对噪声进行中值滤波 median_image (ImageNoise, ImageMedian, 'circle', 3, 'mirrored') ``` 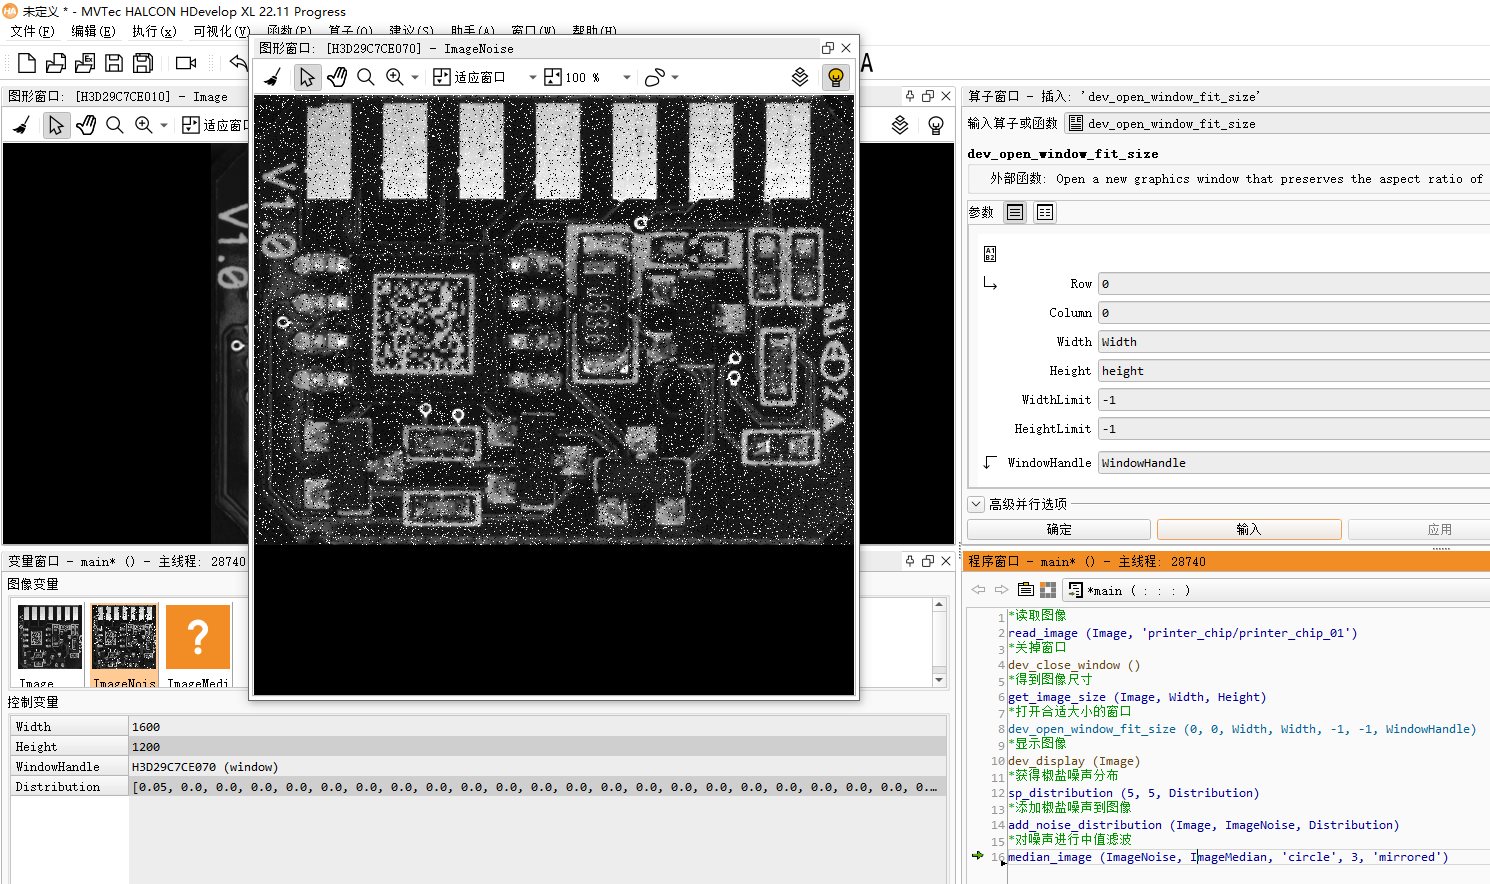  ### 频域低通滤波 tn2>一幅图像中灰度均匀的平滑区域对于傅里叶变换中的低频成分,灰度变换频繁的边缘及细节对应傅里叶变换中的高频成分。 低通滤波器: 1-理想低通滤波器 2-巴特沃斯低通滤波器 3-指数低通滤波器 4-梯形低通滤波器 生成理想的低通滤波图像: gen_lowpass(:imagelowpass生成的滤波图像:frequency截止频率,norm滤波器归一化引子,mode频率图中心位置,width,height生成滤波图像的宽高:) 快速傅里叶变换: fft_generic(image输入图像:imageFFT变换后图像:direction变换的方向,频域到空域还是空域到频域,exponent指数的符号,norm变换的归一化因子,mode DC在频率域中的位置,resulttype变换后图像类型) 频域里卷积图像: convol_fft(imageFFT频域图像,imagefilter滤波器:imageconvol卷积后图像::) ```bash *读取图像 read_image (Image, 'printer_chip/printer_chip_01') *关掉窗口 dev_close_window () *得到图像尺寸 get_image_size (Image, Width, Height) *打开合适大小的窗口 dev_open_window_fit_size (0, 0, Width, Width, -1, -1, WindowHandle) *显示图像 dev_display (Image) *获得椒盐噪声分布 sp_distribution (5, 5, Distribution) *添加椒盐噪声到图像 add_noise_distribution (Image, ImageNoise, Distribution) *获得一个低通滤波模型 gen_lowpass (ImageLowpass, 0.1, 'none', 'dc_center', Width, Height) *对噪声图像进行傅里叶变换得到频域图像 fft_generic (ImageNoise, ImageFFT, 'to_freq', -1, 'sqrt', 'dc_center', 'complex') *对频域图像进行低通滤波 convol_fft (ImageFFT, ImageLowpass, ImageConvol) *对得到的频域图像进行傅里叶反变换 fft_generic (ImageConvol, ImageFFT1, 'to_freq', -1, 'sqrt', 'dc_center', 'complex') ``` 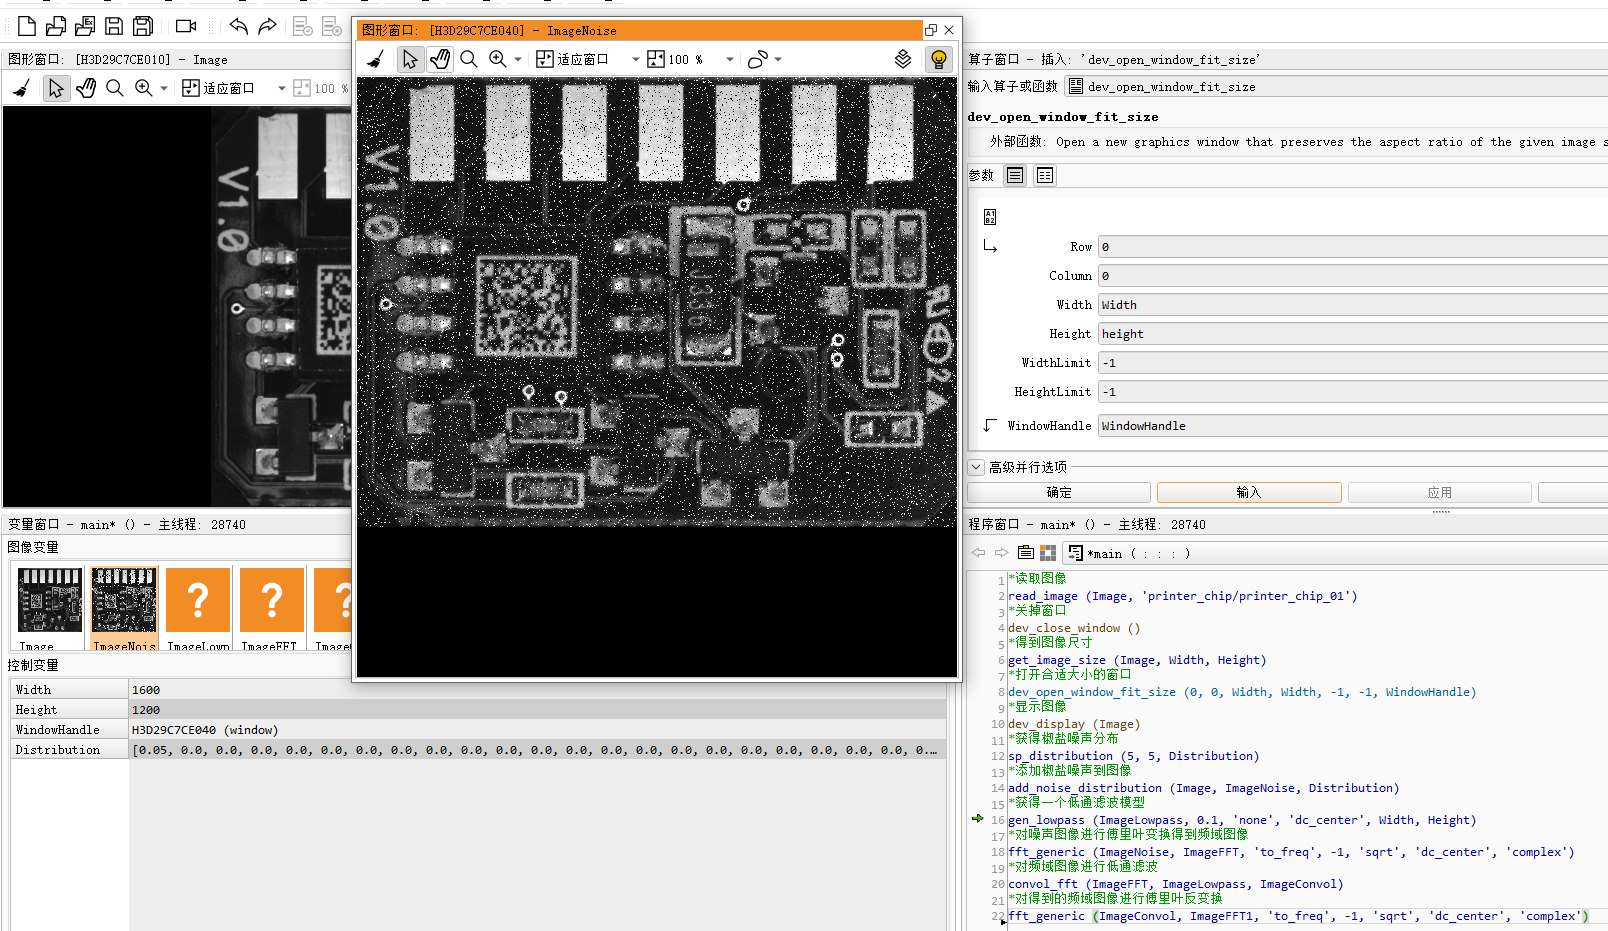 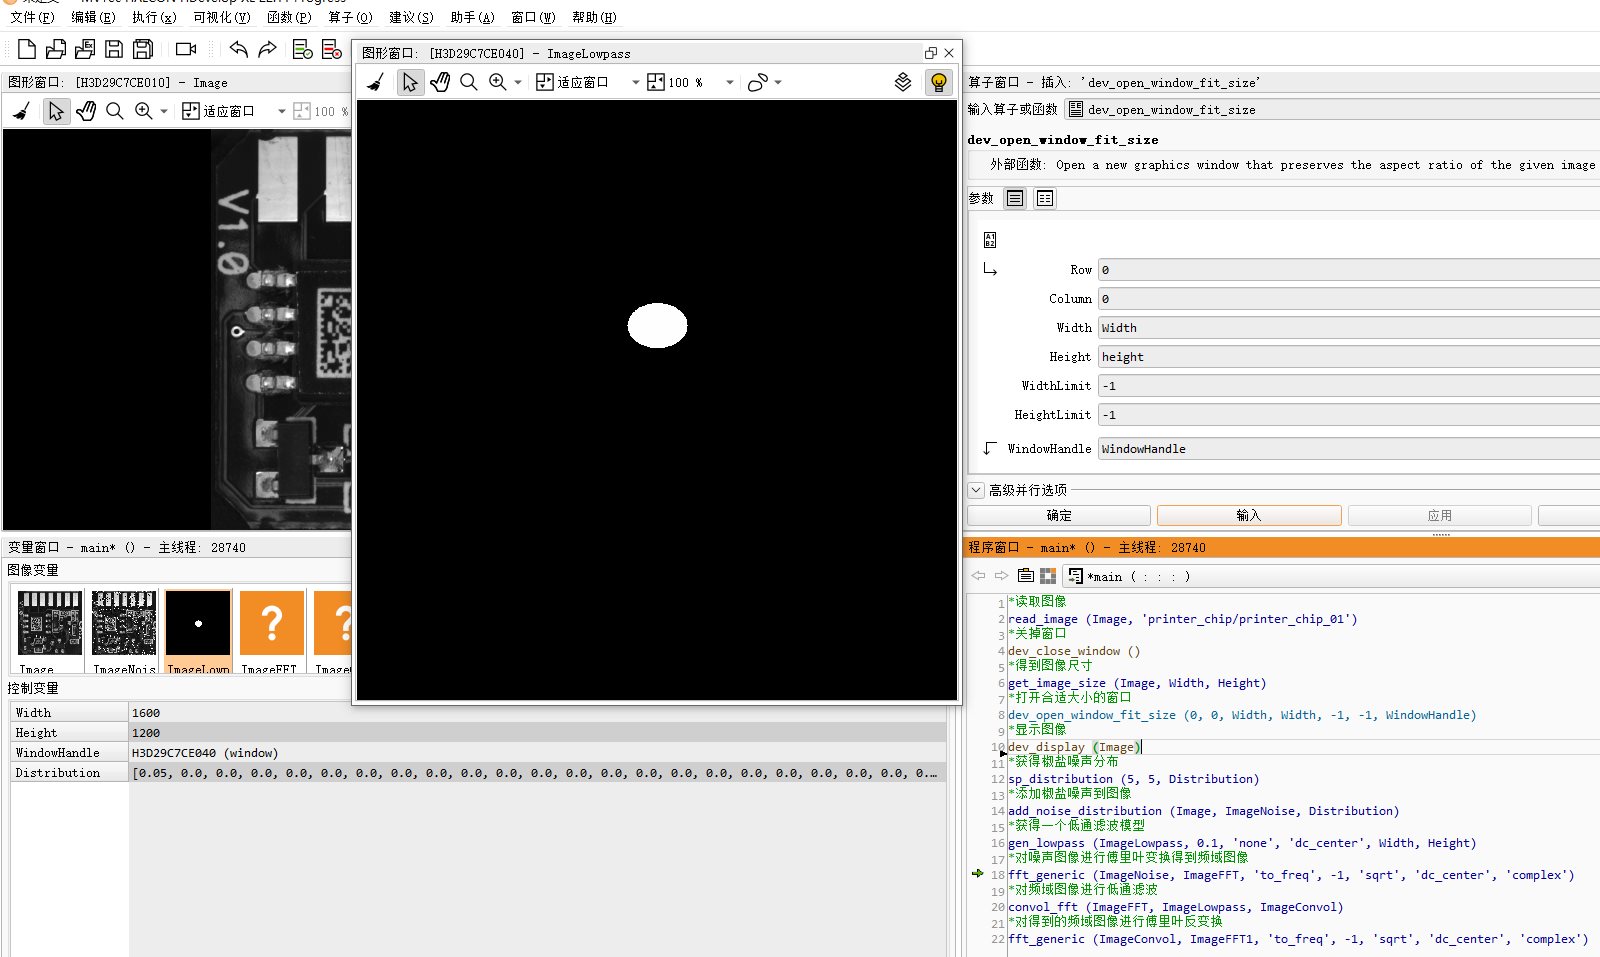 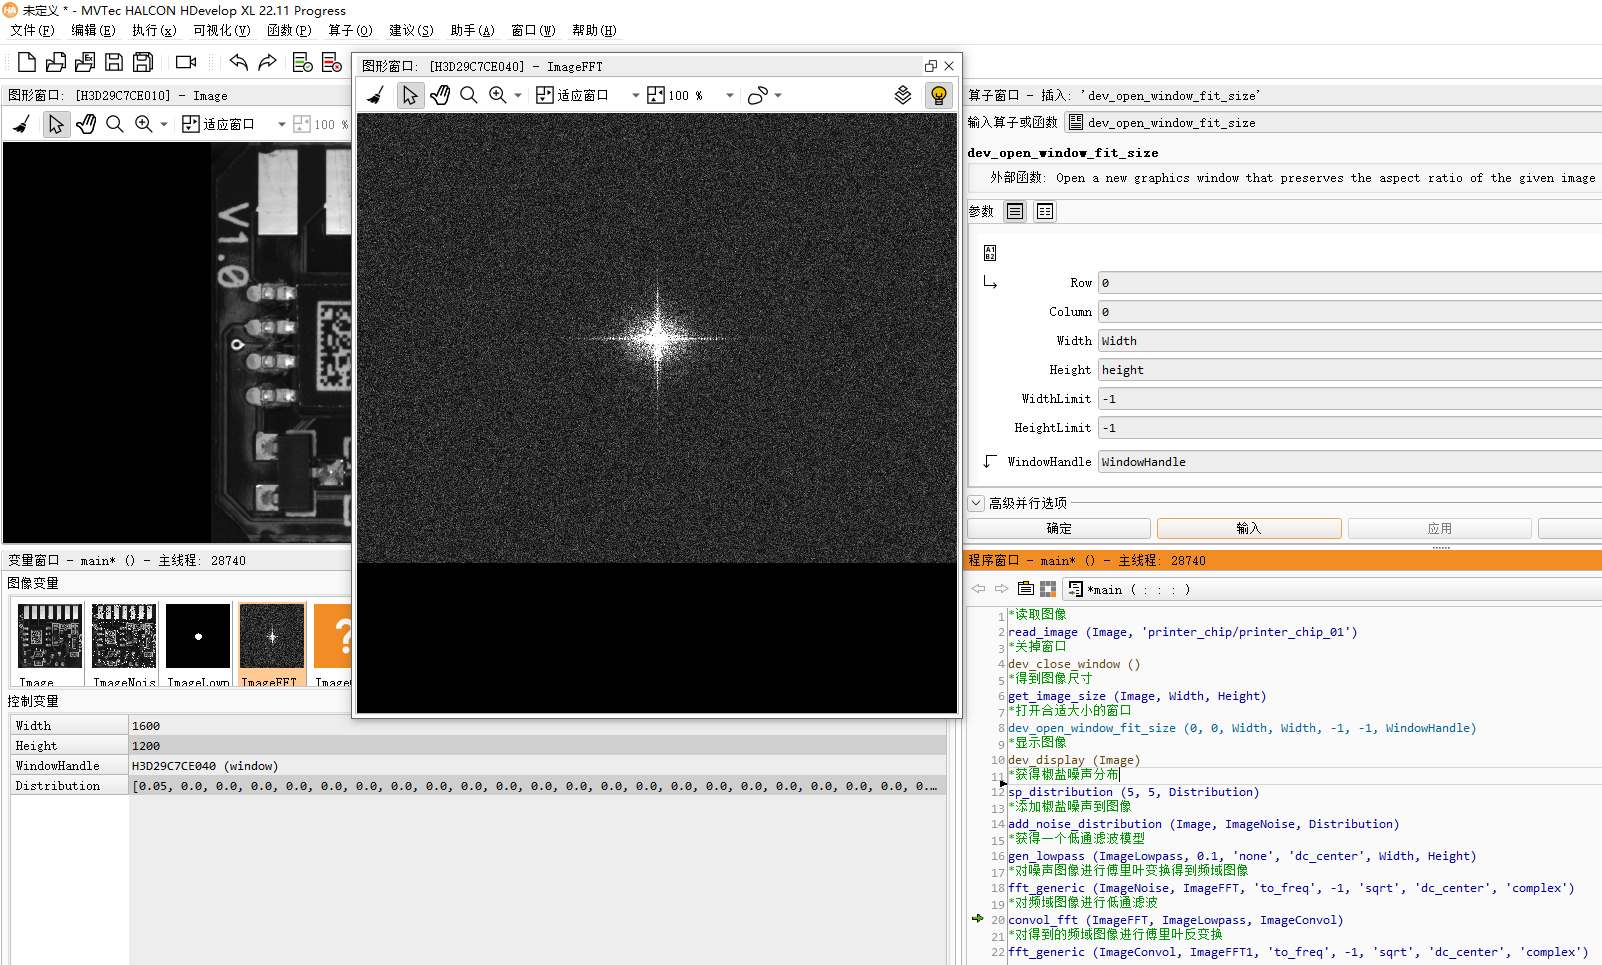 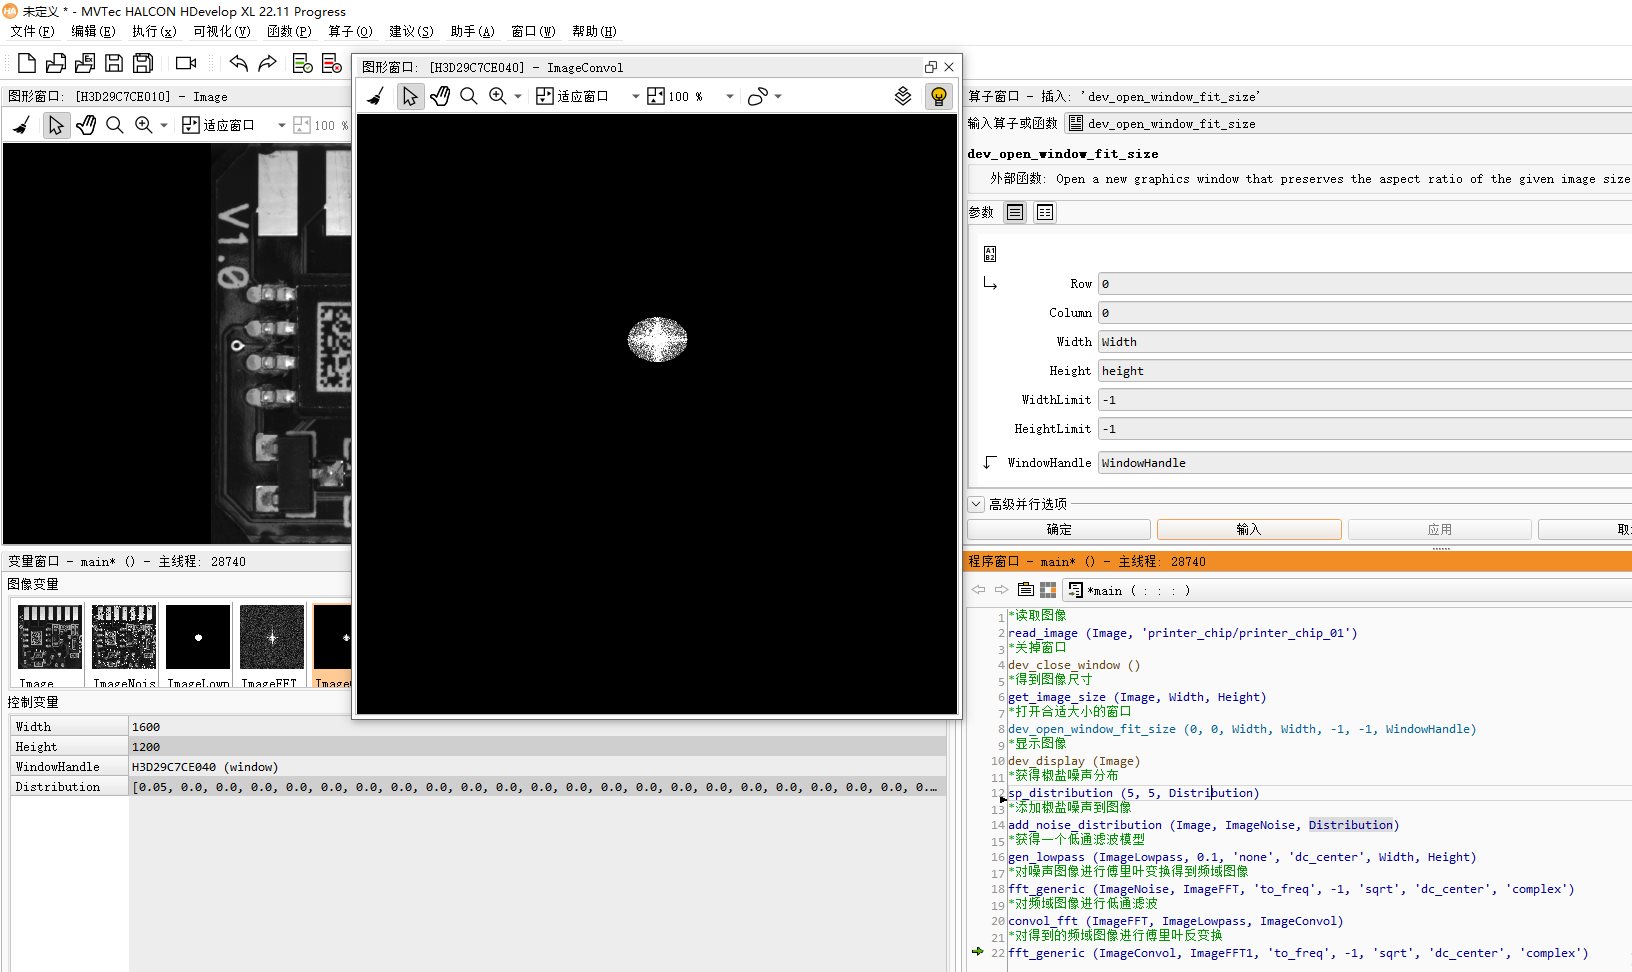 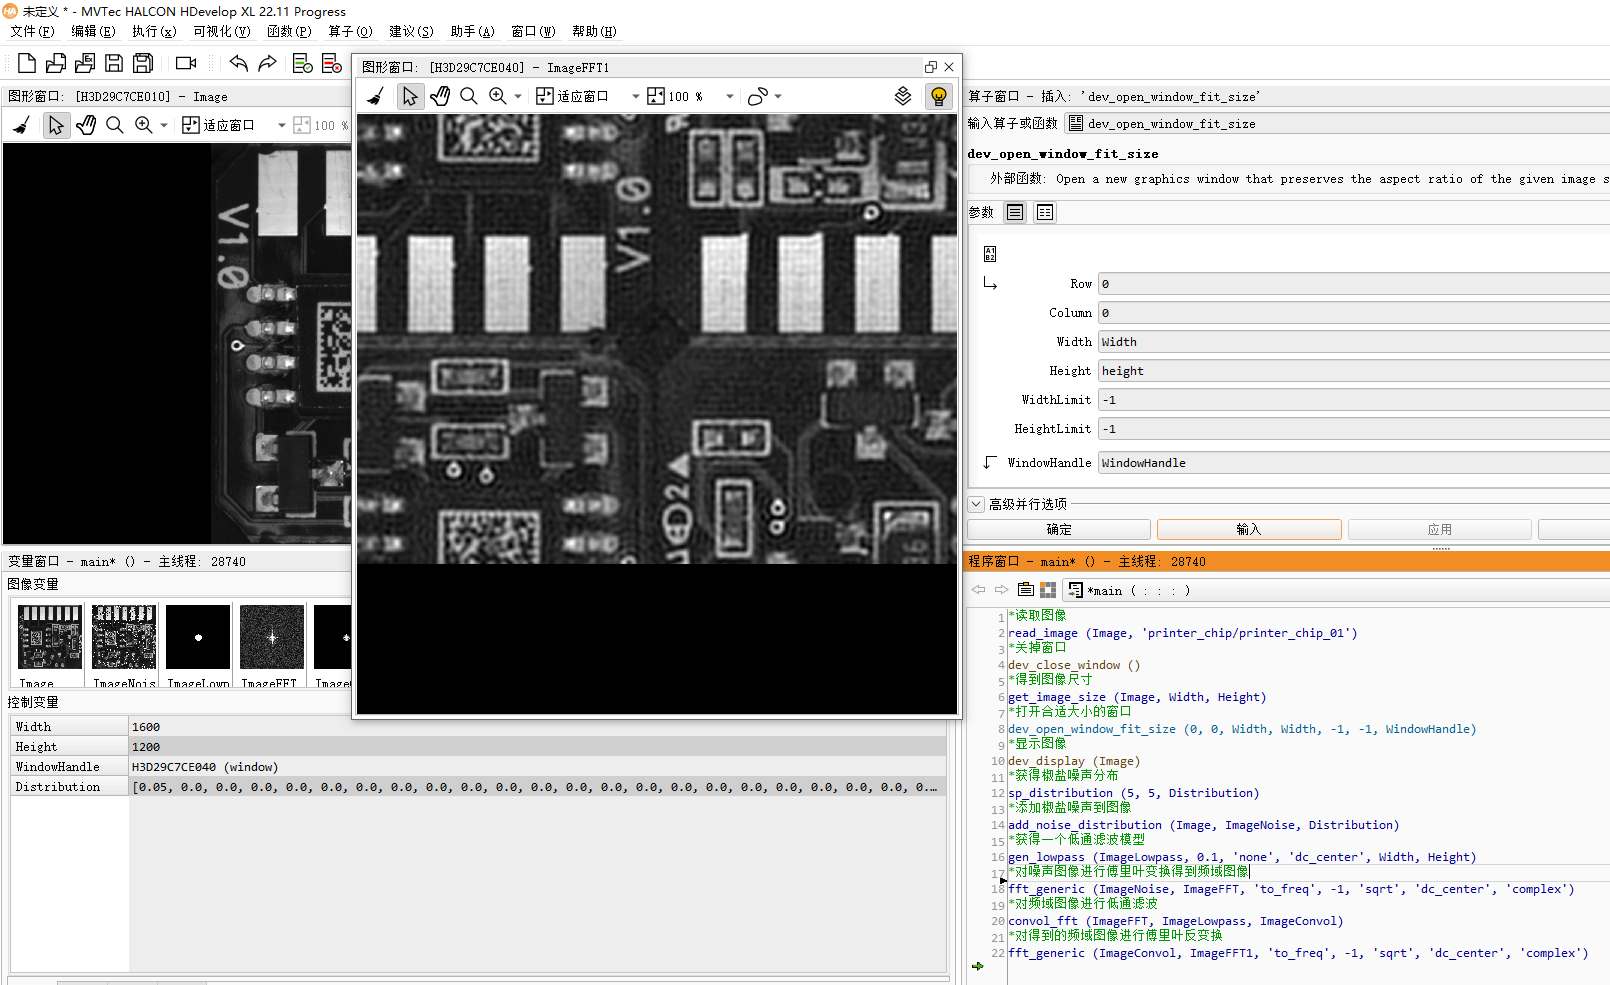 tn2>图像质量不理想、提取线条效果不好时 ```bash *读取图像 read_image (Image, 'printer_chip/printer_chip_01') get_image_size (Image, Width, Height) *在频域中生成高斯滤波器 gen_gauss_filter (ImageGauss, 100, 100, 0, 'n', 'rft', Width, Height) *对图像进行傅里叶变换 rft_generic (Image, ImageFFT, 'to_freq', 'none', 'complex', Width) *对傅里叶图像做卷积,使用之前创建的高斯滤波器作为卷积核 convol_fft (ImageFFT, ImageGauss, ImageConvol) *将卷积后的傅里叶图像还原为空间域图像。可见图像的突变部分得到了增强 rft_generic (ImageConvol, ImageFFT1, 'from_freq', 'none', 'byte', Width) sub_image (Image, ImageFFT1, ImageSub, 5, 100) *对图像进行缩放,一般图像特别大的时候,缩放一下,提取效果会更好 zoom_image_factor (ImageSub, ImageZoomed, 0.4, 0.4, 'constant') *将图像中的有灰度差异的线条提取出来 lines_gauss (ImageZoomed, Lines1, 0.2, 3, 8, 'light', 'true', 'gaussian', 'true') ``` 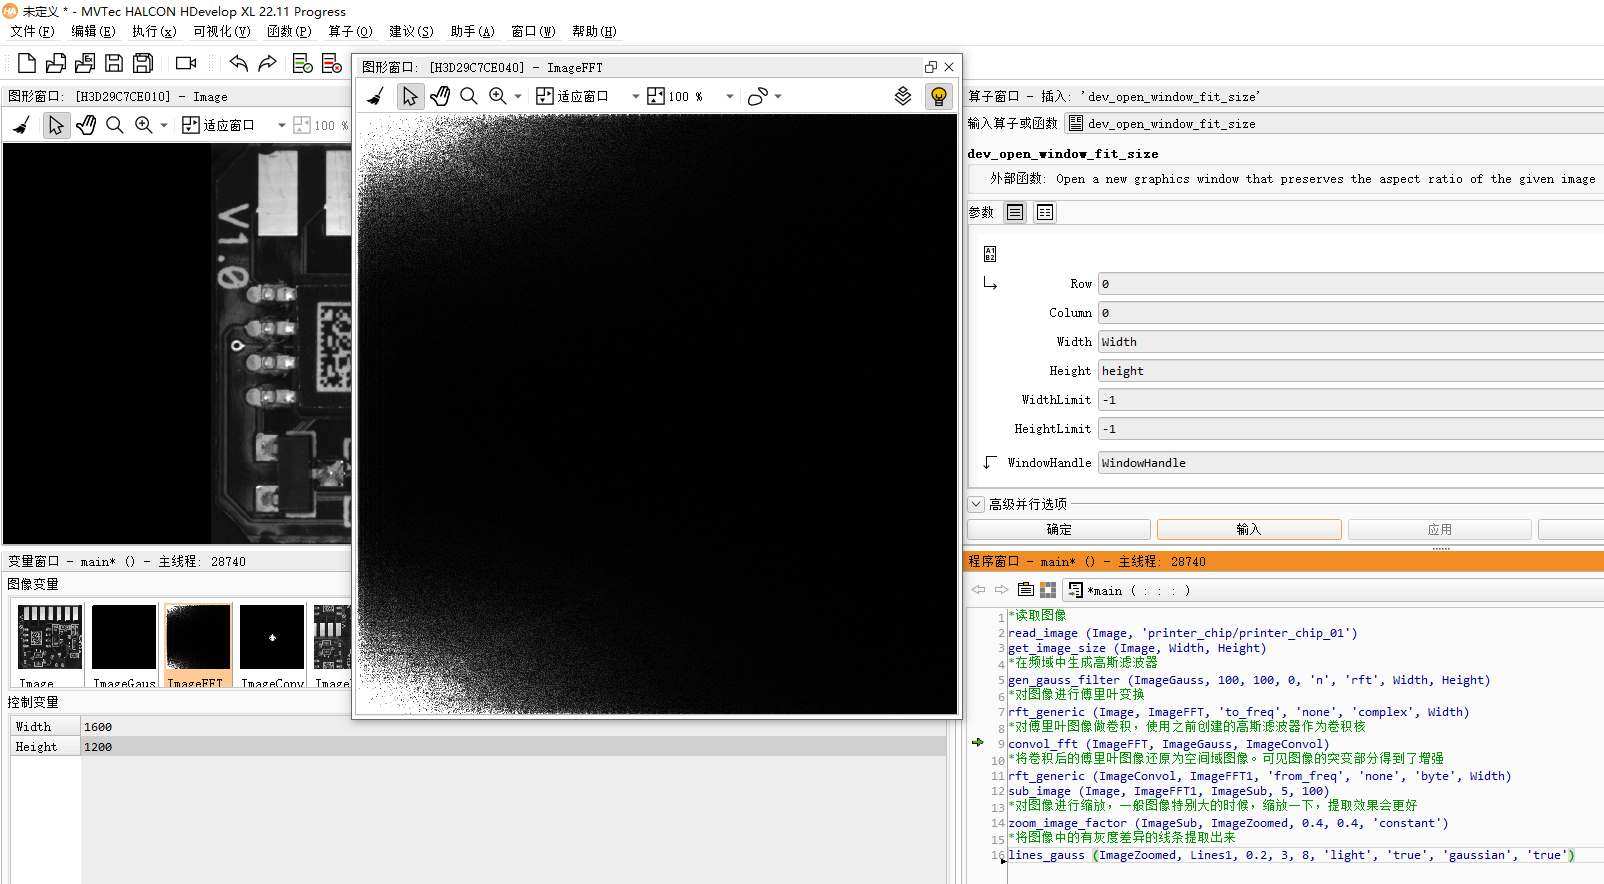 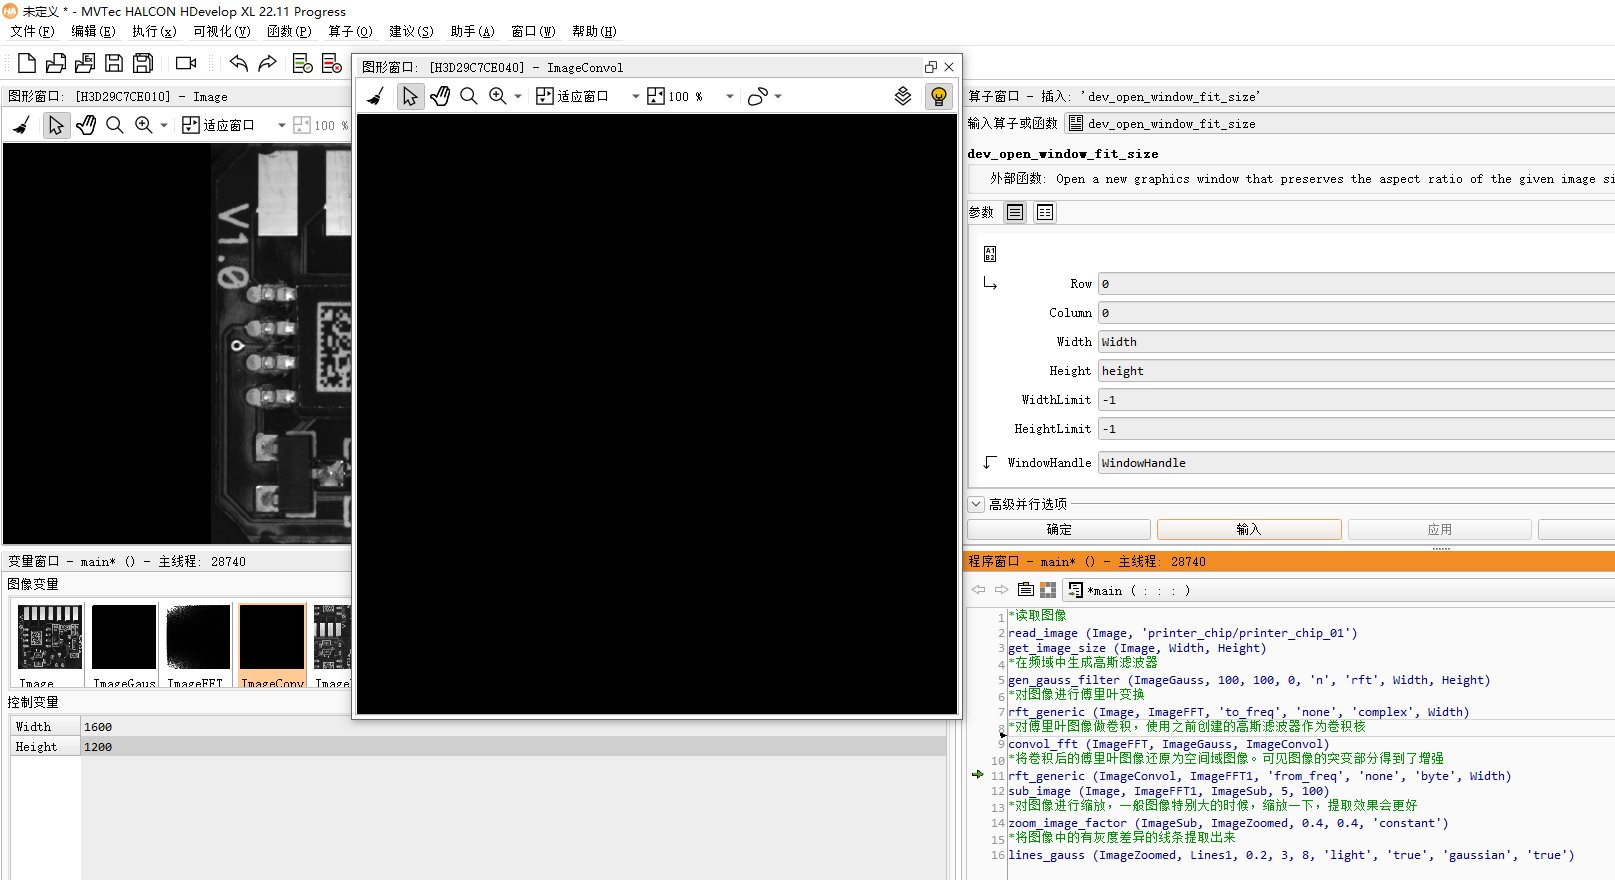 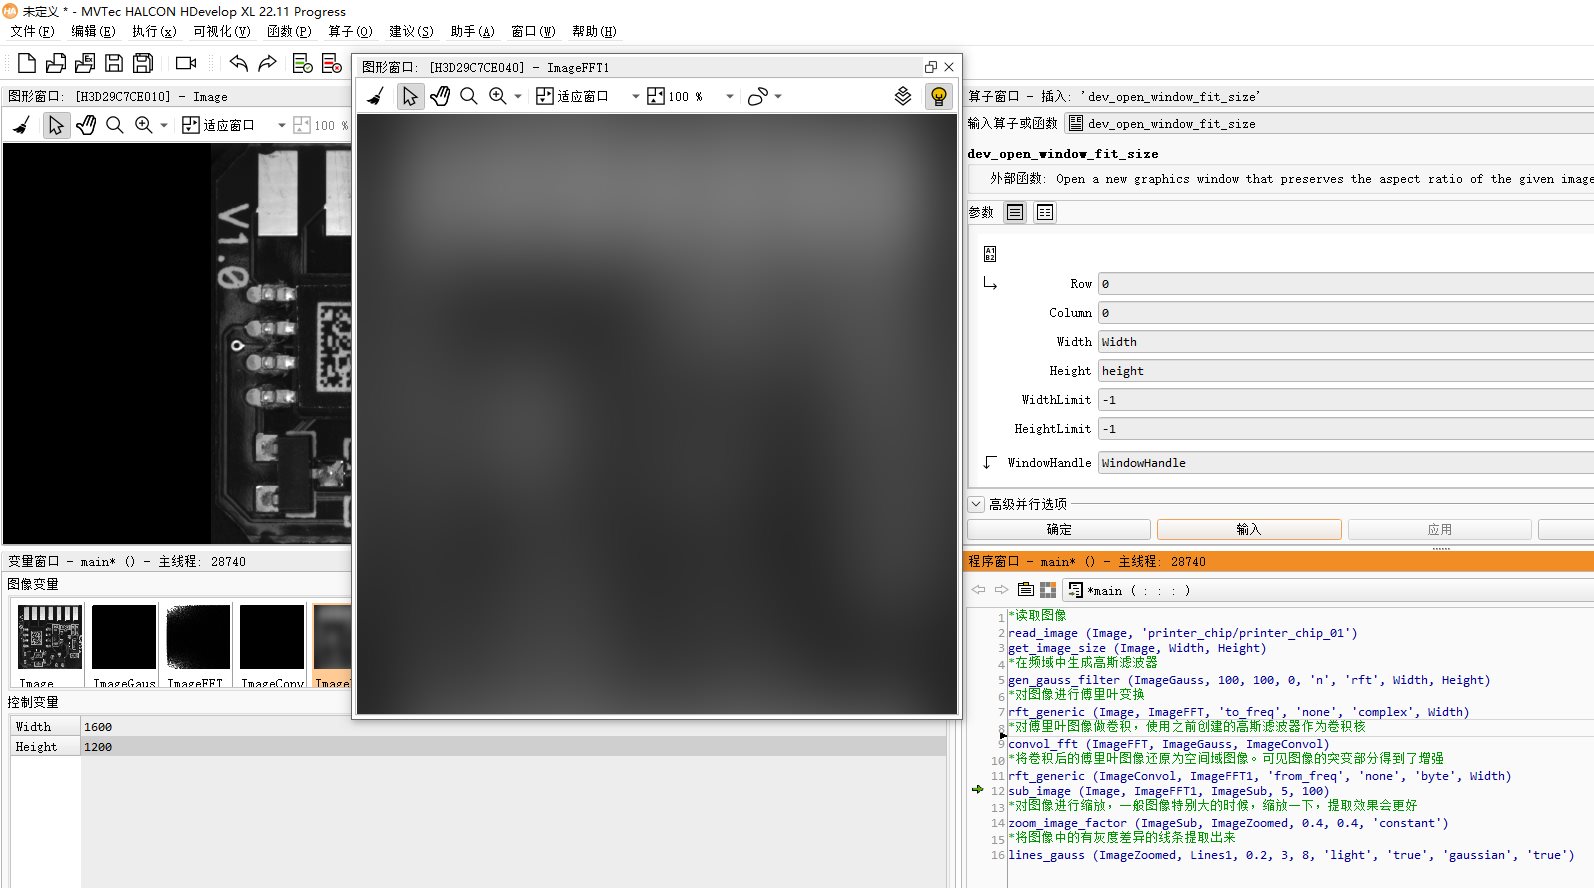 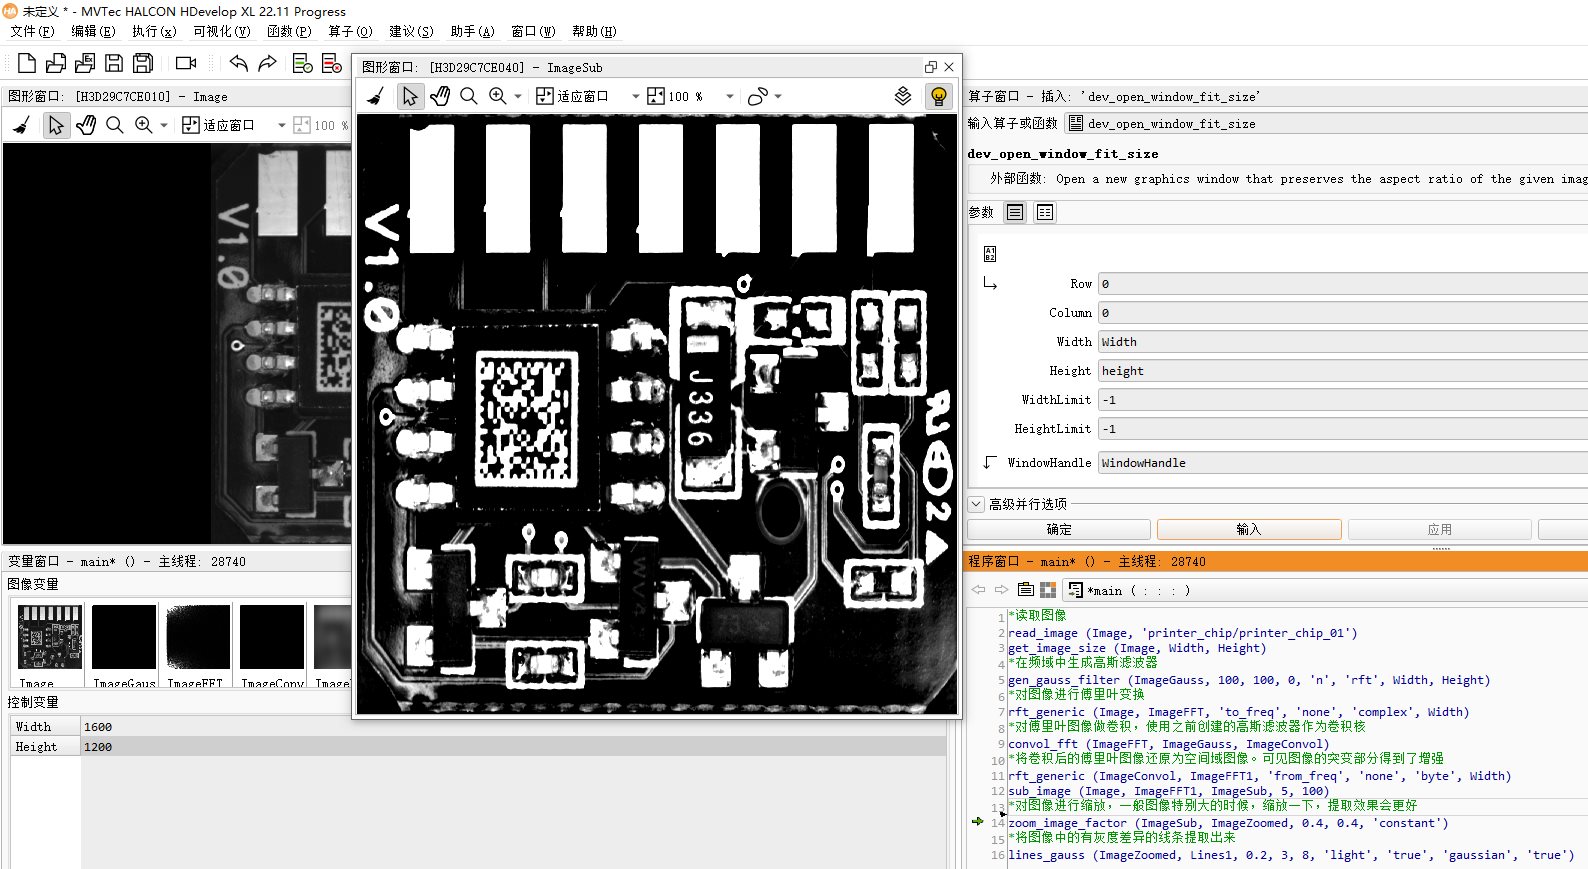 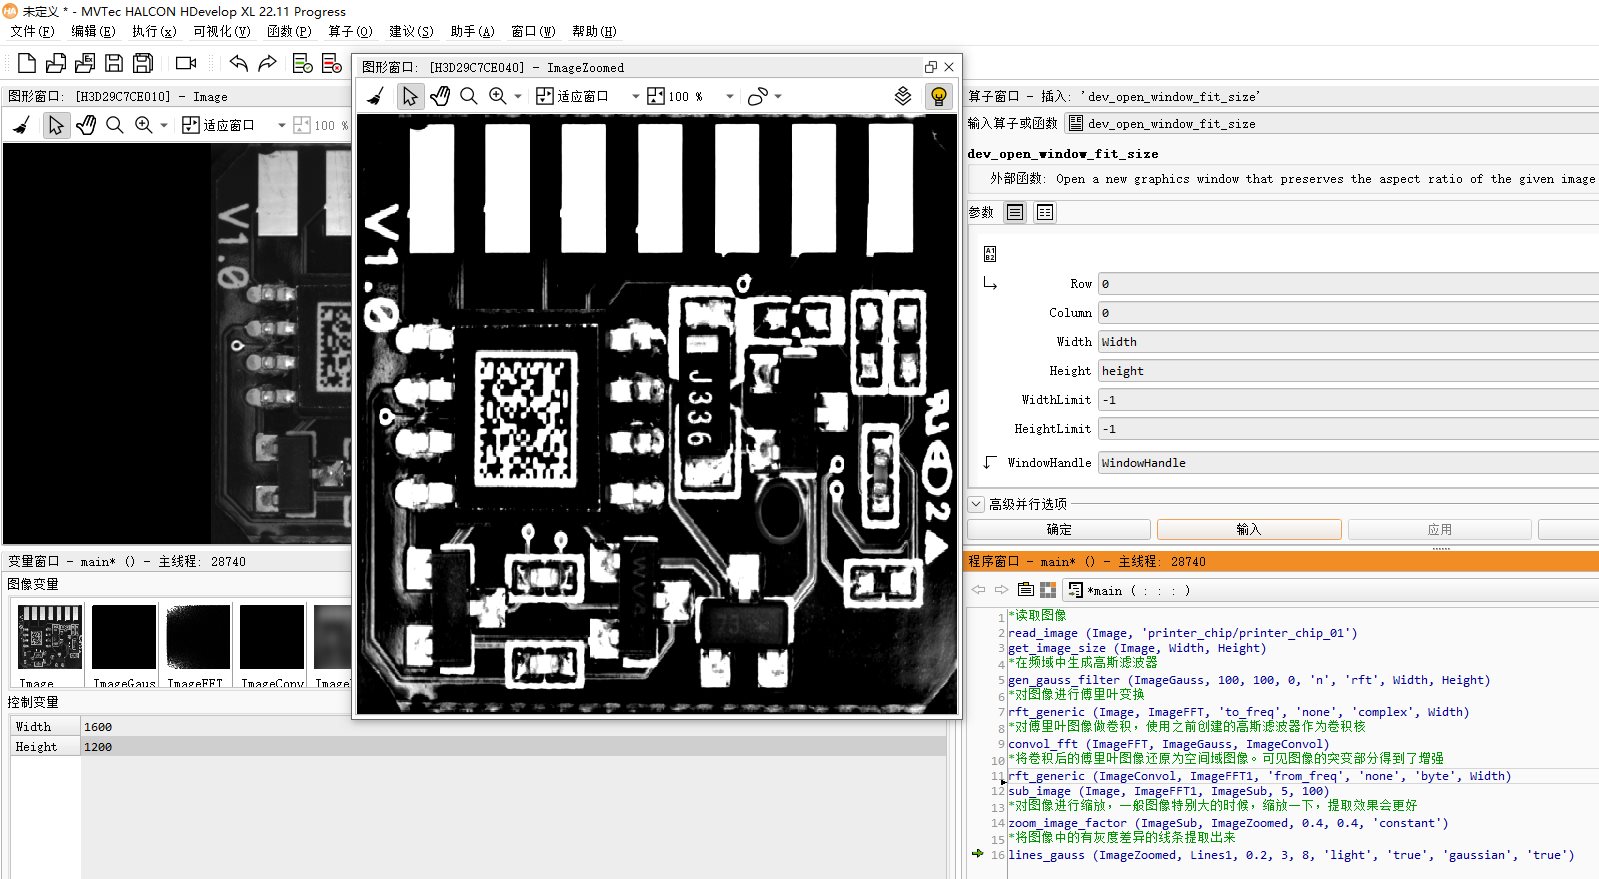 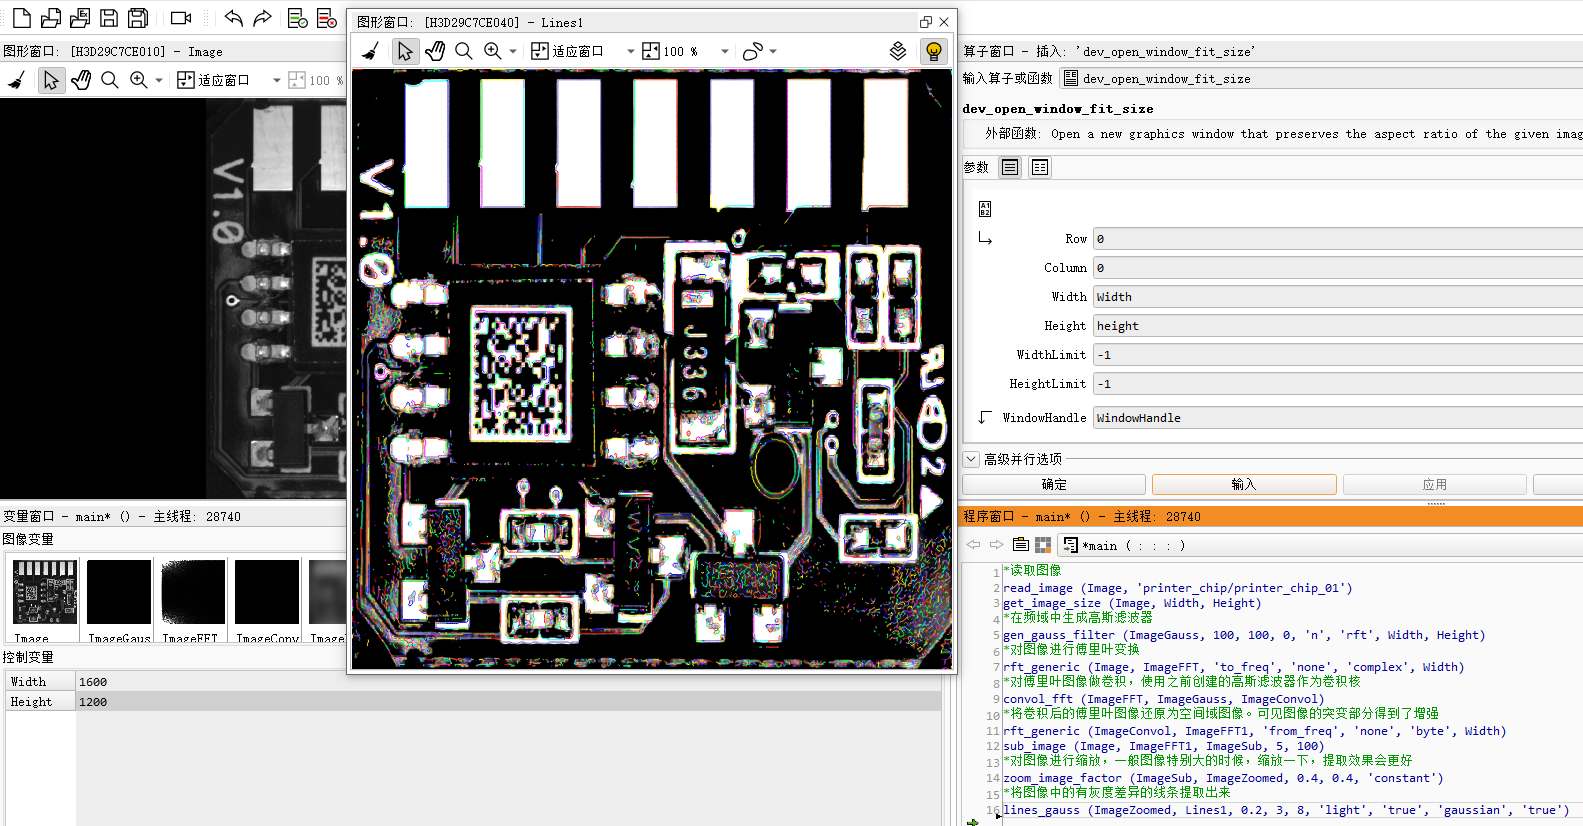 ### 图像的锐化 tn2>从频域分析,图像的低频成分主要对应于图像中的区域和背景,高频成分主要对应于图像的边缘和细节; 图像模糊的实质是表示目标物轮廓和细节的高频分量被衰减,因而在频域可采用高频提升滤波的方法来增强图像。 图像锐化:主要是加强高频成分或削弱低频成分,使图像目标物轮廓和细节更突出。 一阶微分算子法: 1.梯度法 2.Sobel算子<br/> 利用Sobl算子边缘检测: sobel_amp(image输入图像:edgeamplitude边缘梯度图像:filtertype过滤类型,size掩模尺寸:) ```bash *读取图像 read_image (Image, 'printer_chip/printer_chip_01') *关掉窗口 dev_close_window () *得到图像尺寸 get_image_size (Image, Width, Height) *打开合适大小的窗口 dev_open_window_fit_size (0, 0, Width, Width, -1, -1, WindowHandle) *显示图像 dev_display (Image) *对图像进行sobel算子处理 sobel_amp (Image, EdgeAmplitude, 'y', 3) sobel_amp (Image, EdgeAmplitude, 'x', 3) sobel_amp (Image, EdgeAmplitude, 'sum_abs', 3) sobel_amp (Image, EdgeAmplitude, 'sum_sqrt', 3) sobel_amp (Image, EdgeAmplitude, 'sum_sqrt_binomial', 3) sobel_amp (Image, EdgeAmplitude, 'x_binomial', 3) sobel_amp (Image, EdgeAmplitude, 'y_binomial', 3) sobel_amp (Image, EdgeAmplitude, 'sum_abs_binomial', 3) sobel_amp (Image, EdgeAmplitude, 'sum_abs', 3) sobel_amp (Image, EdgeAmplitude, 'sum_abs', 5) sobel_amp (Image, EdgeAmplitude, 'sum_abs', 7) sobel_amp (Image, EdgeAmplitude, 'sum_abs', 9) sobel_amp (Image, EdgeAmplitude, 'sum_abs', 11) ```  ### 用有限差分计算拉普拉斯算子 tn2>laplace(image输入图像:imagelaplace拉普拉斯滤波结果图像:resulttype图像类型,masksize掩膜尺寸,filtermask拉普拉斯掩膜类型:)<br/> 高通滤波法:<br/> 理想高通滤波器 巴特沃斯高通滤波器 指数高通滤波器 梯形高通滤波器<br/> 生成理想高通滤波:<br/> gen_highpass(:imagehighpass生成的滤波器图像:frequency截止频率,norm滤波器归一化引子,mode频率图中心位置,width,height生成滤波图像宽高: ```bash *读取图像 read_image (Image, 'printer_chip/printer_chip_01') *关掉窗口 dev_close_window () *得到图像尺寸 get_image_size (Image, Width, Height) *打开合适大小的窗口 dev_open_window_fit_size (0, 0, Width, Width, -1, -1, WindowHandle) *显示图像 dev_display (Image) *得到高通滤波模型 gen_highpass (ImageHighpass, 0.1, 'none', 'dc_center', Width, Height) *对图像进行傅里叶变换 fft_generic (Image, ImageFFT, 'to_freq', -1, 'sqrt', 'dc_center', 'complex') *对频率图像进行高通滤波 convol_fft (ImageFFT, ImageHighpass, ImageConvol) *对得到的频率进行傅里叶反变换 fft_generic (ImageConvol, ImageFFT1, 'to_freq', -1, 'sqrt', 'dc_center', 'complex') ``` 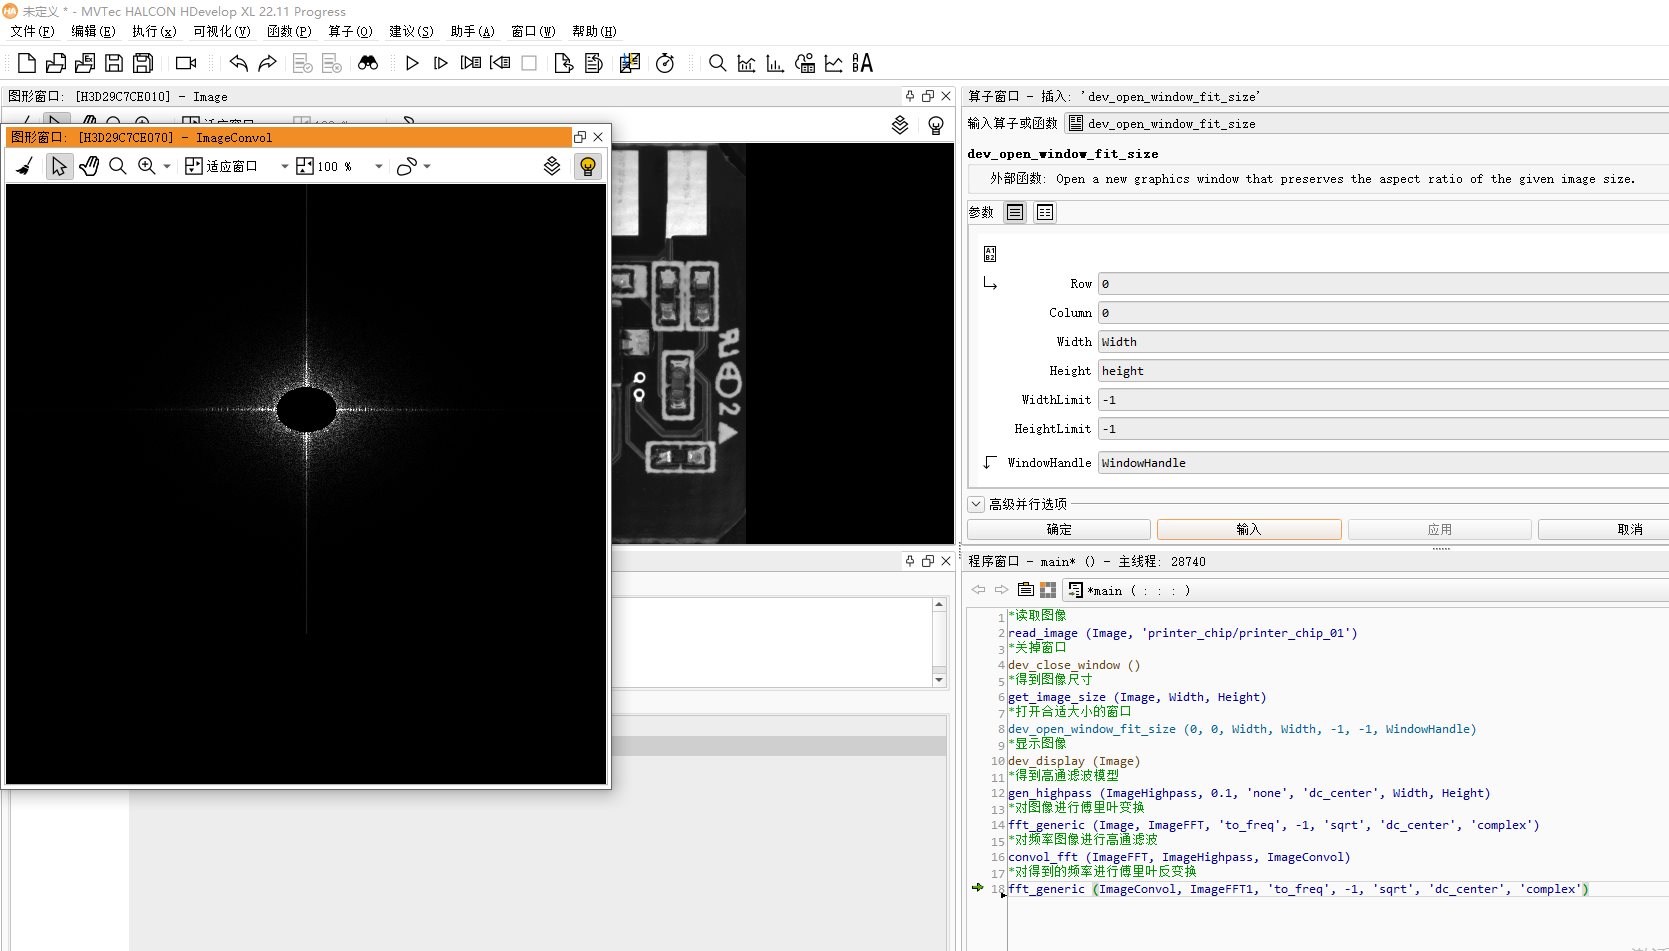 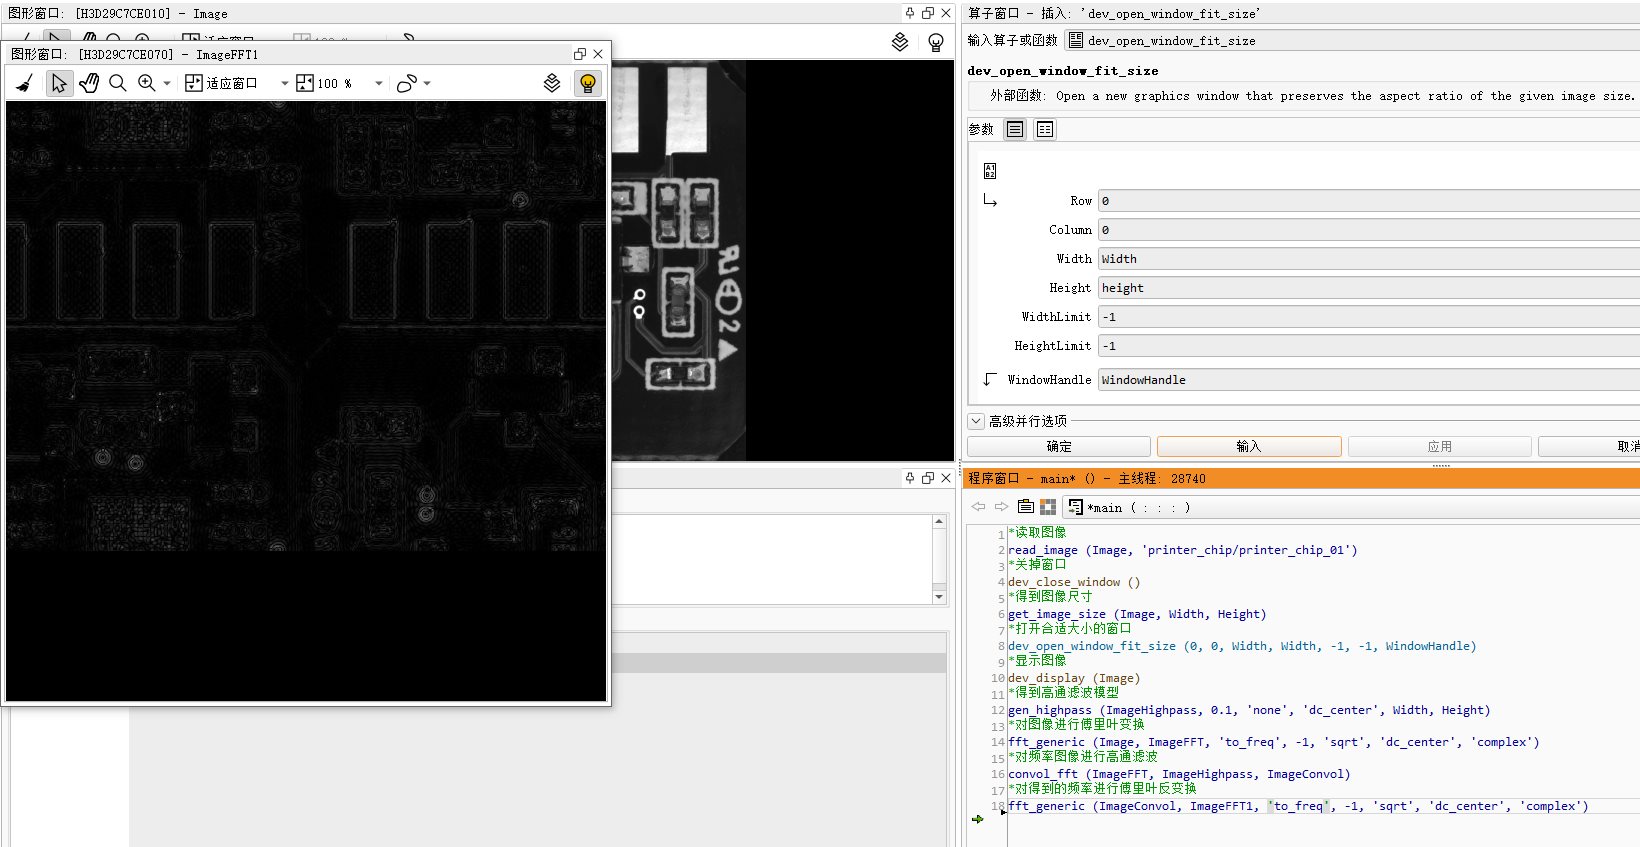 ### 图像减法 tn2>mult_image(Image1, Image2 : ImageResult : Mult, Add : )  ```bash *图二 mult_image (Image, Image, ImageResult, 0.05, 1) *图三 mult_image (Image, Image, ImageResult, 0.003, 100) ```