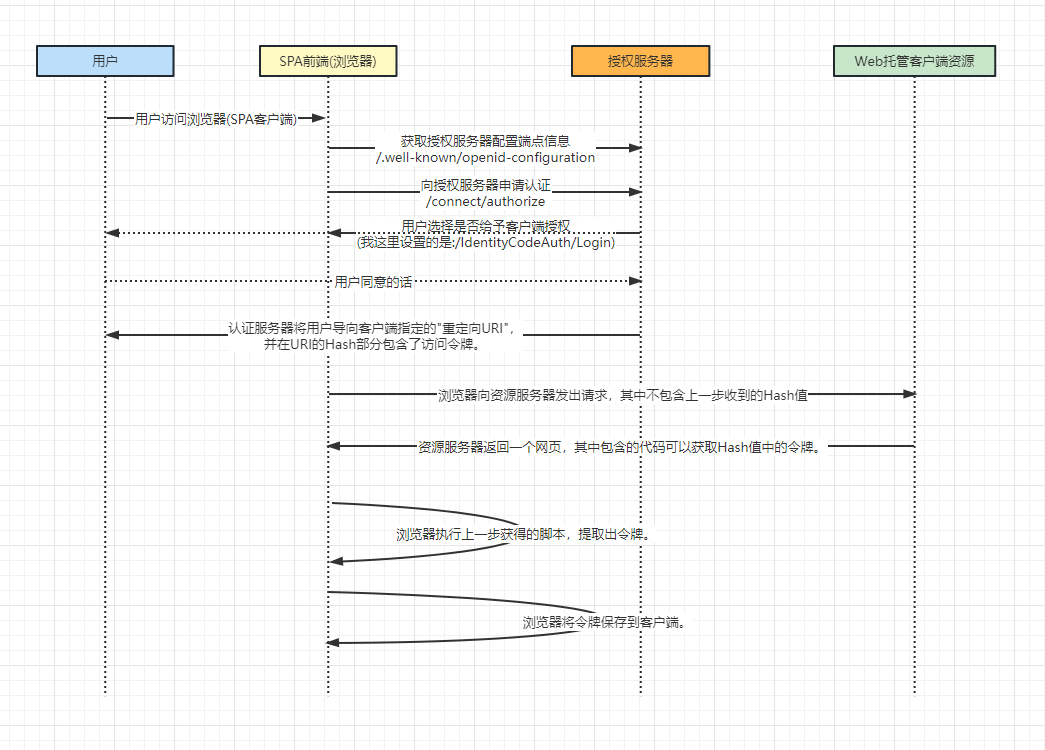
.net 6 Kubernete Identity Server4 与 Ocelot 网关的服务整合 电脑版发表于:2023/1/14 21:05  >#.net 6 Kubernete Identity Server4 与 Ocelot 网关的服务整合 [TOC] 前言 ------------ tn2>当我的项目通过Helm进行打包之后,发现需要对外暴露三个端口,觉得很没有必要,因为网站没有那么大嘛。 一个是SPA前端网页 一个是网关(Ocelot) 还有一个授权服务(Identity Server 4) 所以我就想把授权服务与网关服务进行整合。 Implicit 模式 ------------ ### 何为 Implicit 模式? tn2>简化模式(implicit grant type)不通过第三方应用程序的服务器,直接在浏览器中向认证服务器申请令牌,跳过了`授权码(code)`这个步骤,因此得名。 所有步骤在浏览器中完成,令牌对访问者是可见的,且客户端不需要认证。  tn2>但这还不算什么,在这中间我添加了微软的登录方式,而微软的登录方式使用的又是OAuth2.0+OpenID的登录。 所以我们来讲讲OAuth2.0这种模式。 ### OAuth 2.0 tn2>为了理解OAuth 2.0,我举个例子:当我们登录一个网站时,需要获取微软的账户信息,不可能直接将用户名与密码给这个网站让这个网站去登录获取信息,这样相当不安全,并且有可能会导致用户和密码泄露的情况。 所以OAuth就是为了解决这个而诞生的。  tn2>OAuth在"客户端"与"服务提供商"之间,设置了一个授权层(authorization layer)。 "客户端"不能直接登录"服务提供商",只能登录授权层,以此将用户与客户端区分开来。 "客户端"登录授权层所用的令牌(token),与用户的密码不同。 用户可以在登录的时候,指定授权层令牌的权限范围和有效期。 <br/> "客户端"登录授权层以后,"服务提供商"根据令牌的权限范围和有效期,向"客户端"开放用户储存的资料。 运行的流程如下图所示:  tn2>(A)用户打开客户端以后,客户端要求用户给予授权。 (B)用户同意给予客户端授权。 (C)客户端使用上一步获得的授权,向认证服务器申请令牌。 (D)认证服务器对客户端进行认证以后,确认无误,同意发放令牌。 (E)客户端使用令牌,向资源服务器申请获取资源。 (F)资源服务器确认令牌无误,同意向客户端开放资源。 <br/> 不难看出来,上面六个步骤之中,B是关键,即用户怎样才能给于客户端授权。 有了这个授权以后,客户端就可以获取令牌,进而凭令牌获取资源。 而 Implicit 就是其中的一种模式。 ### OpenID tn2>OpenID,简单来讲是外部登录获取用户的身份信息。  失败的思路一 ------------ tn2>我的想法是想通过请求Ocelot网关`/auth`地址转发到IdentityServer4授权服务器进行登录授权,最终以失败告终,里面最根本的问题是:当微软授权页面登录完成之后,需要将结果返回到IdentityServer4进行处理时,验证的cookie没了。 使用的包是:  tn2>报了个错: An unhandled exception occurred while processing the request. Correlation failed. 当时查看了很多解决这个问题的方法,但都没有效果。 然后翻源码来调试,重写了`MicrosoftAccountHandler`类调试,发现就是没有Cookie,网上都说没有设置`options.SameSite`这玩意,屁用没有。 我们可以看到它可以通过`Options.CorrelationCookie.Name + correlationId`去Cookie里面找这个,然后再通过验证判断是否非空。 ```csharp public class MyMicrosoftAccessAuthenticationHandler : MicrosoftAccountHandler { public MyMicrosoftAccessAuthenticationHandler(IOptionsMonitor<MicrosoftAccountOptions> options, ILoggerFactory logger, UrlEncoder encoder, ISystemClock clock) : base(options, logger, encoder, clock) { } protected override bool ValidateCorrelationId(AuthenticationProperties properties) { return base.ValidateCorrelationId(properties); return true; ArgumentNullException.ThrowIfNull(properties); if (!properties.Items.TryGetValue(".xsrf", out var correlationId)) { //Logger.CorrelationPropertyNotFound(Options.CorrelationCookie.Name!); return false; } properties.Items.Remove(".xsrf"); var cookieName = Options.CorrelationCookie.Name + correlationId; var correlationCookie = Request.Cookies[cookieName]; if (string.IsNullOrEmpty(correlationCookie)) { //Logger.CorrelationCookieNotFound(cookieName); return false; } var cookieOptions = Options.CorrelationCookie.Build(Context, Clock.UtcNow); Response.Cookies.Delete(cookieName, cookieOptions); if (!string.Equals(correlationCookie, "N", StringComparison.Ordinal)) { //Logger.UnexpectedCorrelationCookieValue(cookieName, correlationCookie); return false; } return true; } } public static class MyMicrosoftAccessAuthenticationHandlerEx { public static AuthenticationBuilder AddMyMicrosoftAccount(this AuthenticationBuilder builder, string authenticationScheme, string displayName, Action<MicrosoftAccountOptions> configureOptions) { return builder.AddOAuth<MicrosoftAccountOptions, MyMicrosoftAccessAuthenticationHandler>(authenticationScheme, displayName, configureOptions); } } ``` ```csharp services.AddAuthentication() .AddMyMicrosoftAccount("mic", "Microsoft", microsoftOptions => { microsoftOptions.ClientId = ClientId; microsoftOptions.ClientSecret = ClientSecret; microsoftOptions.CallbackPath = "/signin-microsoft"; microsoftOptions.AuthorizationEndpoint = $"https://login.microsoftonline.com/{TenantId}/oauth2/v2.0/authorize"; microsoftOptions.TokenEndpoint = $"https://login.microsoftonline.com/{TenantId}/oauth2/v2.0/token"; using (var sp = services.BuildServiceProvider()) { var logger = sp.GetRequiredService<ILogger<LoggingHttpHandler>>(); microsoftOptions.BackchannelHttpHandler = new LoggingHttpHandler(logger); } }) ``` tn2>建议大家千万不要有侥幸心理,改为true跳过去万事大吉的心态,跳过去后还有其他报错。 我直接放弃了。 成功的方法二 ------------ tn2>主要是以网关冒充成授权服务器,并且让授权服务器自己也认为网关是它的授权地址。 首先在本地改网关的转发地址的配置json。 ```json { "Identity_Config": { "Authority": "https://localhost:5400/", "Audience": "ApiOne", "IsHttps": false, "ValidateIssuer": true, "ValidateAudience": false }, "Routes": [ { // MvcClient "DownstreamPathTemplate": "/api/{route}", "DownstreamScheme": "https", "UpstreamPathTemplate": "/api/{route}", "UpstreamHeaderTransform": { "X-Forwarded-For": "{RemoteIpAddress}" }, "DownstreamHostAndPorts": [ { "Host": "localhost", "Port": 5000 } ], "DangerousAcceptAnyServerCertificateValidator": true }, { // signin-oidc "DownstreamPathTemplate": "/signin-microsoft", "DownstreamScheme": "https", "DownstreamHostAndPorts": [ { "Host": "localhost", "Port": 7200 } ], "UpstreamPathTemplate": "/signin-microsoft", "UpstreamHeaderTransform": { "X-Forwarded-For": "{RemoteIpAddress}" }, "DangerousAcceptAnyServerCertificateValidator": true }, { // signin-oidc "DownstreamPathTemplate": "/IdentityCodeAuth/{url}", "DownstreamScheme": "https", "DownstreamHostAndPorts": [ { "Host": "localhost", "Port": 7200 } ], "UpstreamPathTemplate": "/IdentityCodeAuth/{url}", "UpstreamHeaderTransform": { "X-Forwarded-For": "{RemoteIpAddress}" }, "DangerousAcceptAnyServerCertificateValidator": true }, { // signout-callback-oidc "DownstreamPathTemplate": "/signout-callback-oidc", "DownstreamScheme": "https", "DownstreamHostAndPorts": [ { "Host": "localhost", "Port": 7200 } ], "UpstreamPathTemplate": "/signout-callback-oidc", "UpstreamHeaderTransform": { "X-Forwarded-For": "{RemoteIpAddress}" }, "DangerousAcceptAnyServerCertificateValidator": true }, { // IdentityServer "DownstreamPathTemplate": "/{route}", "DownstreamScheme": "https", "DownstreamHostAndPorts": [ { "Host": "localhost", "Port": 7200 } ], "UpstreamPathTemplate": "/{route}", "UpstreamHeaderTransform": { "X-Forwarded-For": "{RemoteIpAddress}" }, "DangerousAcceptAnyServerCertificateValidator": true }, { "UpstreamPathTemplate": "/_vs/{url}", "UpstreamHttpMethod": [ "Get", "Post", "Delete", "Put", "Head", "Options" ], "DownstreamPathTemplate": "/_vs/{url}", "DownstreamScheme": "https", "DownstreamHostAndPorts": [ { "Host": "localhost", "Port": 7200 } ], "UpstreamHeaderTransform": { "X-Forwarded-For": "{RemoteIpAddress}" }, "LoadBalancerOptions": { "Type": "RoundRobin" }, "DangerousAcceptAnyServerCertificateValidator": true }, { "UpstreamPathTemplate": "/_framework/{url}", "UpstreamHttpMethod": [ "Get", "Post", "Delete", "Put", "Head", "Options" ], "DownstreamPathTemplate": "/_framework/{url}", "DownstreamScheme": "https", "DownstreamHostAndPorts": [ { "Host": "localhost", "Port": 7200 } ], "UpstreamHeaderTransform": { "X-Forwarded-For": "{RemoteIpAddress}" }, "LoadBalancerOptions": { "Type": "RoundRobin" }, "DangerousAcceptAnyServerCertificateValidator": true } ] } ``` tn2>`localhost:7200`就是我的ids4。 `X-Forwarded-For`这个可以使下面的路由客户端获取真的IP地址。 `DangerousAcceptAnyServerCertificateValidator`这个可以跳过`https`证书的验证。 然后在IdentityServer4中,添加一个请求管道,每当请求的时候修改为网关的授权地址。 我这里通过判断是否有这个`ExternalUrl`变量来决定的授权服务器地址。 ```csharp if (!Configuration["ExternalUrl"].IsNullOrEmpty()) { var externalUrl = Configuration["ExternalUrl"]; app.Use(async (context, next) => { context.SetIdentityServerOrigin(externalUrl); Console.WriteLine($"The Host: {context.GetIdentityServerHost()} Base Url: {context.GetIdentityServerBaseUrl()} Base Origin: {context.GetIdentityServerOrigin()} Request Cookie: {context.GetIdentityServerBasePath()}"); await next(); }); } ``` ```bash # 5400是我的网关地址 "ExternalUrl": "https://localhost:5400" ``` tn2>Azure里面的应用注册里面,重定向的地址为: ```json https://localhost:5400/IdentityCodeAuth/ExBackLogoutUrl https://localhost:5400/signin-microsoft ``` tn2>注销的通道为: ```bash https://localhost:5400/signout-oidc ``` tn2>在数据库中的,Ids4中的三张链接关键数据表的信息为: ```bash # 8080是前端SPA # [ClientCorsOrigins] https://localhost:8080 http://localhost:8080 https://localhost:5000 # [ClientPostLogoutRedirectUris] http://localhost:8080/Home http://localhost:8080/convert-list https://login.microsoftonline.com/common/oauth2/v2.0/logout https://localhost:5400/auth/IdentityCodeAuth/Logout # [ClientRedirectUris http://localhost:8080/callback.html http://localhost:8080/silent-renew.html http://localhost:8080/convert-list ``` tn2>前端的授权地址写成网关地址,这样在本地测试就没啥问题了,有问题还是在群里问吧! 我已经测试了是没问题的。 然后我们如果要放到Kubernetes中的话就要修改一些信息了。 Kubernetes ------------ tn2>这里我使用的是Ingress域名的方式,首先修改网关,我这里它是通过环境变量来进行判断在不同的环境下使用不同的json。 然后就是注意服务名和ocelot的权限。 ```json { "Identity_Config": { "Authority": "外部域名地址", "Audience": "ApiOne", "IsHttps": false, "ValidateIssuer": true, "ValidateAudience": false }, "Routes": [ { "UpstreamPathTemplate": "/api/{url}", "UpstreamHttpMethod": [ "Get", "Post", "Delete", "Put", "Head", "Options" ], "DownstreamPathTemplate": "/api/{url}", "DownstreamScheme": "https", "ServiceName": "API接口服务", "UpstreamHeaderTransform": { "X-Forwarded-For": "{RemoteIpAddress}" }, "QoSOptions": { "ExceptionsAllowedBeforeBreaking": 500, "DurationOfBreak": 1000, "TimeoutValue": 3000000 } }, { "UpstreamPathTemplate": "/swagger/{url}", "UpstreamHttpMethod": [ "Get", "Post", "Delete", "Put", "Head", "Options" ], "DownstreamPathTemplate": "/swagger/{url}", "DownstreamScheme": "https", "ServiceName": "API接口服务", "UpstreamHeaderTransform": { "X-Forwarded-For": "{RemoteIpAddress}" }, "DangerousAcceptAnyServerCertificateValidator": true }, { "UpstreamPathTemplate": "/ServerFile/{url}", "UpstreamHttpMethod": [ "Get", "Post", "Delete", "Put", "Head", "Options" ], "DownstreamPathTemplate": "/ServerFile/{url}", "DownstreamScheme": "https", "ServiceName": "API接口服务", "UpstreamHeaderTransform": { "X-Forwarded-For": "{RemoteIpAddress}" }, "DangerousAcceptAnyServerCertificateValidator": true }, { "UpstreamPathTemplate": "/_framework/{url}", "UpstreamHttpMethod": [ "Get", "Post", "Delete", "Put", "Head", "Options" ], "DownstreamPathTemplate": "/_framework/{url}", "DownstreamScheme": "https", "ServiceName": "ids4授权服务", "UpstreamHeaderTransform": { "X-Forwarded-For": "{RemoteIpAddress}" }, "DangerousAcceptAnyServerCertificateValidator": true }, { "UpstreamPathTemplate": "/signin-microsoft", "UpstreamHttpMethod": [ "Get", "Post", "Delete", "Put", "Head", "Options" ], "DownstreamPathTemplate": "/signin-microsoft", "DownstreamScheme": "https", "ServiceName": "ids4授权服务", "DangerousAcceptAnyServerCertificateValidator": true, "UpstreamHeaderTransform": { "X-Forwarded-For": "{RemoteIpAddress}" } }, { "UpstreamPathTemplate": "/_vs/{url}", "UpstreamHttpMethod": [ "Get", "Post", "Delete", "Put", "Head", "Options" ], "DownstreamPathTemplate": "/_vs/{url}", "DownstreamScheme": "https", "ServiceName": "ids4授权服务", "DangerousAcceptAnyServerCertificateValidator": true, "UpstreamHeaderTransform": { "X-Forwarded-For": "{RemoteIpAddress}" } }, { "DownstreamPathTemplate": "/IdentityCodeAuth/{url}", "DownstreamScheme": "https", "ServiceName": "ids4授权服务", "UpstreamPathTemplate": "/IdentityCodeAuth/{url}", "UpstreamHeaderTransform": { "X-Forwarded-For": "{RemoteIpAddress}" }, "DangerousAcceptAnyServerCertificateValidator": true }, { "DownstreamPathTemplate": "/signout-callback-oidc", "DownstreamScheme": "https", "ServiceName": "ids4授权服务", "UpstreamPathTemplate": "/signout-callback-oidc", "UpstreamHeaderTransform": { "X-Forwarded-For": "{RemoteIpAddress}" }, "DangerousAcceptAnyServerCertificateValidator": true }, { "DownstreamPathTemplate": "/{route}", "DownstreamScheme": "https", "ServiceName": "ids4授权服务", "UpstreamPathTemplate": "/{route}", "UpstreamHeaderTransform": { "X-Forwarded-For": "{RemoteIpAddress}" }, "DangerousAcceptAnyServerCertificateValidator": true } ], "GlobalConfiguration": { "ServiceDiscoveryProvider": { "Namespace": "swprinter", "Type": "kube" } } } ``` tn2>然后就是API授权地址也需要改成外部域名地址的地址。 ```json "Identity_Config": { "Authority": "外部域名地址", "Audience": "ApiOne", "IsHttps": false, "ValidateIssuer": true, "ValidateAudience": false }, ``` tn2>IdentityServer4修改授权地址为外部域名地址。 ```bash "ExternalUrl": "外部域名地址" ``` tn2>Azure里面的应用注册里面,重定向的地址为: ```json https://外部域名/ExBackLogoutUrl https://外部域名/signin-microsoft ``` tn2>注销的通道为: ```bash https://外部域名/signout-oidc ``` tn2>好了真正的好戏开始了。 ### 502问题 tn2>当从微软那边登录成功之后,授权服务器跳转回SPA前端,当去授权服务器获取用户信息的时候报错502。 这是因为Cookie在数据包的头部太大了,Ingress nginx在转发的时候报错,所以我们需要去设置Ingress Nginx。 (我个人比较推荐使用IngressClass的方式进行解决,但目前项目赶集我后期会补上,这里我们就先用命令的方式来解决。) 首先找到Ingress nginx的pod,我这里是`nginx-ingress-release-nginx-ingress-86b557d895-hgnlv`,修改该`nginx.conf`与外部域名的配置文件。 ```bash sudo mkdir /xx sudo chmod 777 /xx kubectl cp default/nginx-ingress-release-nginx-ingress-86b557d895-hgnlv:/etc/nginx/nginx.conf /xx/nginx.conf kubectl cp default/nginx-ingress-release-nginx-ingress-86b557d895-hgnlv:/etc/nginx/conf.d/外部域名.conf /xx/外部域名.conf ``` ```bash # nginx.conf http{ ... proxy_buffer_size 128k; proxy_buffers 4 256k; proxy_busy_buffers_size 256k; large_client_header_buffers 4 16k; ... } # 外部域名.conf location /{ ... fastcgi_buffers 16 16k; fastcgi_buffer_size 32k; ... } ``` ```bash # 复制修改后的配置到ingress nginx中 kubectl cp /xx/nginx.conf default/nginx-ingress-release-nginx-ingress-86b557d895-hgnlv:/etc/nginx/nginx.conf kubectl cp /xx/外部域名.conf default/nginx-ingress-release-nginx-ingress-86b557d895-hgnlv:/etc/nginx/conf.d/外部域名.conf # 进入管道中 kubectl exec -it pod/nginx-ingress-release-nginx-ingress-86b557d895-hgnlv bash # 重启nginx nginx -s reload ``` ### 找不到外部域名而导致授权报错 tn2>就是你私有的服务器,在没有配置外部域名的情况下,直接在本机hosts上添加的地址和域名,但是由于内部服务器找不到该地址产生的500报错。 所以解决这个的方式第一种就是购买外部域名,并解析到你的ingress网关地址。 第二种方法,配置CoreDNS将外部域名解析为内部地址。 ```bash kubectl edit cm/coredns -n kube-system ``` ```bash apiVersion: v1 data: Corefile: | .:53 { errors health { lameduck 5s } ready rewrite stop { name regex 外部域名地址 <网关服务>.<名称空间>.svc.cluster.local answer name <网关服务>.<名称空间>.svc.cluster.local 外部域名地址 } kubernetes cluster.local in-addr.arpa ip6.arpa { pods insecure fallthrough in-addr.arpa ip6.arpa ttl 30 } ... ``` tn2>然后等半分钟就解决了。