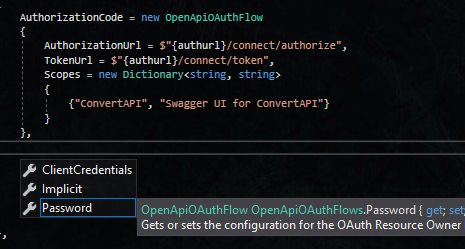
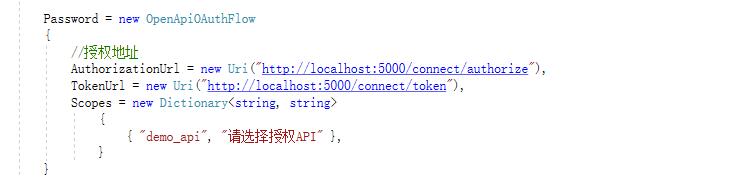
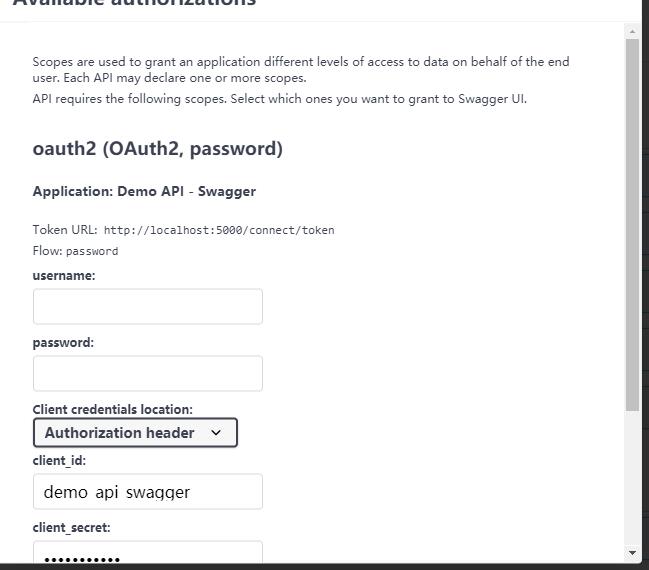
.net core 3.1 Identity Server4 (Swagger UI授权) 电脑版发表于:2021/1/25 16:48  >#.net core 3.1 Identity Server4 (Swagger UI授权) [TOC] tn>Identity Server 4的目录:https://www.tnblog.net/hb/article/details/5458 项目地址:https://gitee.com/zuxiazijiahebo/IdentityServer4 前言 ------------ tn>Swagger是一个有用的工具,用于使用标准JSON格式即时创建基本的API文档,该文档可以使用对开发人员友好的UI进行呈现。这些UI通常允许您开始通过浏览器发出演示请求。但是,一旦您开始使用OAuth保护此API,该如何保持Swagger文档的功能?<br/> Swagger与OAuth授权服务器的集成已有相对完善的文档,因此在本文中,您将了解使用Swagger将IdentityServer支持添加到ASP.NET Core API的基础,然后了解这种方法的局限性以及也许值得探索。<br/> 本文将演示Swashbuckle。 准备API ------------ tn>首先,您需要使用IdentityServer保护的API。这里我们就创建一个`ApIDemo2`的API。在`ConfigureServices`中注册身份验证。 ```csharp services.AddAuthentication("Bearer") .AddJwtBearer("Bearer", options => { options.Authority = "https://localhost:7200"; // 授权服务器地址 //确定自己是哪个资源(资源名称) options.Audience = "ApiTwo"; options.RequireHttpsMetadata = false; // 是否使用https进行通信 //取消验证用户以及验证角色 options.TokenValidationParameters = new Microsoft.IdentityModel.Tokens.TokenValidationParameters() { ValidateIssuer = false, ValidateAudience = false }; }); ``` tn然后通过更新`Configure`方法使其类似于以下内容,在HTTP管道中启用它: ```csharp app.UseAuthentication(); app.UseAuthorization(); ``` tn>然后,您可以通过使用`AuthorizeAttribute`动作或控制器来触发此操作。现在,您应该从这些受保护的端点获取` 401未经授权`。这里我们在默认的`WeatherForecastController`下添加一个`POST`请求方法并添加授权标签`Authorize`。 ```csharp [Authorize] [HttpPost] public IEnumerable<WeatherForecast> Post() { var rng = new Random(); return Enumerable.Range(1, 5).Select(index => new WeatherForecast { Date = DateTime.Now.AddDays(index), TemperatureC = rng.Next(-20, 55), Summary = Summaries[rng.Next(Summaries.Length)] }) .ToArray(); } ``` IdentityServer授权服务器配置 ------------ tn>在`GetApiResources`方法中添加`ApiScope`。通过这种方法,你仅使用一个`scope`就能表示完全访问这个作用域的权限。 ```csharp new ApiScope("ApiTwo", "Full access to API #1") ``` tn>要将`Swagger UI`配置为`IdentityServer`实现中的客户端应用程序(`Client`),您需要在`IdentityServer`中添加一个类似于以下内容的客户端条目。您正在使用授权码流`PKCE`和路径为的重定向URI `/oauth2-redirect.html`,这是Swagger UI的默认路径。如果您的Swagger UI具有基本路径,则还应将其包含在重定向URI中(即,如果Swagger UI处于`/swagger`,则重定向URI应该为`/swagger/oauth2-redirect.html`)。 ```csharp new Client { ClientId = "apidemo2_swagger", ClientName = "Swagger UI for ApIDemo2", ClientSecrets = {new Secret("secret".Sha256())}, // 这个自己整吧 AllowedGrantTypes = GrantTypes.Code, // 启动Pkce RequirePkce = true, RequireClientSecret = false, RedirectUris = {"http://localhost:9001/swagger/oauth2-redirect.html"}, AllowedCorsOrigins = {"http://localhost:9001"}, AllowedScopes = { "ApiTwo" } }, ``` Swashbuckle添加OAuth支持 ------------ tn>回到我们的`ApIDemo2`中,让我们引入`Swashbuckle`: ```bash Install-Package Swashbuckle -Version 5.6.0 Install-Package Swashbuckle.AspNetCore.Swagger -Version 5.6.3 ``` tn>我们在`ConfigureServices`方法中添加以下内容进行注册,使用一些描述性信息配置基本的Swagger文档。 ```csharp services.AddSwaggerGen(options => { options.SwaggerDoc("v1", new OpenApiInfo { Title = "Protected API", Version = "v1" }); // 我们会在这下面添加更多东西... }); ``` tn>接下来,您想将有关授权服务器的一些信息添加到`swagger`文档中。由于您的UI将在最终用户的浏览器中运行,并且在该浏览器中运行的JavaScript将需要访问令牌,因此您将使用授权代码流(`code`的授权方式)(PKCE))。 <br/>同时您需要告诉Swashbuckle授权和令牌端点的位置(请检查IdentityServer4文档),以及它将使用的作用域(其中键是作用域本身,而值是显示名称) )。 ```csharp services.AddSwaggerGen(options => { options.SwaggerDoc("v1", new OpenApiInfo { Title = "Protected API", Version = "v1" }); options.AddSecurityDefinition("oauth2", new OpenApiSecurityScheme { Type = SecuritySchemeType.OAuth2, Flows = new OpenApiOAuthFlows { AuthorizationCode = new OpenApiOAuthFlow { AuthorizationUrl = new Uri("https://localhost:7200/connect/authorize"), TokenUrl = new Uri("https://localhost:7200/connect/token"), Scopes = new Dictionary<string, string> { {"ApiTwo", "Swagger UI for ApIDemo2"} } } } }); options.OperationFilter<AuthorizeCheckOperationFilter>(); }); ``` tn>现在,您需要告诉您的庞大文档,哪些端点需要访问令牌才能工作,并且它们可以返回`401`和`403`响应。您可以使用来执行此操作`IOperationFilter`,您可以在下面看到(已从`EShopOnContainers`示例存储库中的过滤器改编而成)。  ```csharp public class AuthorizeCheckOperationFilter : IOperationFilter { public void Apply(OpenApiOperation operation, OperationFilterContext context) { var hasAuthorize = context.MethodInfo.DeclaringType.GetCustomAttributes(true).OfType<AuthorizeAttribute>().Any() || context.MethodInfo.GetCustomAttributes(true).OfType<AuthorizeAttribute>().Any(); if (hasAuthorize) { operation.Responses.Add("401", new OpenApiResponse { Description = "Unauthorized" }); operation.Responses.Add("403", new OpenApiResponse { Description = "Forbidden" }); operation.Security = new List<OpenApiSecurityRequirement> { new OpenApiSecurityRequirement { [ new OpenApiSecurityScheme {Reference = new OpenApiReference { Type = ReferenceType.SecurityScheme, Id = "oauth2"} } ] = new[] { "ApiTwo" } } }; } } } ``` tn>然后,您可以像这样注册: ```csharp options.OperationFilter<AuthorizeCheckOperationFilter>(); ``` tn>现在,您可以通过在`Configure`方法中添加以下内容,在管道中同时配置`Swagger文档端点`和`Swagger UI` : ```csharp app.UseSwagger(); app.UseSwaggerUI(options => { options.SwaggerEndpoint("/swagger/v1/swagger.json", "My API V1"); options.OAuthClientId("apidemo2_swagger"); options.OAuthAppName("Demo API - Swagger"); options.OAuthUsePkce(); }); ``` tn>运行测试      其他 ------------ tn>某网友表示还可以通过不同的方式进行扩展,比如通过Password,像下面几幅图那样