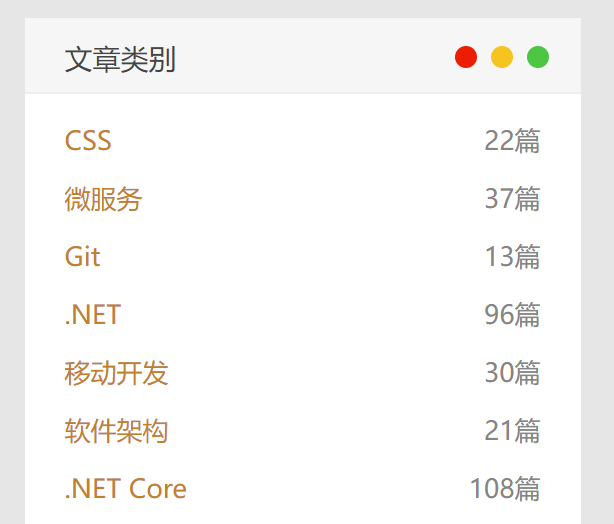
css3 伪类选择器 before和after。实现简单的标题。清楚浮动。红黄蓝效果。实现下方横线((下划线 ,下横线)),Tab菜单效果 电脑版发表于:2015/12/9 11:12 [TOC] ## 伪类选择器before和after,实现一个简单的标题效果  代码如下 ``` <!DOCTYPE html> <html lang="en"> <head> <meta charset="UTF-8"> <meta http-equiv="X-UA-Compatible" content="IE=edge"> <meta name="viewport" content="width=device-width, initial-scale=1.0"> <title>Document</title> </head> <body> <div class="quote"> <span>亲爱的</span> </div> <style> .quote:before, .quote:after { content: ""; display: inline-block; width: 50px; margin: 5px 1%; border-bottom: 1px solid blue; } </style> </body> </html> ``` ## 伪类选择器 实现Tab菜单下横线的选中效果 设计图如下:其实就是实现下面那个横杠的选中效果:  **html结构如下** 是在vue里边写的 ``` <div class="tabmenu"> <span class="item cur" @click="switchData($event, 'cur', true, false)">项目数据</span> <span class="item " @click="switchData($event, 'cur', false, true)">班级数据</span> </div> ``` **样式如下,这里还用了相对定位和绝对定位的,要出现在下方** ``` .tabmenu { .item { display: inline-block; margin-right: 20px; font-size: 17px; font-family: Microsoft YaHei; cursor: pointer; } .cur { font-size: 20px; color: #23FFFC; position: relative; } .cur:after { content: ""; display: inline-block; position: absolute; bottom: -12px; left: 13px; width: 59px; // 宽度也可以写成100%,这样就可以保持和父元素一样宽了 // width: 100%; border-bottom: 3px solid #23FFFC; } } ``` #### 效果2 如图,和上面那个几乎一样,多贴一个  **html:** ``` <div class="feedback-container"> <div class="title-wapper"> <div :class="active == 'noread' ? 'cur' : ''" class="title " @click="switchRead(0, 'noread')">未读({{ noReadCount }}) </div> <div :class="active == 'all' ? 'cur' : ''" class="title" style="margin-left: 15px;" @click="switchRead('', 'all')"> 全部({{ allCount }})</div> <div class="readBut" @click="allToRead()">全部已读</div> </div> <div class="split-line" /> <div>...下方内容...</div> </div> ``` **样式:** ``` .feedback-container { padding: 0 20px; .title-wapper { display: flex; height: 60px; // background-color: #ffabcd; line-height: 60px; align-items: center; } .title { font-family: MicrosoftYaHei-, MicrosoftYaHei; font-weight: normal; color: #333339; font-size: 16px; cursor: pointer; } .cur { color: #3E91F7; position: relative; } .cur:after { content: ""; display: inline-block; position: absolute; bottom: 0px; // 这些间距都可以微调实现更好的效果 left: -1px; // 宽度也可以写成100%,这样就可以保持和父元素一样宽了 width: 100%; border-bottom: 2px solid #409eff; } .readBut { margin-left: auto; color: #007EFF; font-size: 14px; width: 90px; height: 31px; background: #FFFFFF; border-radius: 4px 4px 4px 4px; opacity: 1; border: 1px solid #007EFF; text-align: center; line-height: 31px; cursor: pointer; } .split-line { height: 1px; background: #EAEEF0; // width: 100%; margin-left: -20px; margin-right: -20px; } } ``` **js方法也贴一下吧** ``` switchRead(isRead, readTag) { this.getMessage(1, isRead) // 控制菜单选中的标识 this.active = readTag this.isReadTag = isRead // 切换过后重新成1开始吧 this.pageIndex = 1 }, ``` ## 伪类选择器 after清楚浮动 就不用在后面添加一个元素清除浮动了,比较方便 ``` .content::after { content: ""; display: block; clear: both; } ``` ## 伪类选择器 实现红黄蓝效果  代码如下 ``` <!DOCTYPE html> <html lang="en"> <head> <meta charset="UTF-8"> <meta http-equiv="X-UA-Compatible" content="IE=edge"> <meta name="viewport" content="width=device-width, initial-scale=1.0"> <title>Document</title> </head> <body> <div class="widget"> <h3 class="widget-title">文章类别</h3> </div> <style> .widget { margin: 20px; width: 28%; } .widget h3.widget-title { font-size: 16px; color: #333; text-transform: uppercase; padding-bottom: 13px; margin-top: 5px; margin-bottom: 15px; position: relative; border-bottom: 1px solid #ddd; } .widget h3.widget-title:before { display: inline-block; z-index: 1; content: " "; position: absolute; -webkit-border-radius: 50%; border-radius: 50%; background: #f92900 !important; width: 10px; height: 10px; -webkit-box-shadow: 18px 0 #fbc606, 36px 0 #26c73d; box-shadow: 18px 0 #fbc606, 36px 0 #26c73d; /* float: right; */ right: 40px; top: 5px; border-color: transparent; } .widget h3.widget-title:after { content: ""; background-color: #666666; left: 0; width: 66px; height: 2px; bottom: -1px; position: absolute; -webkit-transition: 0.5s; -moz-transition: 0.5s; -ms-transition: 0.5s; -o-transition: 0.5s; transition: 0.5s; } .widget h3.widget-title:hover:after { width: 80px; } </style> </body> </html> ``` 如果使用的是span的话,稍微变一点样式。贴个完整点的 ``` <!DOCTYPE html> <html lang="en"> <head> <meta charset="UTF-8"> <meta http-equiv="X-UA-Compatible" content="IE=edge"> <meta name="viewport" content="width=device-width, initial-scale=1.0"> <title>Document</title> </head> <body> <div class="widget"> <span class="widget-title">文章类别</span> </div> <style> .widget { margin: 20px; width: 28%; } .widget .widget-title { font-size: 16px; color: #333; text-transform: uppercase; padding-bottom: 13px; margin-top: 5px; margin-bottom: 15px; position: relative; border-bottom: 1px solid #ddd; /* 如果是span要给宽度和块元素 */ display: inline-block; width: 100%; } .widget .widget-title:before { display: inline-block; z-index: 1; content: " "; position: absolute; -webkit-border-radius: 50%; border-radius: 50%; background: #f92900 !important; width: 11px; height: 11px; -webkit-box-shadow: 18px 0 #fbc606, 36px 0 #26c73d; box-shadow: 18px 0 #fbc606, 36px 0 #26c73d; /* float: right; */ right: 40px; top: 5px; border-color: transparent; } .widget .widget-title:after { content: ""; background-color: #666666; left: 0; width: 66px; height: 2px; bottom: -1px; position: absolute; -webkit-transition: 0.5s; -moz-transition: 0.5s; -ms-transition: 0.5s; -o-transition: 0.5s; transition: 0.5s; } .widget .widget-title:hover:after { width: 80px; } </style> </body> </html> ```