.net core3.1使用API网关Ocelot一:简单使用 电脑版发表于:2020/8/10 17:31 **创建极简的两个项目**: 一个API网关项目(APIGateway),一个WebApi项目(ProductsAPIServices) 大概就是这个样子: 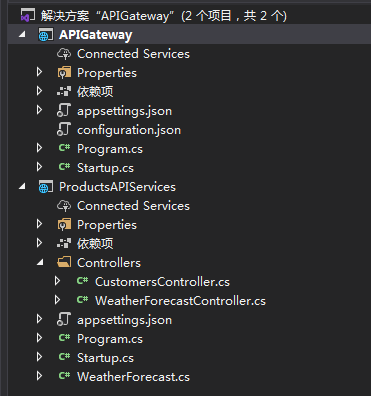 **APIGateway项目**: 类型就选.net core的空项目即可 > 安装Ocelot依赖 ``` Install-Package Ocelot ``` > 创建一个Ocelot的配置文件configuration.json ``` { "Routes": [ { "DownstreamPathTemplate": "/api/customers", "DownstreamScheme": "http", "DownstreamHostAndPorts": [ { "Host": "localhost", "Port": 9001 } ], "UpstreamPathTemplate": "/customers", "UpstreamHttpMethod": [ "Get" ] }, { "DownstreamPathTemplate": "/api/customers/{id}", "DownstreamHostAndPorts": [ { "Host": "localhost", "Port": 9001 } ], "DownstreamPort": 9001, "UpstreamPathTemplate": "/customers/{id}", "UpstreamHttpMethod": [ "Get" ] }, { "DownstreamPathTemplate": "/api/products", "DownstreamScheme": "http", "DownstreamHostAndPorts": [ { "Host": "localhost", "Port": 9002 } ], "UpstreamPathTemplate": "/api/products", "UpstreamHttpMethod": [ "Get" ] } ], "GlobalConfiguration": { "RequestIdKey": "OcRequestId", "AdministrationPath": "/administration" } } ``` tn> 注意:Ocelot 16.x之后配置要换成Routes而不是ReRoutes,否则会报错 > 在Program的CreateHostBuilder中添加配置文件的使用 ``` public class Program { public static void Main(string[] args) { CreateHostBuilder(args).Build().Run(); } public static IHostBuilder CreateHostBuilder(string[] args) => Host.CreateDefaultBuilder(args) .ConfigureAppConfiguration((hostingContext, config) => { //添加配置文件的使用 config .SetBasePath(hostingContext.HostingEnvironment.ContentRootPath) .AddJsonFile("configuration.json") .AddEnvironmentVariables(); }) .ConfigureWebHostDefaults(webBuilder => { webBuilder.UseStartup<Startup>(); webBuilder.UseUrls("http://*:9000"); }); } ``` 修改启动端口还可以在launchSettings.json中修改 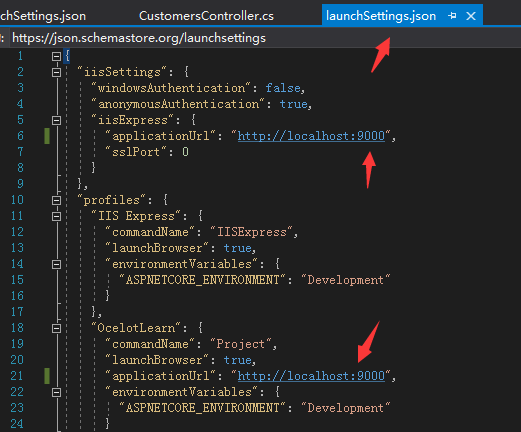 > Startup中添加Ocelot相关的引用 ``` public class Startup { public void ConfigureServices(IServiceCollection services) { services.AddOcelot(); services.AddHttpContextAccessor(); } public void Configure(IApplicationBuilder app, IWebHostEnvironment env) { app.UseOcelot(); } } ``` ok到这一步Ocelot的相关引用已经搞定了 <br/> **WebApi项目**: 这个就很简单了,随便创建一个webapi的项目,然后添加一个叫Customers的API控制器 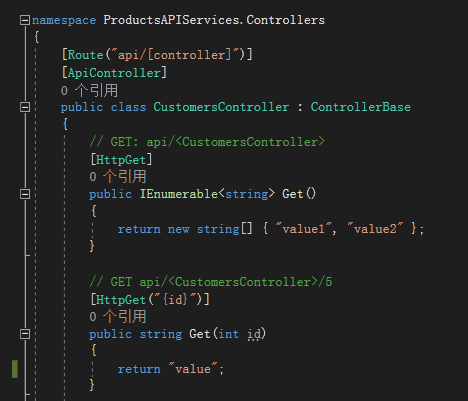 顺手把启动的端口换成9001吧 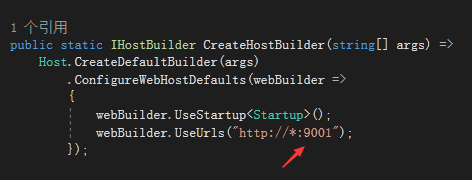 切换到项目目录中使用dotnet run启动,然后保证可以正常访问这个api控制器即可 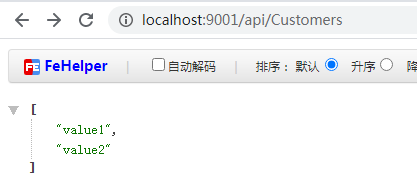 <br> **所有工作准备完毕,可以尝试使用api官网到访问具体的api**: 可以看到我们访问api网关项目,成功访问到具体的api 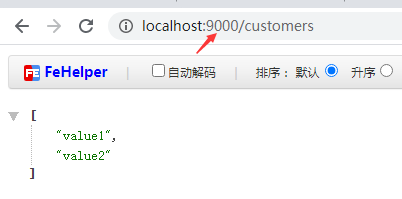 看运行日志可以看到请求的真实地址  代码地址: https://download.tnblog.net/resource/index/13c7281eb89141c9917780a11b0b0d8f

