dubbo快速入门-服务提供者&服务消费者03
续写于 dubbo快速入门-spring和springmvc整合 02
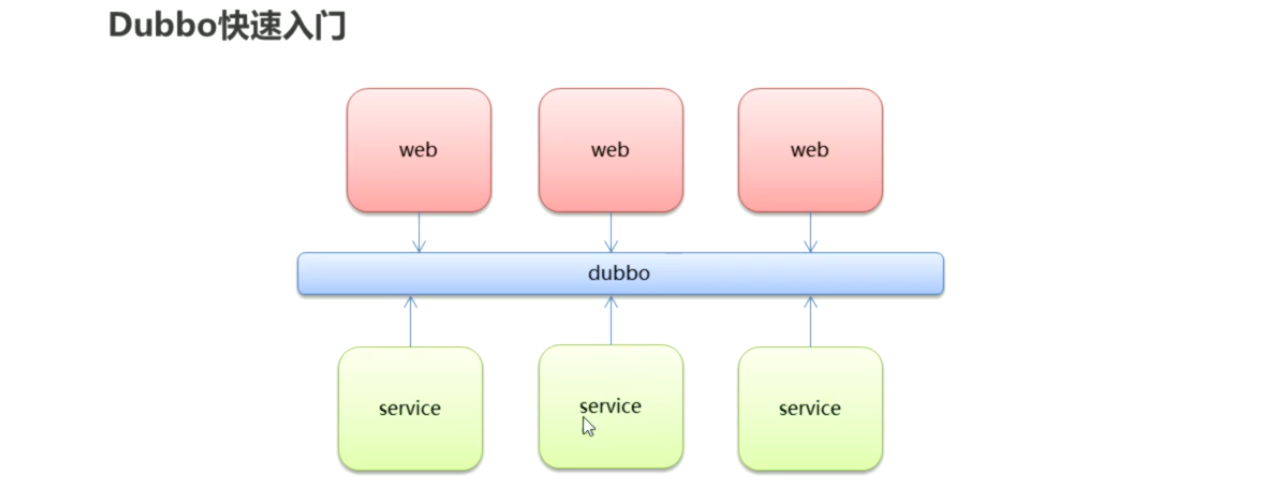
一、dubbo-service模块(服务提供者)
1、pom.xml文件
打war包了可以让该模块独立运行,安装tomcat插件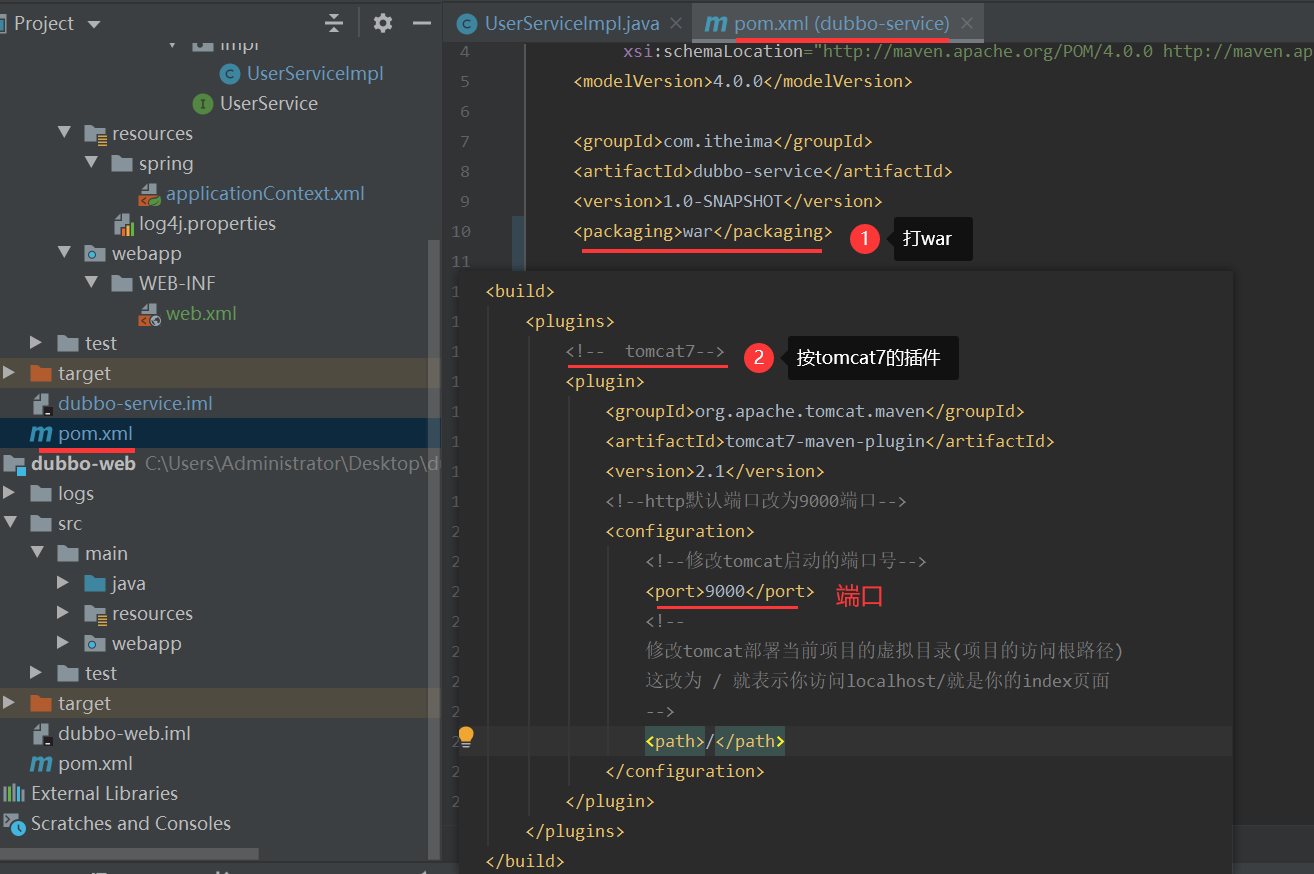
2、applicationContext.xml的配置,此处的配置中心是zookeeper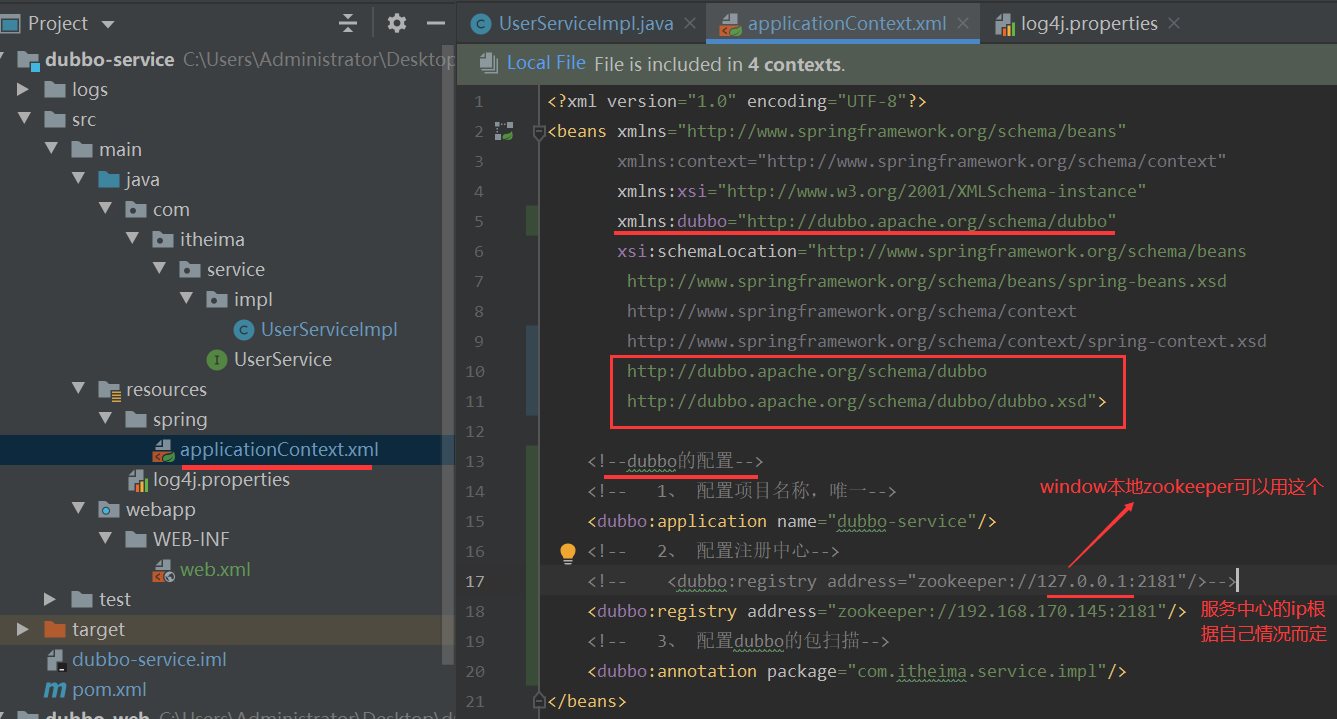
3、创建web.xml并配置
4、启动zookeeper
5、启动dubbo-service模块,这需要自行配置,当然也可以下载mavenhelper插件。
6、控制台效果
二、公共接口模块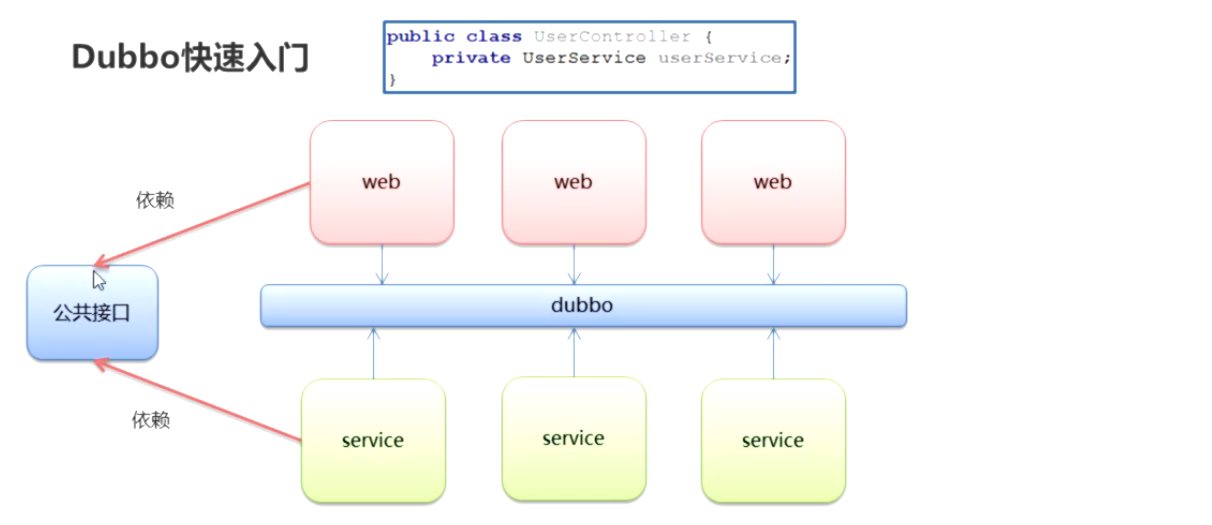
公共接口模块就是两及以上的模块都需要的模块。在dubbo-pro这个项目中dubbo-service(服务模块)需要UserService这个接口,dubbo=web(消费模块)也需要这个接口。那么就可以把这个接口单独提出来写到一个模块里面,这个模块就是公共接口模块。通俗的讲就是把service层的接口提到一个单独的模块,这个模块就是公共接口模块。
1、创建dubbo-interface(公共接口模块)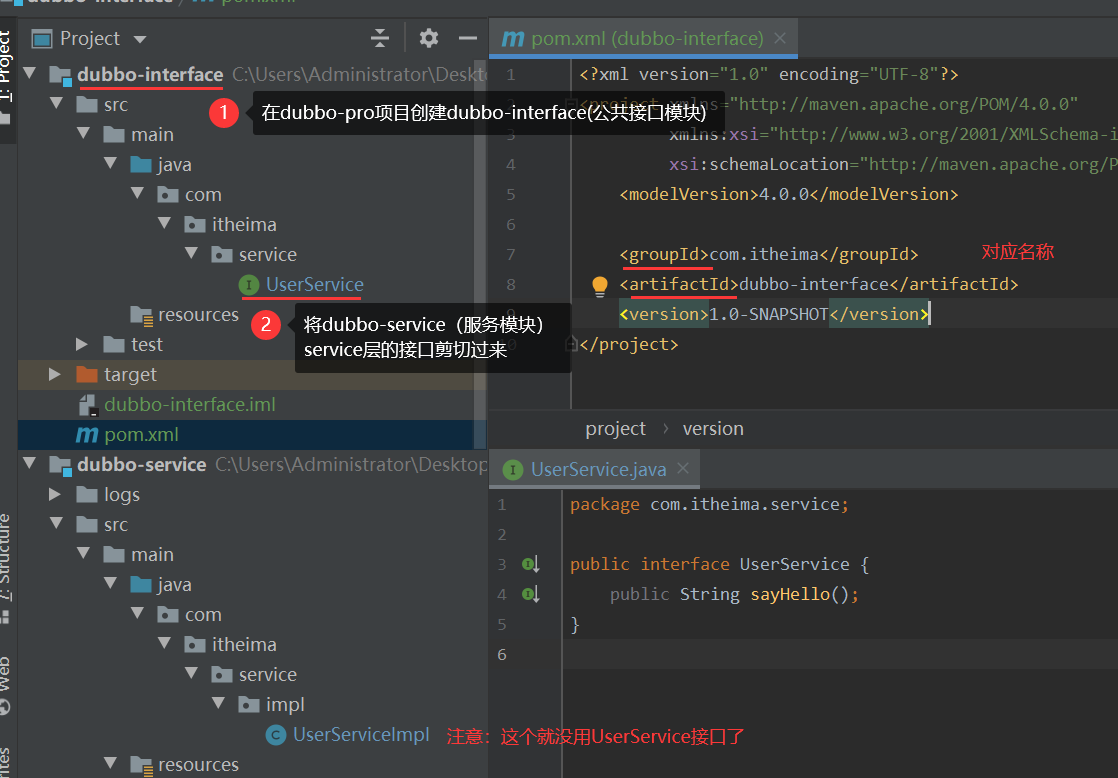
3、给公共接口模块执行install命令(maven的install可以将项目/模块本身编译并打包到本地仓库)
4、给服务模块和消费模块都导入公共接口模块
三、bubbo-web(服务消费者)
1、springmvc.xml的配置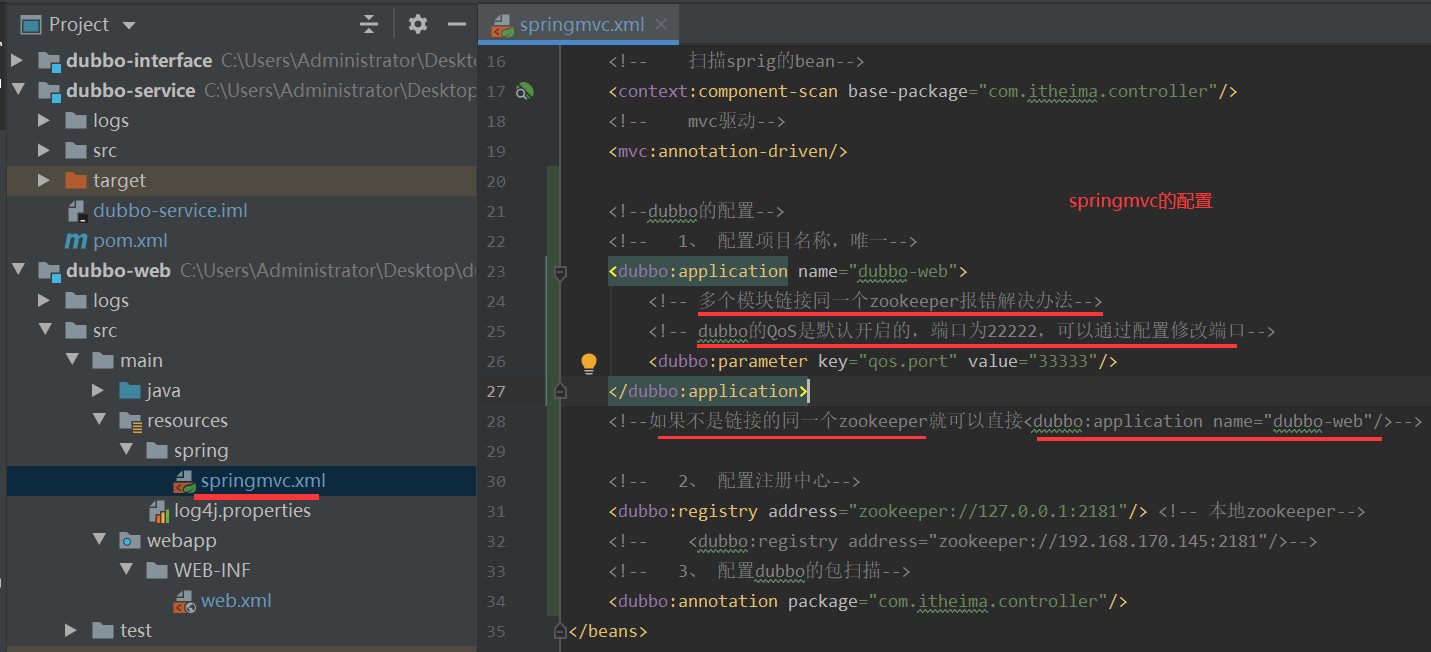
注意:如果该案例项目没修改dubbo的QoS的,端口为22222以外的端口,项目启动访问后会报错。
因为此处dubbo-service模块和dubbo-web模块用的都是同一台机器上的zookeeper所以会报下面错误
<?xml version="1.0" encoding="UTF-8"?>
<beans xmlns="http://www.springframework.org/schema/beans"
       xmlns:context="http://www.springframework.org/schema/context"
       xmlns:xsi="http://www.w3.org/2001/XMLSchema-instance"
       xmlns:mvc="http://www.springframework.org/schema/mvc"
       xmlns:dubbo="http://dubbo.apache.org/schema/dubbo"
       xsi:schemaLocation="http://www.springframework.org/schema/beans
        http://www.springframework.org/schema/beans/spring-beans.xsd
        http://www.springframework.org/schema/context
        http://www.springframework.org/schema/context/spring-context.xsd
        http://www.springframework.org/schema/mvc
        http://www.springframework.org/schema/mvc/spring-mvc.xsd
        http://dubbo.apache.org/schema/dubbo
        http://dubbo.apache.org/schema/dubbo/dubbo.xsd">

    <!--    扫描sprig的bean-->
    <context:component-scan base-package="com.itheima.controller"/>
    <!--    mvc驱动-->
    <mvc:annotation-driven/>

    <!--dubbo的配置-->
    <!--   1、 配置项目名称,唯一-->
    <dubbo:application name="dubbo-web">
        <!-- 多个模块链接同一个zookeeper报错解决办法-->
        <!-- dubbo的QoS是默认开启的,端口为22222,可以通过配置修改端口-->
        <dubbo:parameter key="qos.port" value="33333"/>
    </dubbo:application>
    <!--如果不是链接的同一个zookeeper就可以直接<dubbo:application name="dubbo-web"/>-->

    <!--   2、 配置注册中心-->
    <dubbo:registry address="zookeeper://127.0.0.1:2181"/> <!-- 本地zookeeper-->
    <!--    <dubbo:registry address="zookeeper://192.168.170.145:2181"/>-->
    <!--   3、 配置dubbo的包扫描-->
    <dubbo:annotation package="com.itheima.controller"/>
</beans>
2、web.xml,将spring的加载配置注释掉就行了,因为现在我们是通过dubbo来于服务模块通信的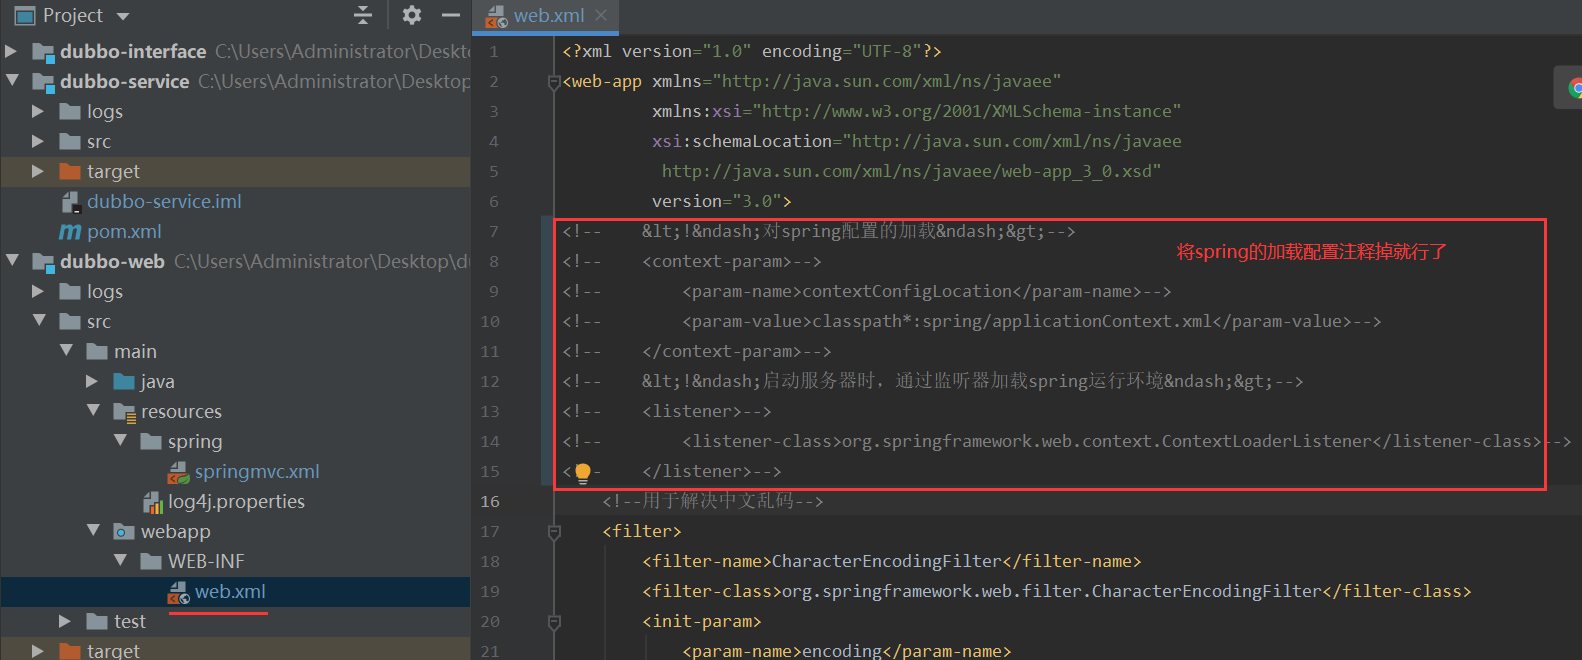
<?xml version="1.0" encoding="UTF-8"?> <web-app xmlns="http://java.sun.com/xml/ns/javaee" xmlns:xsi="http://www.w3.org/2001/XMLSchema-instance" xsi:schemaLocation="http://java.sun.com/xml/ns/javaee http://java.sun.com/xml/ns/javaee/web-app_3_0.xsd" version="3.0"> <!-- <!–对spring配置的加载–>--> <!-- <context-param>--> <!-- <param-name>contextConfigLocation</param-name>--> <!-- <param-value>classpath*:spring/applicationContext.xml</param-value>--> <!-- </context-param>--> <!-- <!–启动服务器时,通过监听器加载spring运行环境–>--> <!-- <listener>--> <!-- <listener-class>org.springframework.web.context.ContextLoaderListener</listener-class>--> <!-- </listener>--> <!--用于解决中文乱码--> <filter> <filter-name>CharacterEncodingFilter</filter-name> <filter-class>org.springframework.web.filter.CharacterEncodingFilter</filter-class> <init-param> <param-name>encoding</param-name> <param-value>UTF-8</param-value> </init-param> </filter> <filter-mapping> <filter-name>CharacterEncodingFilter</filter-name> <url-pattern>/*</url-pattern> </filter-mapping> <!--拦截--> <servlet> <servlet-name>springmvc</servlet-name> <servlet-class>org.springframework.web.servlet.DispatcherServlet</servlet-class> <init-param> <param-name>contextConfigLocation</param-name> <param-value>classpath*:spring/springmvc.xml</param-value> </init-param> </servlet> <!-- <servlet-mapping>--> <!-- <servlet-name>DispatcherServlet</servlet-name>--> <!-- <url-pattern>/</url-pattern>--> <!-- </servlet-mapping>--> <servlet-mapping> <servlet-name>springmvc</servlet-name> <url-pattern>*.do</url-pattern> </servlet-mapping> </web-app>
3、测试
3.1、启动zookeeper->启动dubbo-service->启动dubbo-web
3.2、访问: http://localhost:8000/user/sayHello.do

